In New York, adults 21 and older can legally grow up to three mature and three immature cannabis plants at their private residence. Outdoors, that means you can run a small but genuinely productive garden right in your backyard. The key to doing it well is working with NY's climate rather than against it: starting seeds indoors in late April, transplanting outside after mid-May when frost risk drops, choosing mold-resistant strains that finish before mid-October, and managing the late-summer humidity that makes bud rot a real threat on Long Island and in the Hudson Valley. Do those things right and you can pull several ounces per plant with minimal equipment.
How to Grow Weed Outdoors in NY: Step-by-Step Guide

Marcus Holbrook
5 Jul 2026
What NY law actually allows (and what to watch out for)
New York legalized personal home cultivation under NY Penal Law § 222.15 and the Office of Cannabis Management's adult-use regulations (9 NYCRR § 115.3). The plant limits are straightforward: three mature plants and three immature plants per adult 21 or older, with a household cap of six mature and six immature plants regardless of how many adults live there. So two adults sharing a home max out at six mature plants total, not twelve.
Cultivation must happen on the grounds of your private residence. 9 NYCRR § 115.3 limits personal home cultivation to a person’s private residence and grounds and requires that cultivation occur only within or on the occupant’s private residence grounds where the occupant is 21+. A rented apartment with a fire-escape garden technically falls outside the spirit of the law, and many leases prohibit it outright. If you rent, check your lease and talk to your landlord before starting. Growing on someone else's property without their permission, or anywhere visible to the general public without consent, can trigger civil penalties. The OCM's Adult-Use Home Cultivation FAQ has the full breakdown, and it's worth a 10-minute read before you buy a single seed.
One practical note: keep your plant count conservative. Three mature plants outdoors, grown well, will produce more cannabis than most home growers can use in a year. For details on planning your planting, choosing strains, and meeting local requirements, see our guide on how to grow weed seeds outside. Exceeding the limits, even accidentally, turns a legal hobby into a legal problem.
Pick strains that actually finish in a NY season
New York's outdoor growing window runs roughly from mid-May to mid-October. That gives you about 22 weeks, which sounds generous until you factor in the humidity spikes of August, the unpredictable rains of September, and the fact that some strains need 10 to 12 weeks of flowering alone. Choosing the wrong strain is the most common reason NY outdoor growers end up with wet, unfinished buds when frost arrives.
For most NY growers, the sweet spot is strains with a total flowering time of 8 to 9 weeks that also show strong resistance to mold and botrytis. Autoflowering varieties are a genuinely good fit here: they flower based on age rather than light cycle, so they can finish in 10 to 12 weeks from seed regardless of photoperiod. This means you can start them in late May and harvest in late August, well ahead of the wet September window. The tradeoff is smaller yields per plant.
If you want larger photoperiod plants, lean toward strains with Northern European or Russian lineage. Northern Lights, Early Skunk, and early-finishing Kush crosses were bred for short, cold, damp seasons similar to upstate New York. Strains developed for California's dry October (like many Haze-heavy sativas) will struggle badly in a rainy NY fall. Avoid any strain with a flowering time listed at 10 weeks or more unless you're in a protected microclimate.
| Strain type | Flowering time | Mold resistance | Best for NY region | Yield potential |
|---|---|---|---|---|
| Autoflowering (ruderalis hybrid) | 10-12 weeks from seed | Generally good | All NY regions | Moderate (1-2 oz/plant outdoors) |
| Early-finishing indica/hybrid | 8-9 weeks flower | Medium to high | All NY regions | High (3-6 oz/plant) |
| Northern European photoperiod | 8-9 weeks flower | High | Upstate, Hudson Valley | High (3-6 oz/plant) |
| Sativa-dominant (Haze types) | 10-12 weeks flower | Low | Not recommended for NY | High but risky |
If you're growing in the outer boroughs of NYC, Long Island, or the lower Hudson Valley, factor in heat as well as humidity. These areas regularly hit 90°F in July and August, which can cause heat stress and hermaphroditism in temperature-sensitive strains. Robusto hybrids with some indica dominance handle the heat better than pure sativas.
Setting up your outdoor grow site
Sun, airflow, and privacy
Cannabis outdoors wants at least 6 hours of direct sun per day, and 8 or more is better. In New York, the sun tracks from southeast to southwest, so south-facing garden beds and south-facing walls are your best spots. Avoid north-facing slopes or areas shaded by trees in the afternoon, which is when the sun is most intense. I've made the mistake of picking a spot that looked sunny in spring only to discover that a neighbor's oak tree blocks afternoon light by July when the canopy fills in. Check your site at different times of day in late May before committing.
Airflow matters just as much as sunlight, especially in NY where late-summer humidity regularly exceeds 80%. Plants that have good air movement around their canopy dry out faster after rain and resist mold far better than plants tucked into still, sheltered corners. If your yard is enclosed by fences or hedges, position plants where there's a gap or opening that allows cross-breeze. Avoid planting directly against walls where air is stagnant.
Ground beds vs. containers
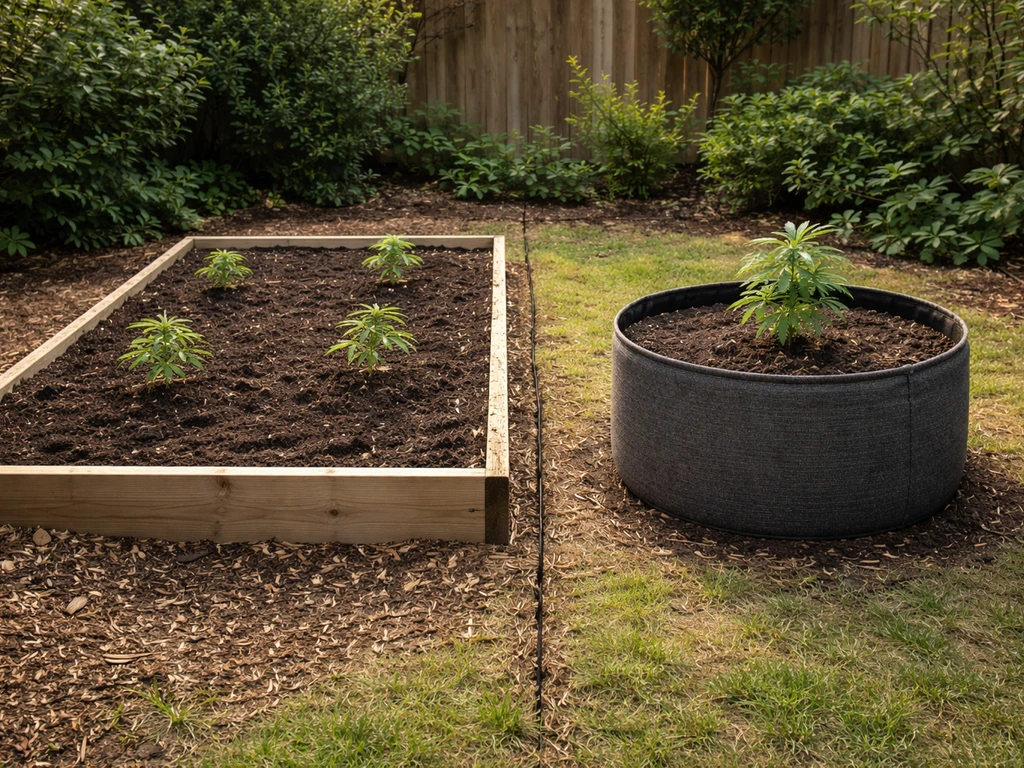
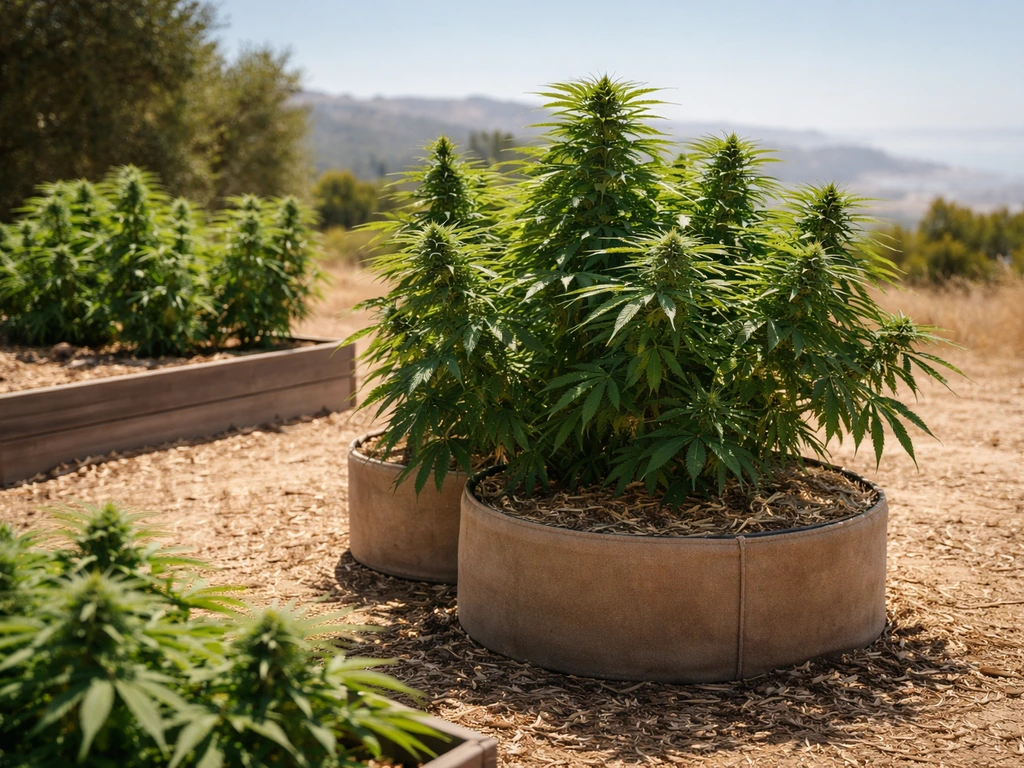
You have two main options: planting directly in the ground or growing in containers. Both work well in New York, but they have different tradeoffs.
| Factor | Ground beds | Containers (15-30 gal fabric pots) |
|---|---|---|
| Root space | Unlimited, plants get larger | Limited but manageable with right pot size |
| Water retention | Holds moisture well, less frequent watering | Dries out faster, requires more frequent watering |
| Portability | Fixed location | Can move if frost threatens or for privacy |
| Drainage | Depends on native soil quality | Excellent if fabric pots used |
| Soil quality control | Requires amendment of native soil | Full control: fill with quality mix |
| Yield potential | Higher per plant | Slightly lower but still very productive |
For beginners, I'd recommend 20 to 30 gallon fabric pots filled with a quality cannabis-specific potting mix or a blend of 60% quality potting soil, 30% perlite, and 10% worm castings. Fabric pots air-prune the roots, which prevents root-bound plants and improves drainage. This is especially useful in NY where heavy summer rains can waterlog ground beds if drainage is poor. If you do go in the ground, amend native soil generously with perlite and compost, and avoid low-lying areas where water pools after rain.
Drainage and soil pH
Cannabis wants well-draining, slightly acidic soil with a pH of 6.0 to 7.0 (the sweet spot is 6.2 to 6.8). Most NY soil runs slightly acidic, which is actually favorable, but heavy clay soils common in the Hudson Valley and parts of Long Island drain poorly and compact easily. If you're digging into clay, mix in significant amounts of perlite, coarse sand, and compost. Pick up a simple soil pH meter (they're around $15 to $20) and test before planting. Soil that's too acidic below 6.0 or too alkaline above 7.0 locks out nutrients even when they're present, which causes deficiencies that look confusing and waste money on supplements.
Seed and seedling schedule for New York timing
Getting your timing right is probably the single most important planning decision for a NY outdoor grow. Start too early and frost kills your seedlings. Start too late and your plants don't have enough time to reach full size before they're triggered into flowering by the shortening days of August. Here's the schedule that works:
- Germinate seeds indoors: late April to early May. Use a paper towel method or plant directly in small pots under a grow light or sunny south-facing window.
- Seedling stage indoors: 2 to 4 weeks under at least 16 hours of light per day. A simple T5 or LED panel works fine. This keeps them in vegetative mode until outdoor day length supports it.
- Harden off plants: starting around May 10 to 15, put seedlings outside for a few hours each day, increasing exposure over 7 to 10 days. This acclimates them to direct sun, wind, and temperature swings without shocking them.
- Transplant outdoors: after May 20 for most of NY (after May 25 for upstate areas prone to late frost). The last average frost date in NYC is around April 7, but upstate areas like Albany are closer to May 1 to 7. Don't rush this.
- Vegetative growth: June through late July. Plants will grow rapidly. Outdoor photoperiod plants in NY typically begin flowering naturally around late July to early August as day length drops below 14 hours.
- Flowering: August through September to October. For most 8 to 9 week strains, harvest falls in late September to mid-October.
- Harvest window: aim to finish before mid-October in upstate NY, and before late October in NYC/Long Island.
Since today is July 5, 2026, here's where that puts you right now: if you haven't started yet, you still have a viable window, but you need to move quickly. If you are growing in Oklahoma, plan around local heat and rainfall patterns so you can keep plants healthy through the outdoor season. Your best options at this point are autoflowering strains, which can go from seed to harvest in 70 to 85 days, or fast-finishing photoperiod clones if you can source them locally. Starting photoperiod seeds from scratch today will give plants very little vegetative time before they begin flowering in August, resulting in small plants with modest yields. That's still worth doing, but set realistic expectations.
Watering and feeding your outdoor plants
Watering outdoors in NY
Outdoor watering schedules vary a lot depending on container size, soil type, and how much it rains. As a general rule, container plants need watering when the top 2 to 3 inches of soil feel dry. In hot July and August weather, fabric pots may need water every 1 to 2 days. Ground plants need less frequent watering because the soil holds moisture longer. Overwatering is a very common mistake with beginners: cannabis in soggy soil develops root rot, and the symptoms (yellowing, drooping, slow growth) look identical to underwatering, which leads to a frustrating diagnostic loop. When in doubt, let the top inch dry out before watering again.
NY summers bring inconsistent rain. One week you get nothing and the next week you get 3 inches. For ground plants, this usually balances out fine. For container plants, check drainage holes after heavy rain: if water isn't draining within 30 minutes, you have a drainage problem that needs to be fixed before root rot sets in. Elevating fabric pots slightly off the ground on bricks or pot feet helps drainage and prevents the bottom from sitting in standing water.
A simple feeding plan that works
You don't need a complex nutrient regimen to grow good cannabis outdoors. A simple three-phase approach covers most of what the plant needs:
- Vegetative phase (transplant through late July): use a balanced or nitrogen-forward fertilizer. Something like a 3-1-2 NPK ratio or a quality organic veg formula. Apply at half the recommended dose to start. Organic options like fish emulsion, kelp meal, or compost teas work excellently outdoors and are more forgiving than synthetic salts.
- Transition to flower (early to mid-August): reduce nitrogen, increase phosphorus and potassium. Most 'bloom' or 'flower' formula fertilizers handle this. Switch when you see the first pre-flowers forming.
- Mid to late flowering (August through harvest): use a low-nitrogen, phosphorus/potassium-heavy feed. Stop feeding with nitrogen entirely in the last 2 to 3 weeks before harvest. Many growers flush with plain water in the final 1 to 2 weeks to clean up residual salts from the soil.
If you filled containers with high-quality potting soil amended with worm castings and slow-release organic fertilizer, you may need very little supplemental feeding at all during the vegetative phase. The biggest signs of nutrient problems are: yellowing lower leaves (nitrogen deficiency), purple stems and dark leaves (phosphorus issue or cold temps), and burnt brown leaf tips (nutrient burn from overfeeding). When in doubt, less is more with nutrients, especially outdoors where a rich organic soil does a lot of the work for you.
Training your plants for better yields and airflow
Outdoor plants in NY have a relatively short vegetative window, so training techniques need to be applied early and not too aggressively. The goal outdoors is to open up the plant's canopy for better light penetration and, critically, to improve airflow through the plant to reduce mold risk.
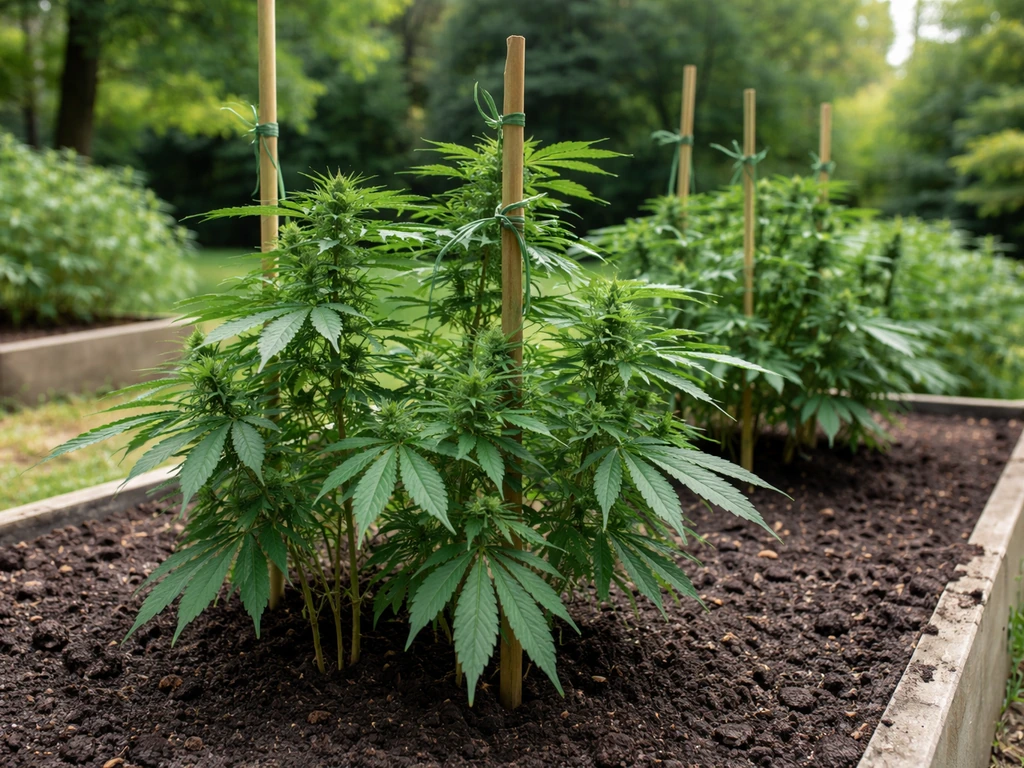
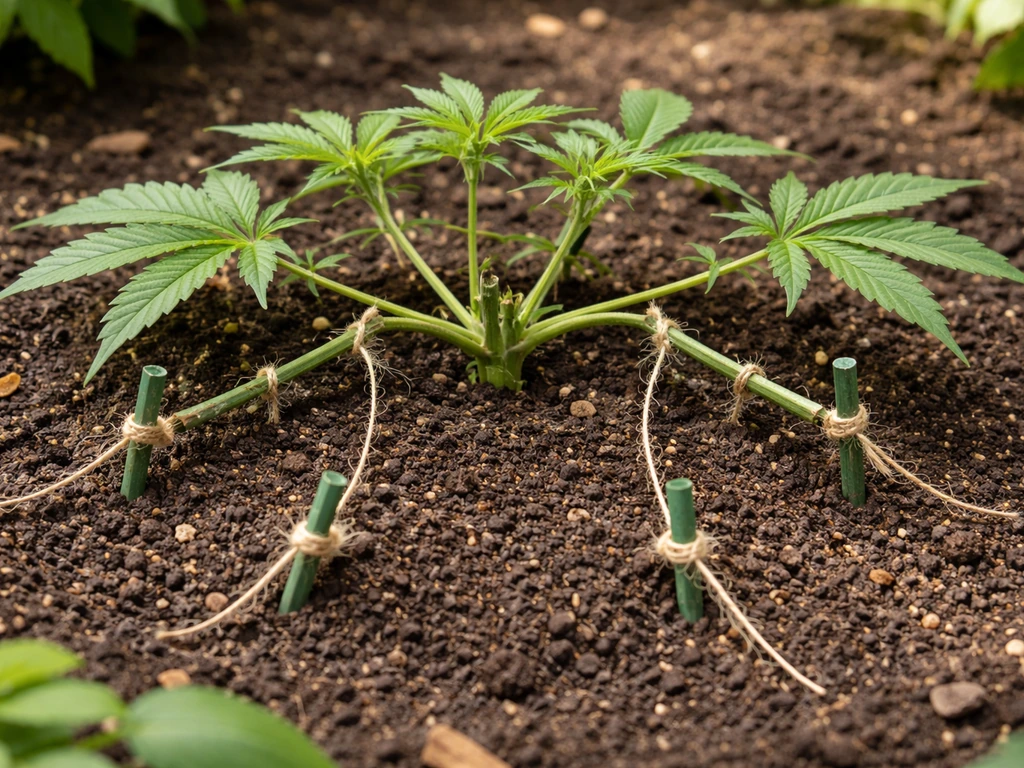
Low-stress training (LST) is the best starting point for beginners. It involves gently bending and tying down the main stem and branches to create a more horizontal, bush-like structure rather than a single tall Christmas-tree shape. Do this during the vegetative phase, starting when the plant has 4 to 6 nodes. Use soft plant ties or even strips of nylon stocking to avoid cutting into the stem. This exposes lower bud sites to direct sun and pushes the plant to develop multiple colas instead of one.
Topping (cutting off the main growing tip) doubles the number of main colas and is very effective outdoors. Top your plants in early to mid-June when they have at least 5 to 6 nodes. Give the plant a week to recover before doing any further training. Avoid topping after late July when the plant is transitioning to flower, as this causes stress at the worst possible time.
Lollipopping (removing the lower third of fan leaves and small bud sites) is especially important in NY. Dense lower growth with poor airflow is where bud rot begins. By mid-August, strip the lower 12 to 18 inches of your plant of small popcorn buds and excess foliage. This diverts energy to the top colas and opens up the base of the plant to airflow. It looks aggressive but makes a real difference in mold resistance during NY's humid September.
Spacing matters too. Give each plant at least 4 feet of clearance in every direction. Crowded plants create a humid microclimate that's basically a mold incubator. In containers, you can space them apart manually and adjust as the plants grow.
Pests, diseases, and bud rot: the NY-specific risks
New York outdoor growers face a specific combination of threats: high late-summer humidity, heavy fall rains, aphids and spider mites in dry July heat, and white powdery mildew (WPM) as a near-constant pressure from late July onward. The good news is that most of these are manageable with a proactive routine.
Bud rot (botrytis)
Bud rot is the number one killer of NY outdoor crops. Botrytis cinerea is a fungal pathogen that thrives in humid, still air, and it attacks dense buds from the inside out. You'll first notice grayish-brown, mushy spots inside a bud that looked healthy from the outside. By the time it's visible, it's already spread. In NY, the risk spikes in August and September when humidity is high and temperatures begin to drop at night.
Prevention is everything here because there's no cure once rot sets in inside a bud. Your prevention toolkit:
- Choose mold-resistant strains (the single most effective prevention strategy)
- Lollipop the lower canopy by mid-August to improve airflow
- Shake plants gently after rain to dislodge water pooling in bud sites
- Apply potassium bicarbonate or a diluted hydrogen peroxide foliar spray preventively in August and September
- Avoid overhead watering once buds are forming
- Inspect plants every 2 to 3 days in September, checking inside dense colas for early signs of gray fuzz or brown discoloration
- Remove and bag any affected bud immediately; do not compost it
White powdery mildew
WPM shows up as white, powdery circular spots on leaves, usually starting on the upper leaf surface. It's common in NY from July through September, especially in areas with high humidity and temperature swings between day and night. Treat early and aggressively: a diluted mix of 1 tablespoon baking soda, a few drops of dish soap, and 1 gallon of water applied as a foliar spray works reasonably well for mild cases. Neem oil is another option but avoid using it on flowering plants as it can affect taste. For serious infestations, potassium bicarbonate sprays are more effective. Again, airflow and plant spacing are your best prevention.
Insects
Spider mites thrive in hot, dry July conditions and can devastate plants quickly. Check the undersides of leaves regularly for fine webbing and tiny moving dots. Neem oil or insecticidal soap applied to the undersides of leaves at first sign works well. Aphids cluster on new growth and stems; blast them off with water and follow up with neem oil if the population is large. Caterpillars (corn earworms and loopers) are a real problem in upstate NY corn country and can bore directly into buds. Bacillus thuringiensis (Bt) spray is an organic, plant-safe solution that specifically targets caterpillars. Fungus gnats are common in container grows with overwatered soil; let the top inch dry out completely between waterings and use yellow sticky traps to monitor populations.
Knowing when to harvest, how to cure, and cleaning up for next season
Reading harvest readiness
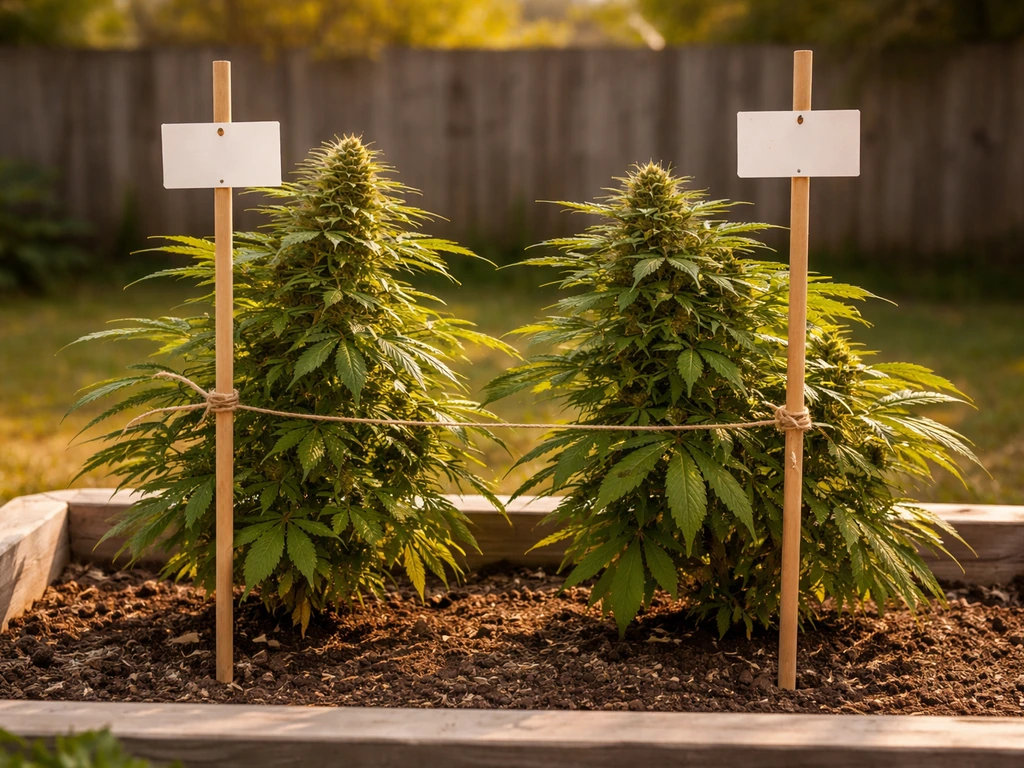
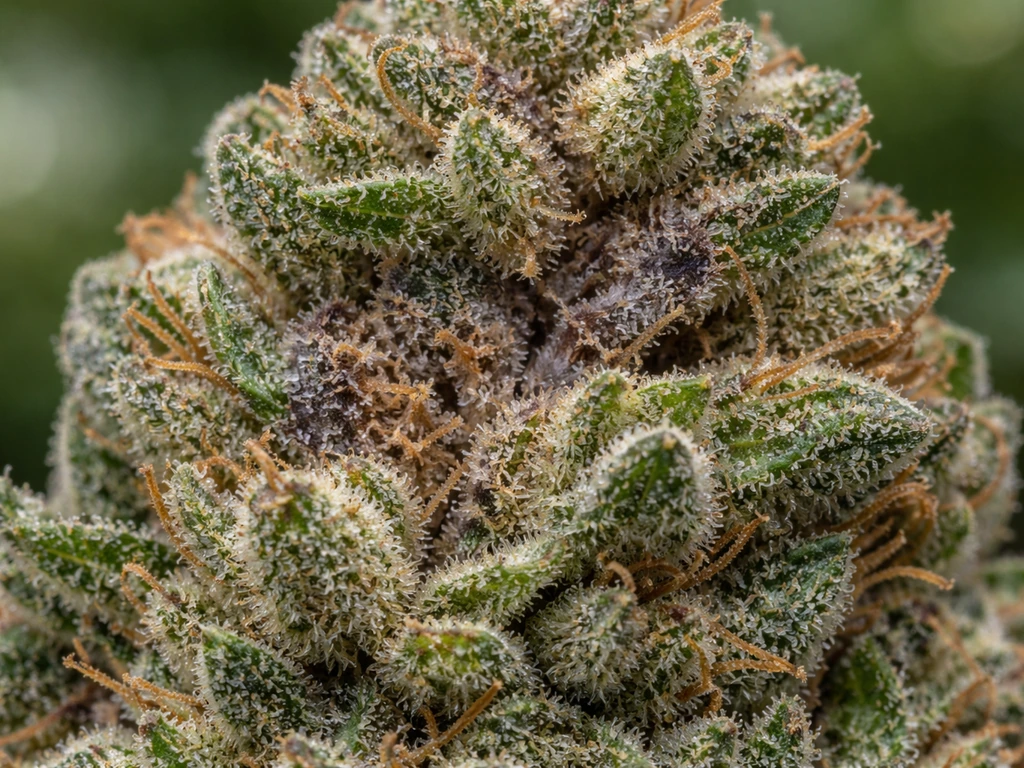
The most reliable way to judge harvest timing is by looking at the trichomes with a jeweler's loupe (30x to 60x) or a digital microscope. Trichomes are the tiny crystal-like structures coating the buds and surrounding leaves. When they're mostly clear, the plant isn't ready. When they're mostly milky white (cloudy), you're in the harvest window and THC is at peak levels. When they start turning amber, THC is degrading into CBN, which produces a more sedating effect. Most growers aim for a mix of mostly cloudy with 10 to 20% amber for a balanced effect.
Secondary indicators: pistils (the hair-like structures on buds) will be mostly orange or red rather than white (aim for 70 to 90% color change), and the buds should feel dense and stop swelling noticeably. The plant will also start dropping fan leaves naturally as it nears the end of its cycle.
For NY timing, most 8 to 9 week flowering photoperiod strains that were transplanted outdoors in late May will be ready to harvest between late September and mid-October. If you're specifically trying to figure out how to grow weed in Virginia, the climate and timing are different, so plan around Virginia's growing season and local conditions. Watch the weather forecast closely in late September: if a week of rain is coming, it may be worth harvesting a few days early rather than gambling on bud rot wiping out your crop. An early harvest of 90% ripe buds beats a lost harvest every time.
Harvesting and drying
Harvest in the early morning after a dry night, not after rain. Cut branches one at a time, removing large fan leaves immediately. Hang branches upside down in a dark, well-ventilated space at 60 to 70°F with 55 to 65% relative humidity. This is the slow-dry window. Aim for 7 to 14 days of drying. You know they're ready when the smaller stems snap rather than bend and the outside of the buds feels dry to the touch.
After drying, trim the buds (removing remaining small leaves) and place them in airtight glass jars filled no more than 75% full. This is the cure stage, which dramatically improves taste, smoothness, and potency. For the first 2 weeks, open the jars once or twice a day for 10 to 15 minutes to release moisture (this is called 'burping'). Smell the jars when you open them: a sour, ammonia smell means the buds are still too wet and need more drying time before going back in jars. After 2 weeks of daily burping, reduce to once every few days. A minimum 4-week cure makes a big difference; 8 weeks is even better.
End-of-season cleanup
After harvest, don't just leave the dead plants in place. Remove the entire plant including as much root mass as you can. Cannabis roots left in the ground can harbor pathogens that affect next year's grow. If you used containers, dump and replace the soil entirely rather than reusing it. Clean fabric pots with a mild bleach solution, rinse well, and let them fully dry before storing. Remove any plant debris, stake ties, and support materials from the grow area. Dispose of plant material responsibly, and note what worked and what didn't for next season, because every outdoor grow teaches you something specific about your microclimate.
Common problems and quick fixes
| Problem | Likely cause | Fix |
|---|---|---|
| Yellowing lower leaves | Nitrogen deficiency or natural senescence late in flower | Feed nitrogen if in veg/early flower; normal in late flower, no action needed |
| Drooping, clawing leaves | Overwatering or root rot | Let soil dry out, improve drainage, check roots for brown/mushy appearance |
| Burnt brown leaf tips | Nutrient burn (overfeeding) | Flush with plain water, reduce feed dose by 50% |
| White powdery spots on leaves | Powdery mildew | Baking soda spray, improve airflow, remove worst leaves |
| Gray mush inside buds | Botrytis (bud rot) | Remove affected bud immediately, improve airflow, may need early harvest |
| Pale, light green new growth | Iron or pH lockout | Check and adjust soil pH to 6.2-6.8 |
| Stretching, sparse growth | Insufficient sunlight | Move to a sunnier spot or trim shading vegetation |
| Male flowers on female plant (hermaphrodite) | Heat stress, light stress, or genetics | Remove pollen sacs immediately to prevent pollination; consider removing plant |
| Tiny webbing on underside of leaves | Spider mites | Neem oil or insecticidal soap spray on leaf undersides, repeat every 3 days |
What to do in the next two weeks (starting today, July 5)
If you haven't started yet, here's your actionable checklist for the next two weeks to get a legitimate crop in the ground before the window closes:
- Order autoflowering seeds today. Look for strains with 70 to 80 day seed-to-harvest timelines and mold-resistance ratings. This is your best path to a finished crop this season.
- Scout your yard for the sunniest, most south-facing location with good airflow. Note any afternoon shade from trees or structures.
- Pick up 20 to 30 gallon fabric pots, a bag of quality cannabis potting mix (with perlite), a pH meter, and a basic bloom-oriented nutrient line.
- Germinate seeds as soon as they arrive. Don't wait for 'perfect' conditions.
- If you can source photoperiod clones locally from a NY dispensary or clone retailer (some sell them for home growers), grab ones that are already in veg. This saves 3 to 4 weeks versus starting from seed.
- Set up a simple indoor germination area with a heating mat and a T5 or LED panel to keep seedlings under 18+ hours of light for the first 1 to 2 weeks before moving them outside.
- Review your local forecast for the next 30 days and identify your micro-weather risks (mostly rain? heat? both?) so you can plan accordingly.
Growing in NY is genuinely rewarding, and the state's relatively short outdoor season forces you to be organized in a way that actually makes you a better grower. If you're comparing notes with growers in other states, the approach here is meaningfully different from, say, growing outdoors in California where the season runs to November in some regions, or from growing outdoors in Virginia or Ohio where the humidity profiles and strain selection considerations share some overlap with NY but vary by latitude and local climate. If you're specifically looking at how to grow weed in Ohio, you can apply the same core outdoor planning, but adjust for your local humidity, heat, and season length outdoors in Virginia or Ohio. NY is its own thing: fast, humid, and unforgiving of late starts. Plan early, choose the right strains, manage your airflow aggressively, and you'll be well ahead of most first-time outdoor growers.
FAQ
Can I grow outdoors in NY from seed directly in the ground instead of starting indoors?
It’s usually riskier because outdoor seed germination depends on stable warmth and frost-free nights. A missed week can push flowering too late for NY’s mid-October cutoff, especially for photoperiod strains. If you do direct sow, choose an auto or a very fast strain and plan to protect early seedlings with a cloche or row cover on cold nights.
What should I do if my plants start showing pre-flowers early, before I wanted flowering?
Early signaling is often caused by stress (cold snaps, extreme fluctuations in light, or root restriction). Give containers extra insulation at night, avoid letting pots dry out completely, and do not apply heavy nitrogen during late vegetative growth. For photoperiod plants, make sure they are not receiving unusual artificial light at night from nearby fixtures.
How close to a fence or property line can I grow outdoors in NY?
Even if it’s on your private residence, practical “visibility” matters for enforcement risk and for neighborhood complaints. Keep plants far enough that mature plants are not easily seen from public spaces, and treat any requirement about “grounds of the residence” as a safety margin. If you share property boundaries with neighbors, consider a physical barrier plus strategic placement to reduce line-of-sight.
What’s the safest way to choose container size if I want bigger harvests outdoors?
Larger containers support more root mass and buffer drought swings, but they’re harder to move for storms. If you want yield without constantly babysitting, 20 to 30 gallon fabric pots are a practical range, and 30 gallons or more can help late-summer humidity and heat management. Make sure every pot has drainage holes, and confirm water drains within about 30 minutes after a heavy watering.
Can I reuse soil in containers for the next season?
You can, but it increases the chance of reintroducing pests and soilborne issues (especially fungus gnats and pathogen remnants from diseased plants). A safer approach is to dump and replace soil, and if you do reuse, only do it if the previous grow had no major disease problems. At minimum, refresh with amendments and sterilize or fully compost in a way that reaches high temperatures.
Is baking soda spray actually safe on buds that are close to harvest?
Use it cautiously and only for early, mild powdery mildew. Spraying right before harvest can affect flavor and residue. For late-season treatment, focus on airflow first, spot-treat affected areas, and stop foliar products several days to a week before harvest so buds can dry cleanly after treatment.
How often should I inspect for mites and mildew during late summer?
Check at least every 2 to 3 days starting in late July, and ideally daily during heat spikes followed by humid nights. Look at leaf undersides for spider mites and check lower canopy layers for early mildew specks. Catching the first signs early is what keeps treatment options effective.
What if bud rot starts in the middle of a dense bud, can I remove the affected part?
You can remove a visibly affected bud or section, but if rot has spread inside, removing only the outside area often won’t save the plant. The safest move is to remove the entire infected bud immediately and improve airflow across the plant. If multiple buds show interior mushiness, consider harvesting early to prevent total crop loss.
How do I tell if my sick-looking plant is overwatered or underwatered in NY’s weather swings?
Overwatering often causes persistent droop and slow growth with yellowing that doesn’t recover after brief drying, while underwatering typically improves within a day once soil moisture is restored. Use your watering rule (let the top 2 to 3 inches dry for containers) and verify drainage after heavy rain. If the pot stays wet or smells sour, treat it as a drainage problem, not a schedule problem.
Should I top or lollipop if my plants are already late to start?
If you’re behind schedule, aggressive training can reduce yield by delaying recovery and shortening the time available for bud development. In late starts, lean toward low-stress training to open airflow and light, then do minimal lollipopping only if the lower canopy is truly dense. Prioritize finishing on time over maximizing the number of colas.
What’s the most reliable harvest trigger when rains keep changing the forecast?
Use trichomes as the primary signal, then make a weather-based backup plan. If a long wet stretch is coming and your buds are already mostly cloudy with some amber, harvesting a few days early can be smarter than waiting for perfect timing, since bud rot often spreads faster than harvest windows shrink.
How should I store freshly cured buds to prevent mold during humid NY summers?
Keep jars airtight and store them in a cool, stable place away from humidity swings. During the first cure weeks, monitor jar humidity by smell and appearance, and don’t skip burping. If buds were slightly too wet when jarred, consider extending dry time rather than repeatedly opening indefinitely.
After harvest, how do I reduce pest and disease risk for next year?
Remove all plant material and roots, then clean the grow area thoroughly. If using containers, don’t just rinse and reuse everything, replace or fully refresh soil and disinfect pots. Also remove supports and ties that can harbor debris, and plan to rotate placement so the same humid microclimate isn’t recreated next season.
Next Article
How to Grow Weed Outside in CA: Step-by-Step Guide
Step-by-step guide to grow weed outside in California, from legal setup and outdoor timing to pests, harvest, and curing