You can absolutely grow cannabis indoors during winter, and in some ways it's easier than summer because cold outdoor air naturally helps you manage heat inside your tent. The real challenges are keeping temperatures above 65°F, stopping humidity from creeping up as cold air meets warm grow-space air, and making sure your lighting fully compensates for the short, dim days outside. Nail those three things and winter is just another grow cycle.
How to Grow Weed Inside During Winter: Step-by-Step Guide

Marcus Holbrook
7 Jun 2026
Winter indoor grow planning checklist
Before you plant a single seed or clone, run through this checklist. It saves you from scrambling mid-grow when temperatures drop or mold appears out of nowhere. Print it out, stick it on your tent.
- Confirm your grow space: size, location, and whether it shares a wall with an unheated garage or exterior — cold surfaces cause condensation problems.
- Check your electrical circuit: lights, fans, heater, and dehumidifier running simultaneously must not trip your breaker.
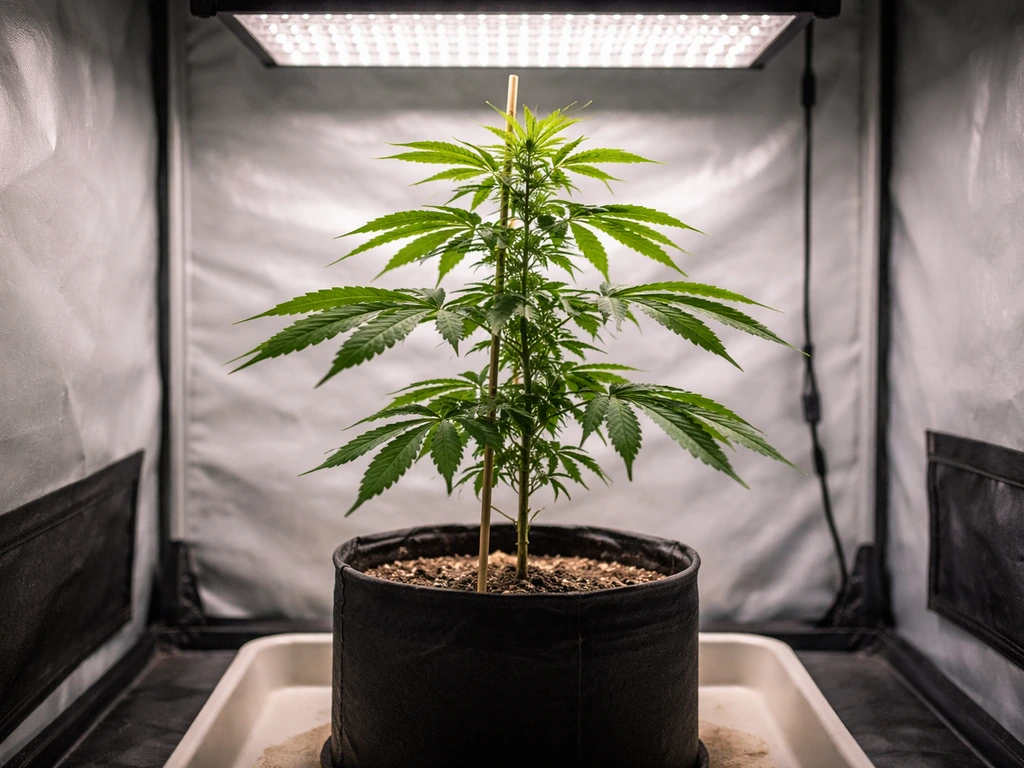
- Choose your light: LED is the go-to for winter because it generates manageable heat and runs efficiently (more on this below).
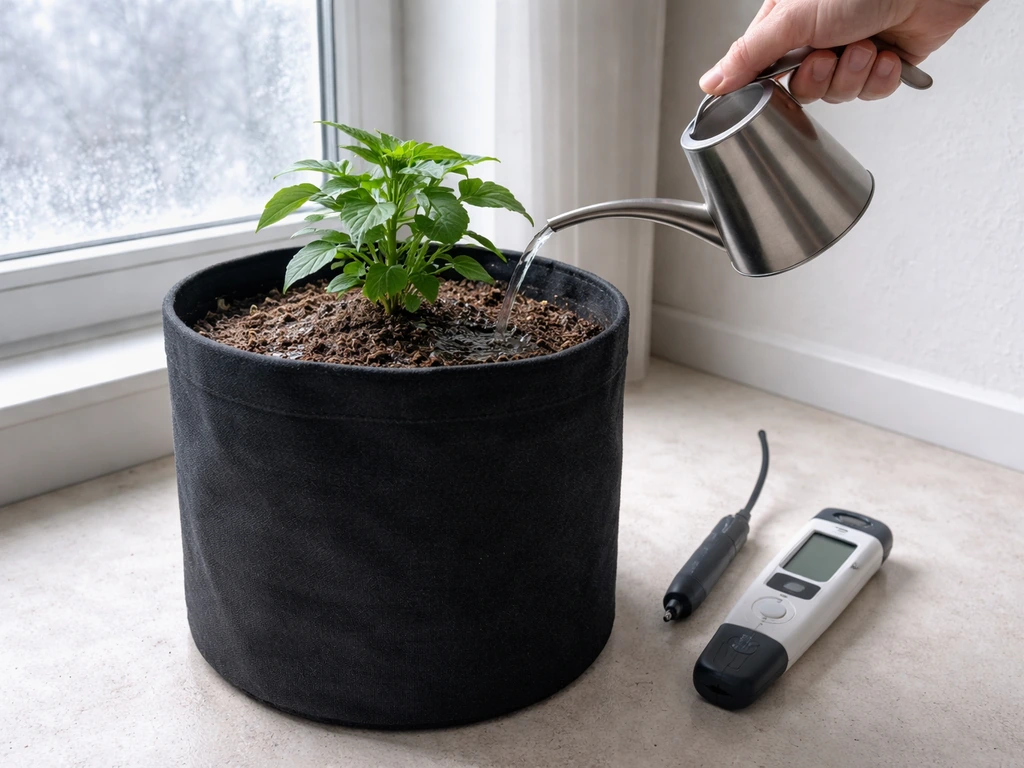
- Purchase a digital thermometer/hygrometer combo with min/max logging so you catch overnight temperature dips.
- Identify your heat source: oil-filled electric radiator or ceramic space heater with a thermostat are the two safe choices for indoor grows.
- Pick your strain or grow method before buying seeds or sourcing clones — autoflowers are ideal for winter beginners.
- Decide on your medium: soil is most forgiving for beginners; coco coir gives faster growth but demands tighter pH management.
- Set up carbon filter and exhaust fan before anything goes in the tent.
- Check local laws and personal plant-count limits before purchasing anything. Compliance first, every time.
- Stock pH meter, pH-up/down solution, and a TDS/EC meter before your first feed.
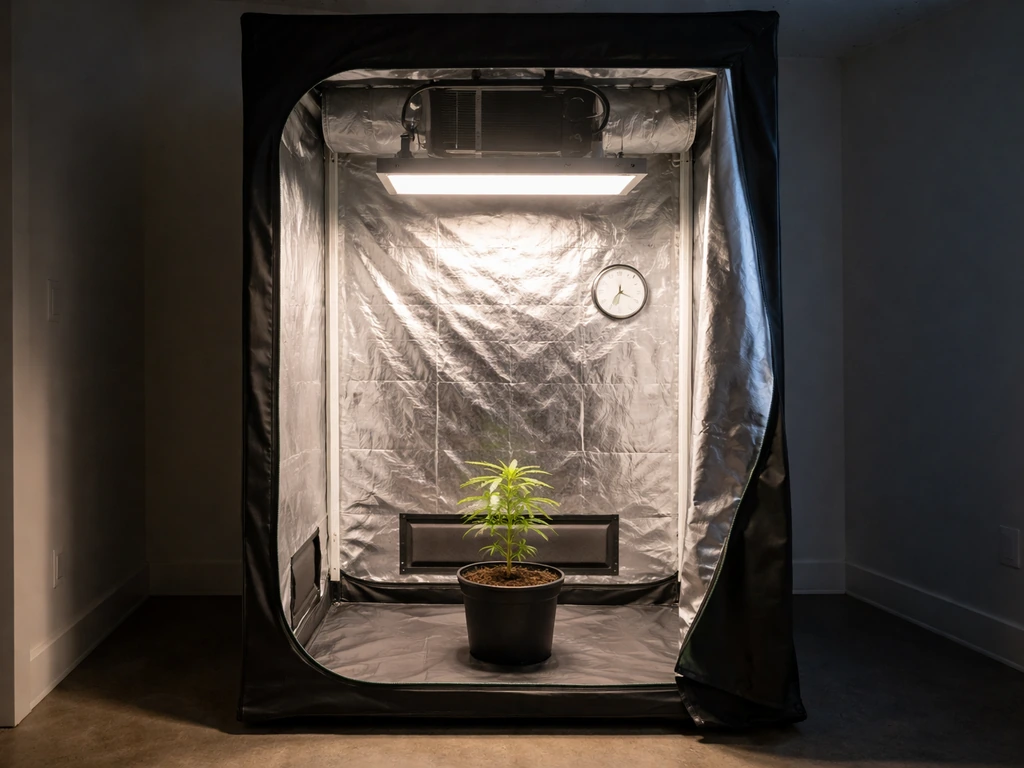
Space, equipment, and airflow setup

A grow tent is the smartest starting point for winter because it contains heat, light, and smell while giving you a controlled environment. A 2x4 or 4x4 foot tent works well for one to four plants and is manageable in a spare bedroom, basement, or closet. Avoid placing your tent directly against an exterior wall or in an uninsulated garage during winter, thermal bridging will pull heat out of your space and spike your heating costs.
Airflow is non-negotiable. The goal is negative pressure: your exhaust fan pulls more air out than flows in through passive or active intakes. This keeps humid, stale air moving out and replaces it with fresh, drier air from the room. In winter, the air outside your tent is often drier than the air inside it, which actually works in your favor for humidity control. A properly sized inline fan with a carbon filter is the core of this system. As a practical rule, look for a fan rated at 200 to 300 CFM for a standard 4x4 tent, this gives you enough headroom to overcome resistance from the carbon filter and any ducting bends without struggling.
Inside the tent, a small oscillating fan circulating air over and around the canopy prevents humidity pockets from forming in dense foliage. This is especially important during flower, when tight buds create ideal conditions for bud rot if air stagnates. As Cannapot notes in its seed-to-harvest growth-stage guide, denser flowering increases mold risk unless humidity is managed accordingly flowering-density increases mold risk if humidity is not managed accordingly. Think of it as constant gentle movement, leaves should flutter slightly, not bend hard.
- Grow tent sized to your plant count (2x4 for 1–2 plants, 4x4 for 2–4 plants)
- Inline exhaust fan with carbon filter (200–300 CFM for a 4x4 setup)
- Passive intake vents or a smaller intake fan at the bottom of the tent
- Internal oscillating clip fan for canopy airflow
- Reflective tent interior (most tents come with this built in)
- Digital thermometer/hygrometer with min/max logging placed at canopy height
- Oil-filled radiator or ceramic heater with built-in thermostat for cold nights
- Timer for lights and optional timer for exhaust fan speed control
Temperature and humidity targets (and how to fix low temps and high moisture)
Cannabis has a preferred temperature band depending on its stage. Seedlings and young veg plants do well between 70 and 80°F. During late veg and early flower, aim for 65 to 78°F. As plants push deep into flower and especially in the final two weeks before harvest, cooler nights around 60 to 65°F are actually fine and can help bring out color in some strains. The hard line is staying above 60°F consistently, roots slow dramatically below that, and cold, damp roots are a recipe for root rot.
Humidity management in winter is a bit of a balancing act. Cold air holds less moisture than warm air, so when you heat your tent, the relative humidity (RH) can drop quickly if your heating source dries the air, this happens especially with ceramic heaters running at high output. On the flip side, poor ventilation lets humid transpiration from leaves build up fast. Here are the stage-specific RH targets to keep on your wall:
| Growth Stage | Target RH | Hard Limit |
|---|---|---|
| Seedling | 65–70% | Keep below 75% |
| Vegetative | 50–65% | Keep below 70% |
| Late veg / pre-flower | 45–55% | Keep below 60% |
| Early to mid flower | 40–50% | Keep below 55% |
| Late flower (final 2 weeks) | 35–45% | Keep below 50% |
When it's too cold
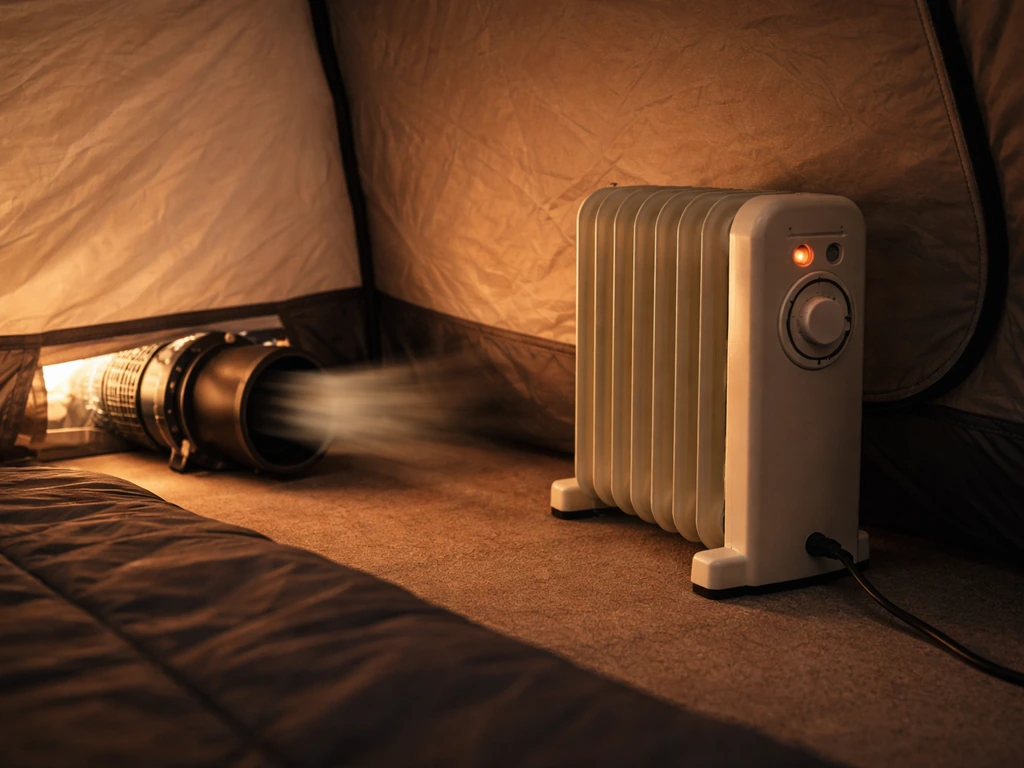
If your overnight temperature is dropping below 65°F, add an oil-filled electric radiator on a thermostat set to kick in at 65°F. These radiate steady, even heat without blasting hot dry air directly at plants. Ceramic space heaters with thermostats are also fine, just point them away from the canopy so you're not desiccating leaves. Never use propane or natural gas heaters inside a sealed grow room, CO buildup is a serious safety hazard and propane produces water vapor that will spike your humidity.
When humidity is too high
Your first tool is exhaust airflow. Run your inline fan at higher speed to exchange tent air more frequently, since winter outdoor air is typically drier, pulling it in actively lowers RH inside. If that's not enough, a small dehumidifier rated for your tent volume is your next step. These work by drawing air over cold coils to condense moisture out, which is effective even in winter. The 60% RH hard line is your trigger: if you're consistently above that number, something in your airflow setup needs to be fixed immediately. Mold doesn't give you a warning period.
When humidity is too low
In seedling and early veg stages, low humidity (below 40%) will cause leaves to curl and growth to slow. A small ultrasonic humidifier on a timer in the intake area brings RH up without soaking surfaces. Dial it back gradually as plants move into flower, you want humidity dropping as buds develop, not rising.
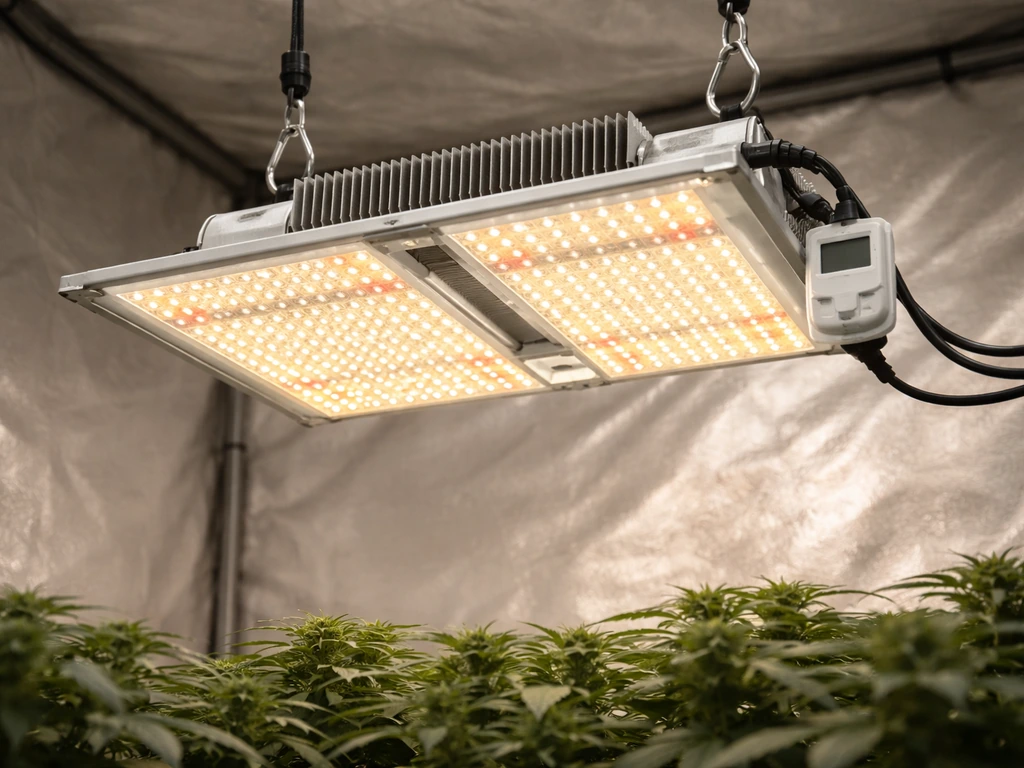
Lighting choices and schedules for winter growth
Indoor cannabis doesn't care what season it is outside, your lights are the sun. This is one of winter's biggest advantages: you have total control over the light cycle regardless of how dark it gets at 4pm. The key is choosing the right fixture and dialing in the right intensity and schedule for each stage. If you are looking for a full walkthrough, see our indoor guide on how to grow weed inside from setup to harvest.
LED vs other options
Modern quantum board LEDs are the best choice for winter grows. They run cooler than HPS (high-pressure sodium) lights, which means you're not generating excess heat you then have to exhaust out, only to fight cold air coming back in. HPS can actually help maintain tent temperature in very cold spaces, which is worth knowing, but for most setups, LED's efficiency and spectrum quality win. CMH (ceramic metal halide) is a solid middle ground if you already own one. T5 fluorescents work for seedlings and early veg but don't have the intensity for flower.
DLI targets and fixture distance
DLI (Daily Light Integral) is the total amount of light your plants receive in a day, measured in mol/m²/day. For vegetative growth, aim for 20 to 40 mol/m²/day. For flowering, cannabis thrives between 30 and 45 mol/m²/day, which under a 12-hour photoperiod translates to roughly 694 to 1,042 µmol/m²/s average PPFD at canopy level.
If you don't have a light meter app, use fixture distance as your proxy: for fixtures under 100W, start at 10 to 14 inches from the canopy; 100 to 300W fixtures at 14 to 24 inches; 300 to 600W at 18 to 36 inches or more. Move the light up if you see bleaching or taco-curling leaves; move it down if plants are stretching hard toward the light.
Light schedules
For photoperiod strains: run 18 hours on / 6 hours off during veg, then flip to 12 hours on / 12 hours off to trigger flower. For autoflowering strains: keep lights on 18 to 20 hours throughout the entire grow, autos don't need a light-cycle change to flower, which simplifies winter scheduling considerably. One practical tip: schedule your lights-on period to align with the coldest part of the night. Lights off during the warmest part of the day means your passive cooling is most effective, and lights on at night supplements heat when outdoor temps drop lowest.
Watering and nutrient protocol adjustments for winter
Cold slows everything, including how fast your medium dries out. In a warm summer grow, soil in a 3-gallon pot might need water every two days. In winter with lower temps and slower plant metabolism, that same pot might go three to four days between waterings. Overwatering is the most common beginner mistake and it's even easier to make in winter. The rule: stick your finger two inches into the soil, and only water when that top layer is dry. For coco coir, the approach is different, coco typically gets watered daily even in winter, but in smaller amounts.
pH is the lever that controls nutrient availability. Get this wrong and your plants look deficient even when you're feeding them plenty. For soil, keep your pH between 6.2 and 6.8. For coco coir or hydro, keep it between 5.5 and 6.5, with most growers finding 5.8 to 6.2 the sweet spot for coco specifically. Check pH every single time you mix a feed solution, it drifts more than you'd expect, especially in winter when water temperature changes affect chemistry.
For nutrients in winter: plants in slower-growing, cooler conditions often need slightly lower nutrient concentrations (EC/PPM) than manufacturer schedules suggest. Start at 75% of the recommended dose and watch for any signs of tip burn (too much) or yellowing between veins (potentially too little, but check pH first). Cold roots also absorb nutrients less efficiently, so if you're running hydro or coco in a cold basement, warming your reservoir or root zone to 65 to 72°F makes a meaningful difference.
Strain and grow-method selection
If you're starting a new winter grow right now, autoflowering strains from seed are the easiest path. Autos finish in 70 to 90 days from germination regardless of light schedule, so you could be harvesting by September with a June start. They're more forgiving of temperature fluctuations, require no light-flip management, and tend to stay compact, ideal for a tent in a spare room. The trade-off is that autos don't clone reliably, so you're committing to seeds each run.
Photoperiod strains give you more control over plant size and yield, you veg them as long as you want before flipping to 12/12. If you already have clones from a photoperiod mother plant, winter is a perfectly fine time to root them and run a crop. Clones skip the seedling stage (saving two to three weeks), which matters if you're working toward a specific harvest date. Just make sure the clone source is healthy and pest-free, bringing in infected cuttings is how spider mites and powdery mildew enter a previously clean grow room.
| Factor | Autoflower (Seed) | Photoperiod (Seed or Clone) |
|---|---|---|
| Time to harvest | 70–90 days from seed | 90–140+ days depending on veg length |
| Light schedule complexity | Simple — 18–20h on throughout | Requires 18/6 veg then 12/12 flip |
| Beginner friendliness | High — forgiving of minor errors | Moderate — more variables to manage |
| Yield potential | Lower per plant | Higher per plant with longer veg |
| Clone availability | Not practical | Yes — saves 2–3 weeks |
| Temperature sensitivity | Moderate tolerance | Slightly more sensitive in flower |
For complete beginners: start with autoflower seeds in soil. The learning curve is gentler, the timeline is predictable, and you can dial in your environment without stressing about light leaks or clone health at the same time. Once you've run one successful auto grow, you'll understand your space well enough to tackle photoperiods or coco grows.
Related approaches, like starting from a single seed indoors or growing a full plant in a small room setup, follow much of the same environmental logic covered here. If you want a stem-to-harvest walkthrough for indoor grows, see our guide on how to grow weed from stem indoors. If you're trying to grow a weed plant in your room, you can use the same environmental targets for temperature, humidity, light, and airflow to avoid most common problems.
If you want a step-by-step indoor approach, use this guide on how to grow a weed seed indoors.
Common winter grow problems and how to fix them
Slow growth and stunted plants
The most common cause in winter is cold roots or cold ambient temps. If your thermometer shows consistent readings below 65°F, especially overnight, add your heater and check again after 24 hours. Slow growth can also mean overwatering in cold conditions, roots can't uptake oxygen properly in waterlogged, cold soil. Let the medium dry out more thoroughly before the next watering.
Stretching toward the light
If your seedlings or young plants look leggy, long stems with wide gaps between nodes, they're not getting enough light intensity. Lower your fixture closer to the canopy (within the safe range for your wattage) or increase the light's output if it has a dimmer. This is a sign that your DLI is too low for healthy compact growth.
Bud rot and mold
Botrytis (bud rot) thrives in cool temperatures combined with high humidity and poor airflow, exactly the conditions that can develop inside a winter tent if ventilation slips. Cool temperatures (about 65, 75°F) along with humidity and moisture from rain or irrigation are favorable for bud rot, which USU Extension notes is associated with Botrytis cinerea bud rot favorable conditions.
It often starts inside dense buds where air doesn't penetrate. The first sign is a grey-brown mushy patch inside a bud that looks healthy from outside. The moment you see it: cut at least an inch below the visible infection with sterile scissors, immediately seal the infected material in a bag, and remove it from the room. Then crank your exhaust fan, check your RH (should be under 50% in flower), and add internal circulation if you haven't already.
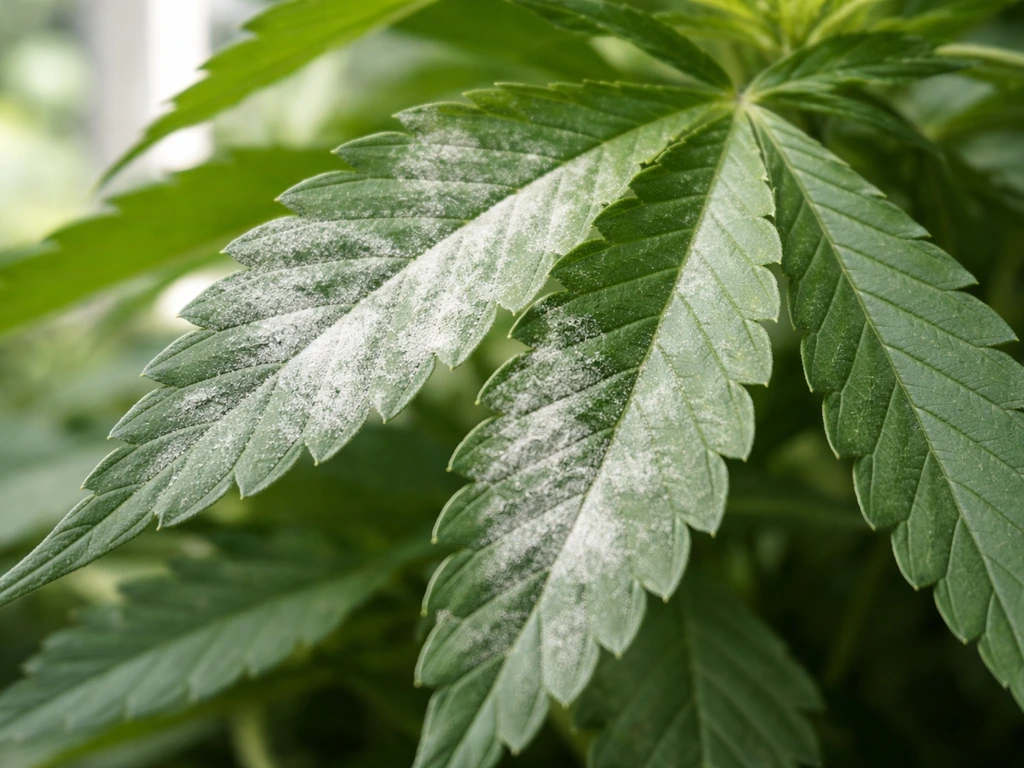
Powdery mildew
Powdery mildew shows up as white dusty patches on leaves and stems. It needs living plant tissue to spread and loves humid, low-airflow conditions. Management is prevention: keep RH below 55% during veg and below 50% during flower, and maintain constant air movement over the canopy. If you spot it early, remove affected leaves immediately and improve airflow. Caught late in flower, it's extremely difficult to eliminate without affecting the buds.
Fungus gnats
Fungus gnats thrive in moist topsoil, their larvae feed on roots and organic matter. In winter, overwatering cold soil creates ideal gnat breeding conditions. Let the top two inches of soil dry completely between waterings. Hang yellow sticky traps near the soil surface to catch adults and monitor population size. If the infestation is established, a soil drench with a biological control (like Bacillus thuringiensis var. israelensis, sold as BTi) targets larvae without harming your plants.
Nutrient deficiencies and lockout
Yellow leaves, purple stems, or brown leaf edges in winter often trace back to pH problems rather than actual nutrient shortages. Cold water can also cause pH to drift more than usual. Always test and adjust pH before blaming a specific nutrient. If you've confirmed your pH is correct and deficiency signs continue, slightly increase your feed concentration. Nutrient lockout, where roots can't absorb nutrients despite adequate supply, is most often a pH issue, so fix that first before adding more feed.
Harvest timing, drying, and what to do after
Knowing when to harvest comes down to trichomes. Use a jeweler's loupe (30x to 60x) or a digital microscope to look at the small crystal-like resin glands on your buds. Harvest when roughly 80 to 90% of trichome heads have turned milky white (cloudy) and about 5 to 10% have shifted to amber. Clear trichomes mean you're too early; mostly amber means you've pushed past peak potency for most preferences. Pistil color (the tiny hairs on buds) is a secondary indicator, mostly orange or red pistils generally align with harvest readiness.
Drying is where winter gives you one more advantage: cooler ambient temperatures slow the drying process, which is actually what you want. Ideal drying conditions are 60 to 70°F and 50 to 60% RH. Under those conditions, buds typically dry in 7 to 10 days. A simple stem-snap test confirms dryness: bend a small branch, if it snaps cleanly rather than bending, it's ready to trim and jar for curing. Aiming for 55 to 65% RH during curing is the target for long-term storage quality and smooth smoke.
A note on legal compliance and responsible growing
Before any of the above applies to you, know your local laws. In the United States, cannabis remains a Schedule I controlled substance at the federal level under the Controlled Substances Act, regardless of state laws. Many states permit home cultivation with specific plant-count limits (commonly two to six plants per adult), but rules vary significantly by state, county, and municipality. International readers face an even wider range of legal frameworks.
Research your specific jurisdiction before purchasing equipment or starting a grow. Responsible cultivation means staying within your legal plant count, keeping your grow private and secure, not supplying to minors, and following any local disposal or packaging regulations. Growing within the law protects you, your household, and the broader community of home cultivators working to demonstrate that responsible home growing is safe and manageable.
Your next steps right now
- Verify the legal plant count and cultivation rules in your specific location before purchasing anything.
- Choose your space and measure it — this determines tent size, fan CFM requirements, and light wattage.
- Order a thermometer/hygrometer with min/max logging first — you need baseline data before anything goes in the tent.
- Select your strain: autoflower seeds for simplicity, photoperiod for more yield control if you have clones available.
- Set up your tent, exhaust fan, and carbon filter before your plants arrive — test airflow and confirm negative pressure.
- Dial in your heater and confirm overnight temps stay above 65°F for at least three consecutive nights before planting.
- Germinate your seeds or root your clones, and monitor daily using your checklist from the top of this article.
- Log your temperature, humidity, and watering in a simple notebook — patterns you'd otherwise miss become obvious within two weeks.
FAQ
Why does my tent temperature keep dropping even with a space heater on a thermostat?
In winter, a common failure mode is “running out of heat” because the heater is battling heat loss through the room, not just the tent. Before upgrading your heater, add or improve insulation around the tent area (weather stripping for door gaps, reflective insulation panels behind the tent if appropriate, and sealing cable pass-throughs). Then re-check your heater setpoint and confirm your tent intake path is not pulling air from a colder exterior gap, which can keep fighting your thermostat.
Can I use a propane, natural gas, or kerosene heater to warm the tent in winter?
Yes, but only if you control ventilation and humidity tightly. In very cold rooms, the extra moisture from combustion can spike RH and raise the risk of bud rot and mold, and the heat output can be hard to regulate accurately. If you are in an extremely cold climate, the safer approach is electric heat plus higher exhaust exchange and, when needed, a small dehumidifier.
Where should I measure humidity in the tent, and why does my RH number not match what I see?
Your RH readings can be misleading if the sensor is in the wrong airflow zone. Put the hygrometer inside the tent at canopy height, away from direct heater discharge, and do not place it right next to the intake vent or where exhaust air is swirling. Also log a low and high RH reading for a full 24 hours, because spikes often happen when the lights cycle or when the heater turns on/off.
My RH is staying too high in winter flower, what should I troubleshoot first?
If your RH is consistently above your targets in flower, the fastest diagnostic is to look at exhaust and air exchange first, not plant nutrition. Check that you truly have negative pressure (pull the tent zipper slightly open briefly and confirm air pulls in rather than out). Then ensure ducting is not crushed, carbon filter is not clogged, and the inline fan is sized for head pressure. Only after airflow is confirmed should you add a dehumidifier, and set it up so it can actually draw air from the tent rather than just the surrounding room.
How should nutrient strength and watering schedules change in winter?
Start with a “feed plan that matches slower uptake.” In cooler conditions, many growers see less burn risk from overfeeding, but more root stress and lockout risk if pH drifts. Practical move: drop to about 75% of the usual nutrient strength, keep pH in range, and increase only if new growth stays healthy and you see no tip burn. Avoid increasing both nutrients and water frequency at the same time, because overwatering plus cold wet roots is a double hit.
If I add a dehumidifier, will that solve high humidity problems by itself?
Treat a dehumidifier like a safety tool, not a magic fix. If RH is above 60% in flower, you need better exchange and circulation, because dehumidifiers remove moisture but do not automatically solve stale-air pockets inside dense buds. If you run a dehumidifier, also keep the oscillating fan distribution and exhaust airflow dialed in, then re-check RH several hours later to confirm the dehumidifier is lowering tent RH, not just the room.
What’s the best way to tell when to water in winter, especially if the top of the soil looks dry?
In winter, medium moisture can look “dry on top” while staying wet deeper down, especially in soil. The two-inch finger rule is good, but for small pots it can be inconsistent, so weigh the pot before watering once it is dry, then use that weight as a repeatable trigger. For coco, ensure drainage is fast and that runoff is not staying cold in trays, since cold runoff can slow root uptake.
How strict do I need to be about light leaks during winter flower?
Light leaks still matter, even in winter. For photoperiod plants, any interruption of the 12-hour dark period can push stress and hermaphroditism risk. Practical step: during the lights-off window, avoid opening the tent, use a red or dim headlamp if you must check plants, and route any camera lights or indicator LEDs away from the light path.
Do autos handle winter conditions better, or do they still need the same temperature and light management?
Not always. Autos are more tolerant of schedule changes, but they still benefit from stable temperature and consistent light intensity. If your winter nights are very cold, prioritize keeping roots above 60-65°F and avoid letting the canopy cool dramatically when lights switch off. Also, do not “compensate” for poor DLI by guessing at higher wattage, instead confirm distance and adjust gradually so you avoid bleaching.
My seedlings are leggy in winter, how can I tell if it’s light intensity versus watering or nutrients?
If seedlings look leggy while humidity and temperature are “in range,” the issue is usually light intensity or light height, not nutrients. Raise fixture proximity within safe limits for your wattage, or adjust dimmer settings. Also verify your photoperiod schedule is correct (seedlings need enough daily light even in winter), because too-short schedules can reduce DLI and produce stretching.
I found a small area of bud rot, what exact steps should I take immediately?
For bud rot prevention, avoid only one symptom fix. When you remove a rot spot, do not just trim the visible area, cut back at least an inch below the infection, seal it, and increase airflow immediately. Then lower RH further toward the mid to low 40s in flower and confirm your exhaust duty cycle is sufficient at night, when cold air and heater cycling can change humidity.
If I spot early powdery mildew, how do I prevent it from coming back during the rest of winter flower?
Powdery mildew can reappear if only visible leaves are removed. If you catch it early, remove affected growth promptly and improve air movement across the entire canopy, not just where symptoms appeared. Keep RH slightly lower than your typical target and ensure fans do not blow constantly only from one direction, which can create still pockets inside the plant.
Why do my seedlings stall or germinate slowly during winter indoors?
Germination speed and early growth depend heavily on medium temperature, not only room temperature. In winter, seeds and seedlings can stall if the root zone is cold, even when the tent air is warm. Practical step: monitor or stabilize the medium temperature, use a germination warming method that is safe for your setup, and confirm you are not placing pots on a cold floor or against an exterior draft.
Is it okay to let temps dip lower at night in winter if I’m seeing slower growth?
You can, but avoid relying on “cooler nights” as a blanket strategy if your RH is high. Cooler temps can reduce transpiration, but the moisture balance may not improve if ventilation is weak. A safer approach is to aim for the cooler nights target only when you can keep RH under control through negative pressure and airflow, then use the heater so night temps do not drop below the consistent minimum.
How do I tell whether winter leaf discoloration is a pH problem, nutrient issue, or overwatering?
If you see yellow leaves, purple stems, or brown edges, confirm pH and medium conditions before changing nutrients. In winter, feed solution and reservoir temperatures affect pH drift and uptake, so check pH after mixing and again if you are using longer reservoirs. Then check whether you are overwatering, because cold wet roots can cause nutrient uptake issues that look like deficiencies.
How should I adjust drying and curing targets in winter so I don’t over-dry or mold the buds?
Before trimming and curing, use the bud moisture test consistently and avoid “over-drying” in cold climates. If stems snap cleanly, you can jar and cure, but if branches bend or feel rubbery, extend drying. During curing, keep RH in the mid 50s to avoid mold risk, and burp jars on a schedule so moisture equalizes.
Next Article
How to Grow a Weed Plant in Your Room: Beginner Guide
Step-by-step indoor cannabis guide: legality check, setup, light, nutrients, watering, training, troubleshooting, harves