Yes, you can grow cannabis at home, and you can do it well even on your first try, as long as you go in with a clear plan. If you want the full step-by-step, this guide on how to grow pot at home starts the same way as grow cannabis at home, with a clear plan from setup to harvest.
How to Grow Cannabis at Home: Step-by-Step Guide

Marcus Holbrook
20 Apr 2026
This guide walks you through every stage from picking your setup and strain to harvesting and curing your first batch. Whether you have a spare closet, a tent in a basement, a backyard, or a small hydroponic rig, the core process is the same. I'll give you specific numbers, realistic timelines, and honest troubleshooting so you're not guessing at any stage.
Legality, Safety, and Choosing Your Grow Space
Before you buy a single seed, check your local laws. Home cultivation rules vary dramatically by jurisdiction. In some U.S. states like Colorado, California, and Michigan, adults can grow a limited number of plants (often 3 to 6 mature plants per person, or 6 to 12 per household). Other states permit medical cultivation only. Some countries allow it outright; others criminalize it entirely. Look up your specific state, province, or country's rules before proceeding, and if you're renting, check your lease too. This guide assumes you're operating legally wherever you are.
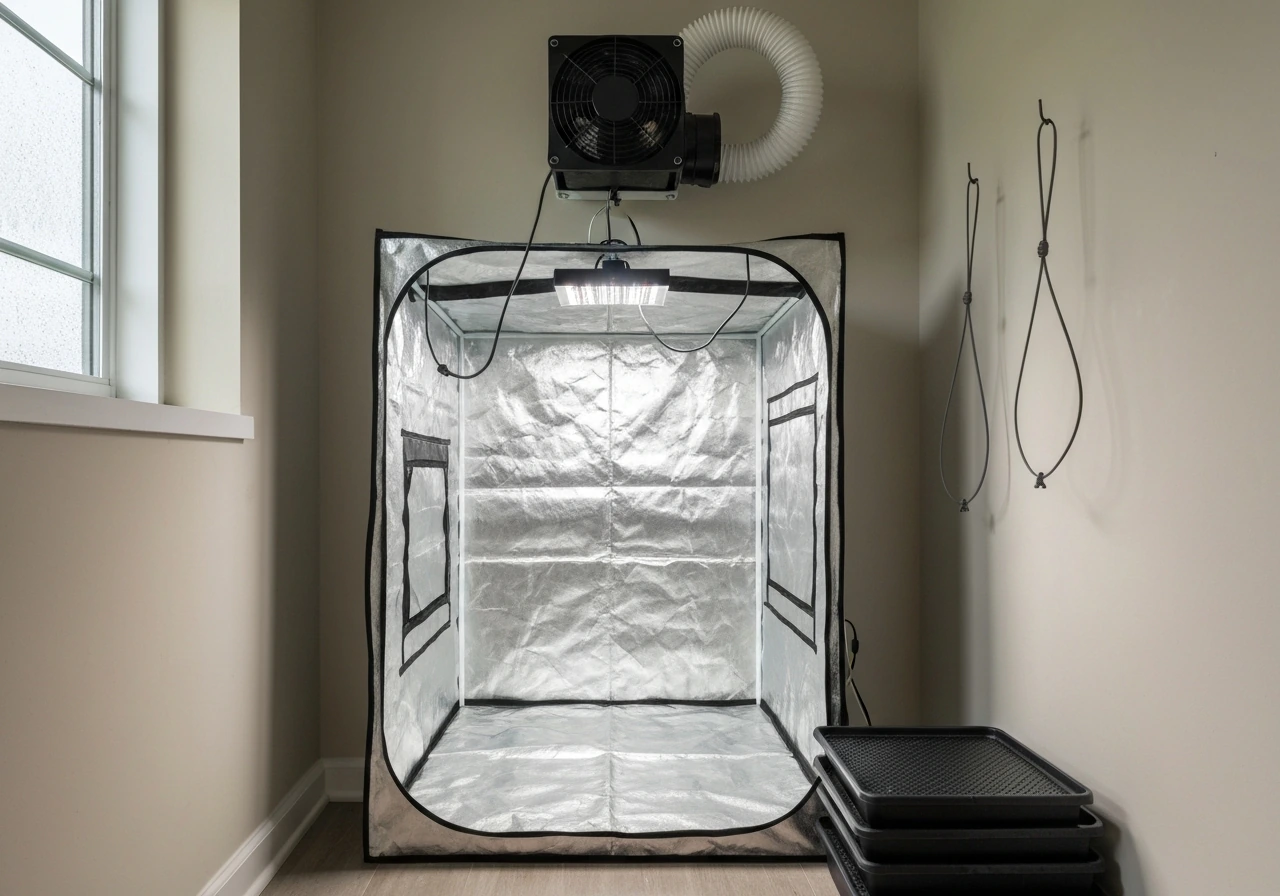
Safety in your grow space is non-negotiable. Cannabis cultivation involves high-wattage lighting, water, and sometimes CO2 supplementation, a combination that can cause fires or electrical hazards if set up carelessly. Colorado's cannabis guidelines specifically recommend having all lights and electrical equipment installed by a licensed electrician. That's solid advice for anyone. At minimum, use surge-protected power strips, never daisy-chain extension cords, and keep water sources away from electrical connections. Ground-fault circuit interrupter (GFCI) outlets are a smart addition anywhere water and electricity coexist.
Mold is the other major safety concern. Cannabis plants transpire a lot of moisture, and if that moisture has nowhere to go it will collect on your walls and in your buds. Colorado's guidelines specifically call out grow-area wall surfaces: painted concrete or plastic-lined walls are far better than bare drywall or wood because they don't absorb water. Good ventilation is equally essential, you need fresh air moving through the space continuously to remove heat and humidity. Plan your space with both of these in mind from the start.
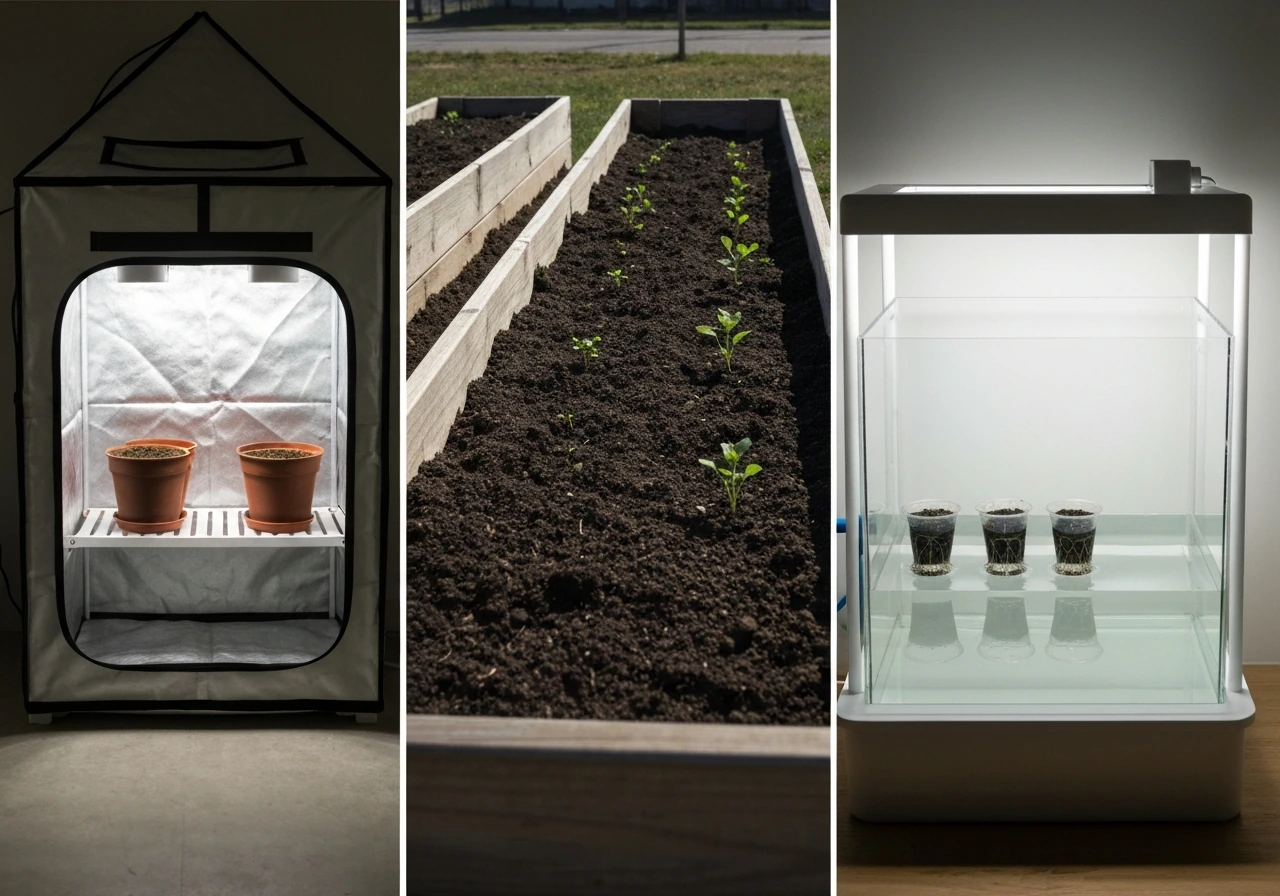
Indoor vs. Outdoor vs. Hydroponic: Which Path Is Right for You?
| Method | Setup Cost | Control Level | Typical Yield | Best For |
|---|---|---|---|---|
| Indoor (soil/tent) | Moderate ($200–$600 to start) | High | 1–5 oz per plant | Year-round growing, privacy, climate control |
| Outdoor (soil/containers) | Low ($50–$150) | Low to moderate | 2–10+ oz per plant | Warm climates, larger harvests, minimal electricity |
| Hydroponic (indoor) | Moderate–High ($300–$800+) | Very high | 2–8 oz per plant | Faster growth, precise feeding, experienced growers |
Indoor growing in a tent is the most beginner-friendly because you control everything: light, temperature, humidity, and pests. A 2x4 foot grow tent fits in most spare rooms and can produce 2 to 4 plants comfortably. Outdoor growing costs less upfront and produces larger plants, but you're at the mercy of your climate, season, and pest pressure. Hydroponics grows plants faster (often 20 to 30 percent quicker than soil) because nutrients go directly to the roots, but it has less of a buffer for mistakes, pH swings and nutrient problems escalate faster than in soil. If this is your first grow, start with soil indoors or outdoors depending on your climate.
Picking a Strain and Planning Your Grow Schedule
Strain selection is one of the most important decisions you'll make, and most beginners underestimate it. The strain you choose determines your plant's eventual height, how long it takes to finish, how much it yields, how forgiving it is to beginner mistakes, and whether it's suited to your climate if growing outdoors.
Photoperiod vs. Autoflowering Strains
Photoperiod strains (both indica-dominant and sativa-dominant) require a change in light schedule, 18 hours of light during veg, then 12 hours on and 12 hours off to trigger flowering. This gives you control over when flowering starts, which is useful for training and managing size. Autoflowering strains flower based on age rather than light cycle, typically finishing in 8 to 10 weeks from seed regardless of light schedule. Autos are excellent for beginners because they're compact, fast, and forgiving, they don't punish you for slight light leaks the way photoperiod plants do. The tradeoff is that autos can't be cloned effectively and offer less time for training.
Beginner-Friendly Strain Recommendations
- Northern Lights (photoperiod, indica) — compact, very resilient, low odor, finishes in 7 to 8 weeks of flower
- Blue Dream (photoperiod, hybrid) — generous yields, forgiving of feeding mistakes, suited to indoor and outdoor
- Gorilla Glue #4 Auto — fast finishing (9 to 10 weeks), high resin, manageable height of 60 to 90 cm
- Critical Mass (photoperiod, indica) — massive yields, stays short, but requires good airflow due to dense bud structure
- White Widow Auto — extremely beginner-friendly, consistent performer, good mold resistance
For your first grow, avoid pure sativas (they can stretch to 2 meters or more indoors and take 12 to 14 weeks to flower) and any strain marketed as particularly finicky or requiring precise conditions. Stick with something described as 'beginner-friendly,' 'hardy,' or 'mold-resistant' until you've got at least one harvest under your belt.
Seed-to-Harvest Timeline
Plan for the full timeline before you start so you're not caught off guard. A typical indoor photoperiod grow from seed to harvest runs 16 to 22 weeks total: roughly 1 week germination, 3 to 4 weeks seedling, 4 to 8 weeks vegetative growth (depending on how big you want the plant), and 7 to 11 weeks flowering. Autoflowering strains compress this to 10 to 14 weeks total from seed. Outdoor photoperiod plants are tied to the natural season and typically harvest in September through October in the Northern Hemisphere.
Germination and Seedling Setup
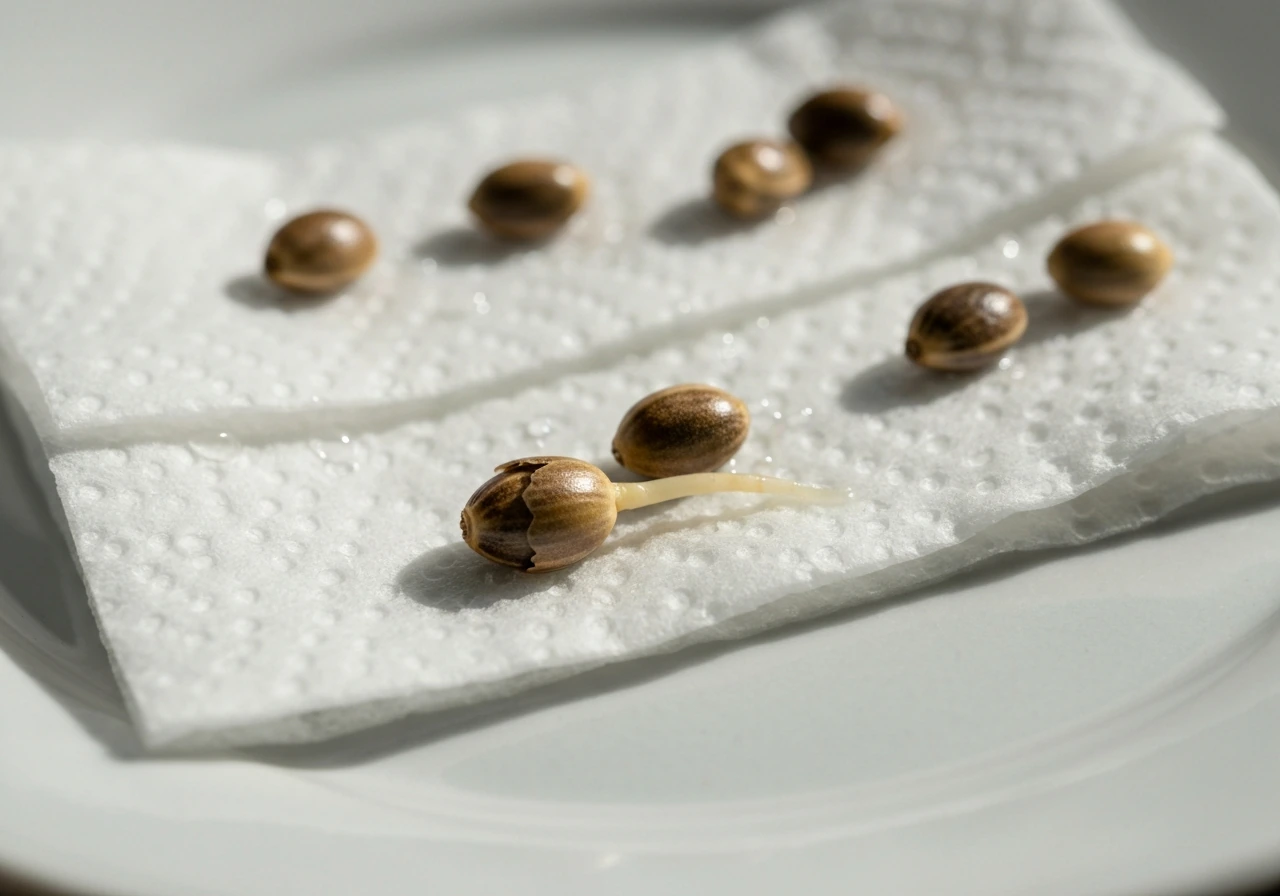
Germination is the easiest stage to get right and the easiest to mess up through impatience. The goal is simple: get the seed to crack and send out a taproot. Many germination guides describe that viable cannabis seeds often crack and show taproots within about 24 to 72 hours under warm, dark, moist conditions using methods like the paper-towel technique get the seed to crack and send out a taproot. The most reliable method for beginners is the paper towel technique.
- Dampen two paper towels so they're moist but not dripping
- Place seeds between the towels on a plate
- Cover with another plate or a plastic bag to retain moisture
- Keep in a warm, dark location — ideally 70 to 77°F (21 to 25°C)
- Check every 12 to 24 hours; most seeds crack in 24 to 72 hours
- Once the taproot is 0.5 to 1 cm long, transfer to your growing medium taproot-down, about 1 cm deep
Alternatively, soak seeds directly in a glass of room-temperature water for 12 to 18 hours until they sink, then transfer to your medium. Both methods work well. What matters most is keeping the environment warm and humid without overwatering, this is where most beginners kill seedlings by drowning them.
Seedling Environment: Light, Temperature, and Humidity
Once your seedlings emerge, they need gentle light, not the full intensity you'll use later. A T5 fluorescent or LED panel kept 20 to 30 cm (8 to 12 inches) above the canopy works well. Seedlings at this stage need 18 hours of light and 6 hours of dark. Keep temperatures at 68 to 77°F (20 to 25°C) during the light period and no lower than 64°F (18°C) in the dark. Relative humidity should be high at this stage: 65 to 75 percent. A seedling dome or clear plastic cup over your starter pots holds humidity in without any extra equipment.
Water seedlings sparingly, just enough to keep the top centimeter of medium moist. A spray bottle works perfectly at this stage. Overwatering is the number one seedling killer; the medium should feel like a wrung-out sponge, not soggy. Seedlings are ready to move to larger containers when you see 2 to 3 sets of true leaves, usually around day 14 to 21.
Vegetative Growth: Environment, Nutrients, Watering, and Training
The vegetative stage is where your plant builds the structure that determines your eventual yield. More branching, more bud sites. Your job during veg is to optimize the environment and start shaping the plant if you want to maximize production.
Veg Environment Targets
| Parameter | Target Range | Notes |
|---|---|---|
| Light cycle | 18 hours on / 6 hours off | For photoperiod; autos can run 18–24 hrs |
| Temperature (lights on) | 70–85°F (21–29°C) | Aim for 77°F (25°C) as sweet spot |
| Temperature (lights off) | 64–75°F (18–24°C) | Keep within 10°F of lights-on temp |
| Relative humidity | 40–70% | Higher end for younger plants, taper down |
| Airflow | Continuous fan circulation | Strengthens stems, prevents hot spots |
| CO2 (ambient) | ~400–800 ppm | Ambient room air is fine; supplementation optional |
Lighting for Veg
LED grow lights have largely replaced HPS (high-pressure sodium) and CMH lights for home growers because they run cooler and use less electricity. A full-spectrum LED producing 200 to 400 watts of actual draw covers a 2x2 to 3x3 foot canopy effectively during veg. Keep your LED 18 to 24 inches above the canopy and watch for light stress signs: upward leaf curl, bleaching, or very tight node spacing (too close) vs. stretchy, pale growth (too far). HPS lights are still excellent but generate more heat and require better ventilation.
Nutrients During Veg
Cannabis in veg needs nitrogen (N) most of all, supported by phosphorus (P) and potassium (K). Look for a fertilizer with a higher N value, something like a 3-1-2 or 2-1-2 N-P-K ratio. If you're growing in pre-amended potting soil (Fox Farm Ocean Forest, for example), you likely won't need to add nutrients for the first 3 to 4 weeks, the soil has enough. After that, introduce a liquid nutrient solution at half the manufacturer's recommended dose to start. Always start low and increase gradually. Nutrient burn (brown crispy leaf tips) is far more common among beginners than deficiency.
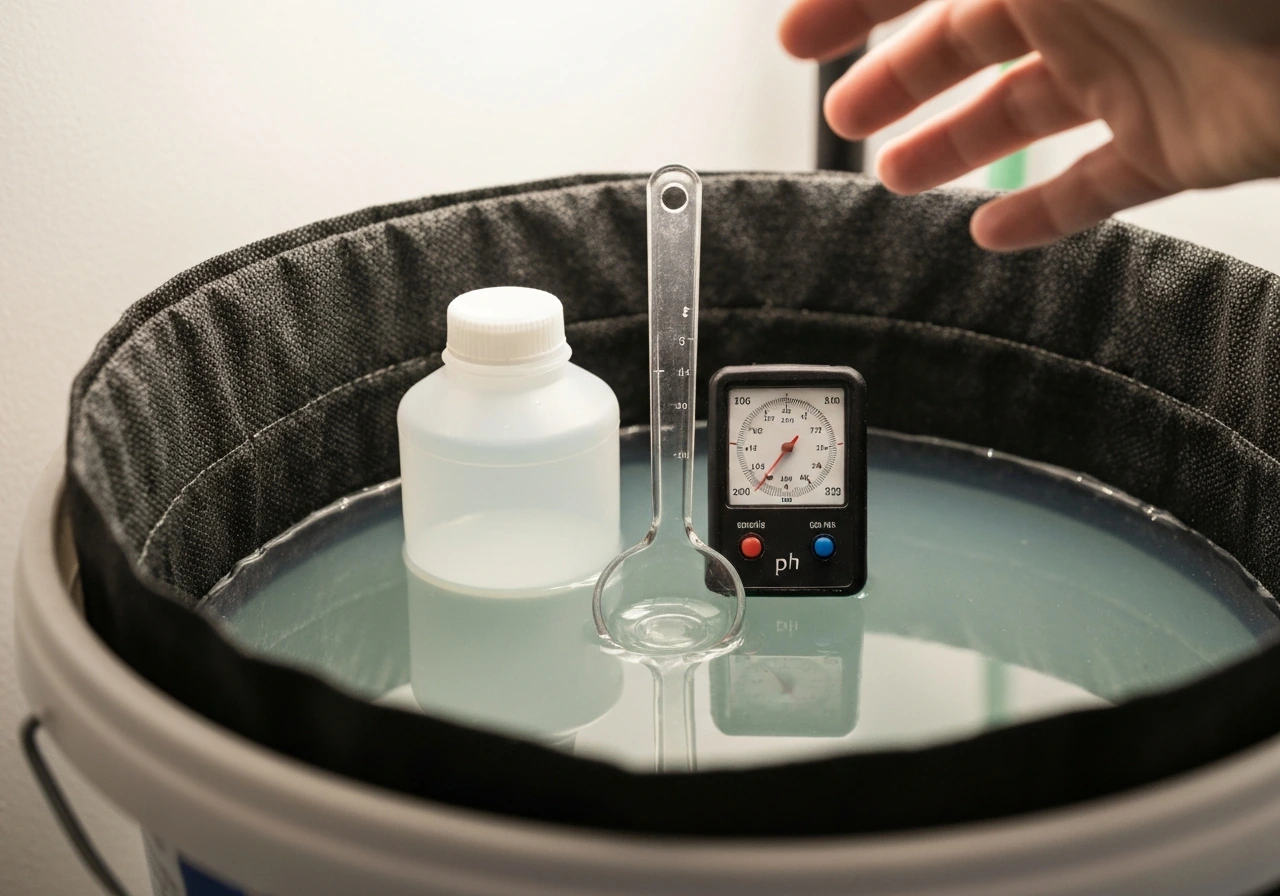
pH is critical and worth spending money on a decent pH meter. For soil grows, water and nutrient solution should be pH 6.0 to 7.0 (6.2 to 6.8 is the sweet spot). For hydroponic or coco coir grows, target pH 5.5 to 6.5. Outside these ranges, your plant can't absorb nutrients even if they're present in the medium, this is called nutrient lockout, and it looks just like a deficiency. I've seen many growers dump in more nutrients trying to fix a lockout and make it much worse. Check your pH first, every time.
Watering in Veg
Water when the top inch of soil is dry and the pot feels noticeably lighter. A 5-gallon pot in active veg might need watering every 2 to 3 days, but this varies enormously with humidity, temperature, and root development. Water thoroughly until you get 10 to 20 percent runoff from the bottom of the pot, this flushes salt buildup. Then let it dry before watering again. The lift test is your best friend: pick up the pot. If it's light, water. If it's still heavy, wait.
Training Techniques for Better Yields
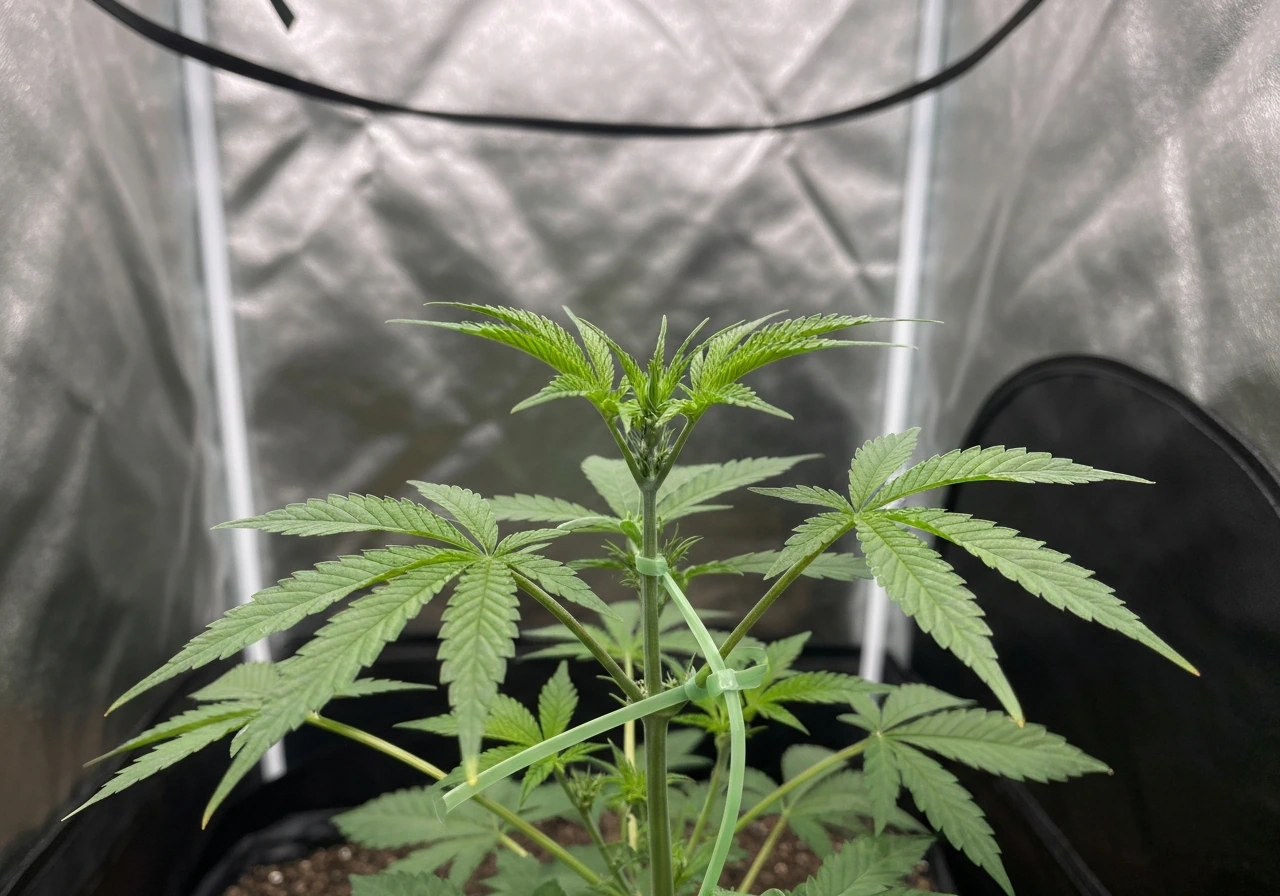
Training is optional but highly recommended if you want more than one or two main colas. The two most beginner-accessible methods are low-stress training (LST) and topping. LST involves gently bending branches away from the main stem and tying them down with soft ties or garden wire, encouraging the plant to grow wide and flat rather than tall. This exposes lower bud sites to light and increases overall yield with zero recovery time. Topping means cutting the main stem above a node, which causes the plant to split into two main colas. You can top multiple times, but each topping adds about a week to your veg time as the plant recovers.
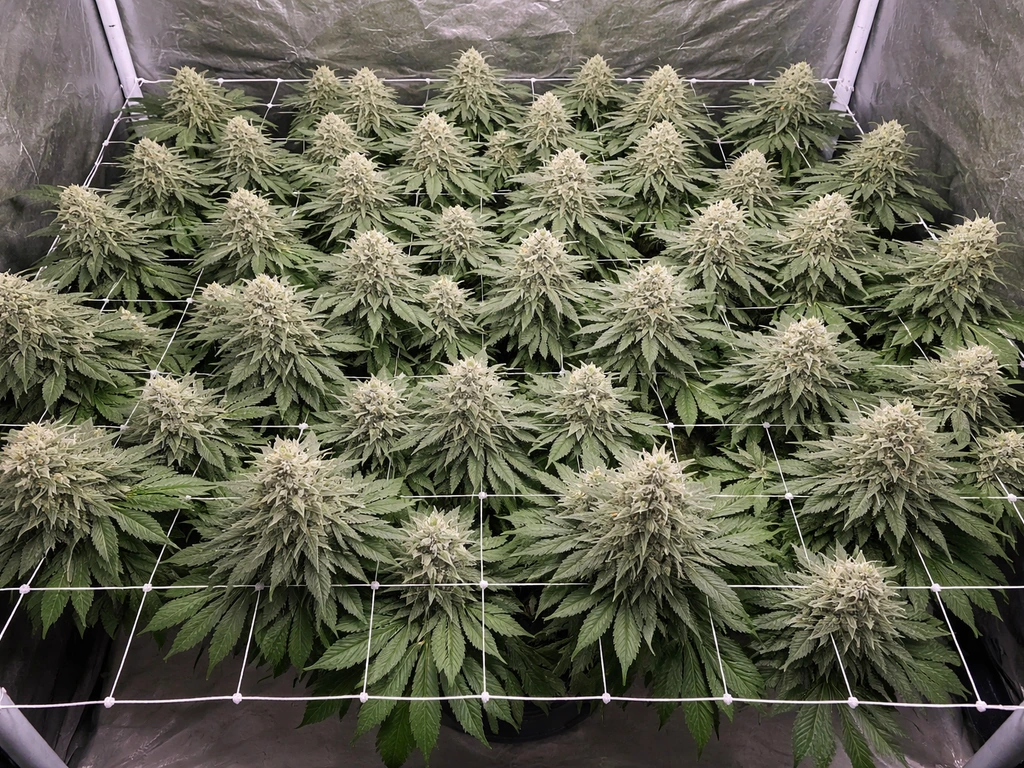
Screen of Green (ScrOG) is a natural extension of LST, you train branches through a horizontal screen to create a flat, even canopy. This is excellent for indoor grows with limited vertical space. Sea of Green (SOG) is the opposite approach: many small plants flowered early, each producing one main cola. Both methods work well for home growers. If you're growing autos, stick with LST only, the compressed timeline means topping can stunt growth significantly.
Flowering Setup: Light Cycle, Feeding, and Bud Development
For photoperiod plants, you trigger flowering by switching your light timer to 12 hours on and 12 hours off. The dark period must be completely uninterrupted, even a brief light leak from a phone screen or a crack under the door can stress photoperiod plants into hermaphroditism (developing both male and female flowers, which pollinate your crop and produce seedy buds). Take dark period light leaks seriously. Autoflowering plants transition on their own schedule regardless of light cycle, so this isn't a concern for them.
Flowering Environment Adjustments
- Drop relative humidity to 40–50% during early flower and aim for 35–45% in late flower to prevent bud rot
- Keep temperatures at 65–80°F (18–26°C) during the light period; cooler nights (60–70°F) can enhance terpene development and bud color
- Increase airflow — dense, developing buds trap moisture and need good circulation, especially in the lower canopy
- Remove large fan leaves blocking bud sites (lollipopping) in the first 2 weeks of flower to improve light penetration and airflow
- Switch your LED to a warmer red spectrum setting if your light has this option — this mimics autumn light and supports flower production
Nutrient Adjustments for Flowering
When flowering begins, shift to a bloom-focused nutrient formula with lower nitrogen and higher phosphorus and potassium, something like a 1-3-2 N-P-K ratio. Excess nitrogen in flower suppresses bud development and creates leafy, loose buds. Many liquid nutrient lines (General Hydroponics, Fox Farm, Advanced Nutrients) sell a three-part system with separate grow, bloom, and micro formulas, follow the manufacturer's feeding schedule as a baseline, starting at half dose. Weeks 3 through 6 of flower are peak bud development, and this is when phosphorus and potassium demand is highest. A 'PK booster' product added during weeks 3 to 5 can improve bud density in this window.
In the final 1 to 2 weeks before harvest, most growers perform a 'flush', watering with plain pH-adjusted water only, no nutrients. The theory is that this clears residual nutrient salts from the medium and improves the taste and smoothness of the final product. Whether flushing makes a measurable difference is debated, but it's a low-risk practice and very common.
Watching Bud Development: Week by Week
Weeks 1 to 2 of flower: White pistils (hairs) appear at bud sites. The plant may stretch 50 to 100 percent in height during this 'flowering stretch', account for this in your vertical space planning. Weeks 3 to 4: Buds begin forming and stacking. Trichomes (tiny crystal structures) start appearing on sugar leaves. Weeks 5 to 7: Buds swell significantly, trichomes become dense, and aroma intensifies. Weeks 8 to 10+: Buds reach maximum density and the pistils begin turning orange or red. This is when you'll determine harvest timing based on trichome color (more on this below).
Troubleshooting Common Problems
Every grower runs into problems. The skill is identifying them fast before they spiral. Here are the most common issues and how to handle them.
Nutrient Problems
| Problem | What It Looks Like | Likely Cause | Fix |
|---|---|---|---|
| Nitrogen deficiency | Yellowing starting on lower/older leaves, moving upward | Underfeeding or pH lockout | Check pH first; increase N-rich nutrients if pH is fine |
| Nutrient burn | Brown, crispy leaf tips across multiple leaves | Overfeeding | Flush with plain pH water; reduce nutrient dose by 25–50% |
| Calcium deficiency | Brown spots on mid/upper leaves, curling edges | Low pH or insufficient Ca | Raise pH slightly; add Cal-Mag supplement |
| Phosphorus deficiency | Purple/dark leaf stems, dark patches on lower leaves | Low pH or cold temps | Check pH; raise temps; increase P in feed |
| Nutrient lockout | Multiple deficiency signs despite feeding | pH too high or too low | Flush medium thoroughly; correct pH on all future waterings |
Pest Problems
Spider mites are tiny (barely visible to the naked eye) and leave stippled, yellowing spots on leaves with fine webbing on the underside. They thrive in hot, dry conditions, keep humidity above 40 percent and introduce neem oil spray (diluted per label) at the first sign. Fungus gnats look like tiny flies hovering around the soil and lay eggs in moist medium. Their larvae eat roots.
Let the top 2 inches of soil dry out completely between waterings and use yellow sticky traps to monitor populations. Aphids cluster on new growth and under leaves. A diluted insecticidal soap spray (or a strong water blast) handles minor infestations. Outdoors, spider mites, caterpillars, and aphids are your most common threats, companion planting with basil or marigolds helps deter them.
Mold and Bud Rot
Botrytis (gray mold/bud rot) is one of the most devastating late-flowering problems, especially in humid conditions. It starts inside dense buds and works outward, turning the inner bud tissue brown and mushy. By the time you see it from the outside, it's usually already spread significantly. Prevention is far easier than treatment: keep late-flower humidity below 45 percent, maintain strong airflow through and under the canopy, and remove any dead or dying leaf material promptly. If you find affected buds, remove and bag them immediately, don't shake them near healthy plants as spores spread. Powdery mildew is a white, powdery coating on leaves and is treated with potassium bicarbonate spray or diluted hydrogen peroxide at early stages.
Other Common Issues
- Overwatering: drooping leaves that don't perk up after lights come on; medium always feels heavy. Fix: let the pot dry out fully before the next watering and adjust your schedule
- Light burn/stress: bleached or yellowing tops closest to the light, with lower leaves unaffected. Fix: raise your light 4 to 6 inches and check the manufacturer's recommended hanging distance
- Hermaphroditism: small banana-shaped pollen sacs or round seed pods appearing within flower clusters. This can be caused by light stress, heat stress, or genetics. Remove and dispose of affected plants or bananas promptly to avoid pollinating your crop
- Stretchy, leggy seedlings: usually caused by insufficient light. Move light closer or increase intensity
- Low yields: most commonly caused by insufficient light intensity, too-short veg time, or poor training. More light and longer veg are your biggest yield levers
Harvest Timing, Drying, and Curing
Harvesting at the right moment is the single most impactful decision in terms of the potency and effect profile of your final product. You can do everything else perfectly and leave significant quality on the table by harvesting too early or too late.
How to Know When to Harvest
The most accurate method is examining trichomes, the tiny resin glands on buds and sugar leaves, with a jeweler's loupe (30x to 60x) or a digital microscope. Trichomes pass through three stages: clear (immature, lower potency), milky/cloudy (peak THC), and amber (THC degrading to CBN, producing a heavier, more sedative effect). Most growers harvest when trichomes are 70 to 90 percent milky with 10 to 30 percent amber for a balanced effect.
If you want more uplifting effects, harvest with fewer ambers. If you want more of a body-sedative effect, wait until you see 30 to 40 percent amber. As a secondary indicator, watch your pistils: when 70 to 90 percent have turned orange or red and the buds have stopped swelling, you're in the harvest window.
Harvesting, Drying, and Curing Step by Step
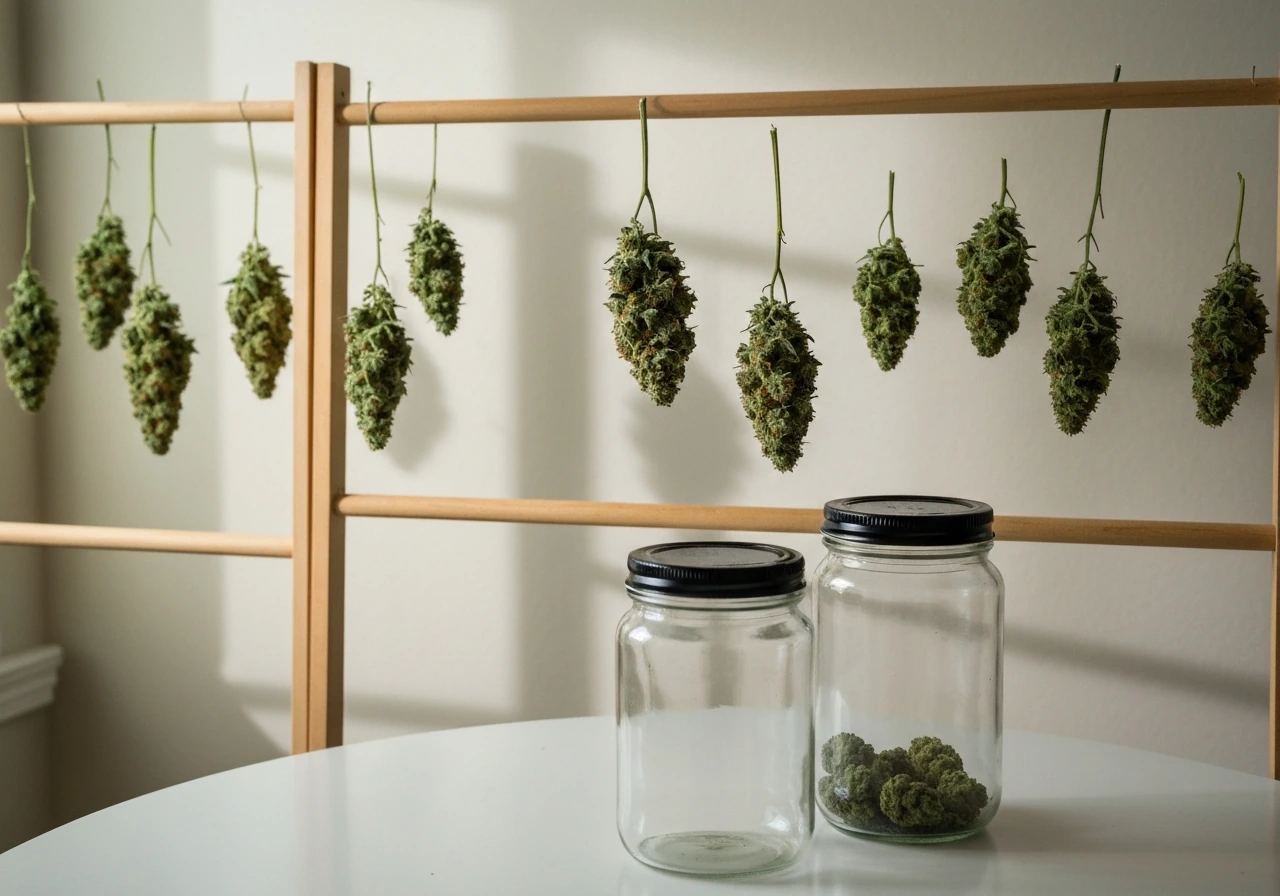
- Harvest in darkness or low light — some growers run a 48-hour dark period before harvest to potentially improve terpene content
- Cut branches and remove large fan leaves immediately (wet trimming) or hang whole branches and trim after drying (dry trimming — easier for beginners as the leaves protect buds during drying)
- Hang branches upside down in a dark room at 60 to 70°F (15 to 21°C) with 45 to 55 percent relative humidity and gentle airflow from a fan aimed at the walls, not directly at the buds
- Drying is complete when the smallest stems snap cleanly rather than bending — typically 7 to 14 days
- Once dry, trim off sugar leaves if you haven't already and place buds in airtight glass mason jars, filling them about 70 to 80 percent full
- Open jars twice daily for the first week for 10 to 15 minutes — this is called 'burping' and releases built-up moisture and gases
- After 2 weeks, burp once daily; after 4 weeks, reduce to every few days
- Cannabis is smokeable after 2 weeks of cure but noticeably better at 4 to 6 weeks; complex terpene profiles peak around 8 weeks of cure for high-quality flower
If you open a jar and smell ammonia, it means the buds weren't dry enough before jarring and bacteria are breaking down chlorophyll. Remove the buds and let them air dry for another 24 to 48 hours before re-jarring. This is salvageable if caught early. Boveda or Integra Boost humidity packs (62 percent RH) placed inside jars during the cure help maintain stable humidity and reduce the frequency of burping needed after the first two weeks.
Your First Week Action Plan
Here's what to do right now to get your first grow moving. Don't try to perfect everything at once, get the fundamentals in place and learn as you go. Every experienced grower you'll ever meet started with at least one failed or mediocre grow.
- Confirm your local laws and plant limits before purchasing anything
- Choose your grow method (indoor tent, outdoor, or hydroponic) based on your space, budget, and climate
- Order or source seeds from a reputable breeder — select a beginner-friendly strain like Northern Lights, White Widow Auto, or Blue Dream
- Assemble your basic equipment: growing medium, containers, pH meter, pH Up/Down solution, a basic nutrient line, and your light setup
- Prepare your grow space with appropriate wall surfaces, ventilation (at minimum an inline fan and carbon filter for indoor odor control), and electrical safety
- Germinate your first seeds using the paper towel method and set up your seedling environment
- Keep a simple grow journal — note dates, watering frequency, any nutrient doses, and environmental readings. You'll thank yourself when troubleshooting later
From seed to harvest you're looking at 10 to 22 weeks depending on your strain and method. That timeline feels long at the start, but once you're watching daily growth it goes quickly. The topics covered here connect to a lot of deeper rabbit holes, growing from seed specifically, doing it without specialized equipment, hydroponics setups, and strain-specific guides all deserve their own detailed treatment if you want to go further down any of those paths. If you want to skip straight to one of those deeper rabbit holes, see this guide on how to grow weed at home hydroponics setups.
If you want how to grow weed at home without equipment from seed, you can still follow the same seed-to-harvest basics with smarter, low-cost substitutions doing it without specialized equipment. If you want how to grow weed at home without equipment from seed, you can still follow the same seed-to-harvest basics with smarter, low-cost substitutions doing it without specialized equipment how to grow weed from seeds at home.
Start simple, stay consistent, and your first harvest is closer than you think.
FAQ
Can I start with feminized seeds or do I need to worry about male plants at home?
Most home growers use feminized seeds to avoid unwanted males, but you should still identify pre-flowers early. Check nodes during early flowering for pollen sacs (usually on males) versus pistils (usually on females), and remove any suspicious plants immediately to prevent seeding of the whole crop.
How do I prevent light leaks besides keeping the timer accurate?
Use a light-tight timer setup (plug timer directly into the wall, not into a lamp that can glow). Also cover any indicator LEDs on the timer or power strip and avoid opening the grow door during the dark window, even briefly, since your eyes adjust and can let in unexpected glare.
What’s the best way to size a tent or grow space for my first run?
Plan for the flowering stretch. A common beginner mistake is using the seedling footprint for space planning. Choose a height that accounts for the plant’s stretch plus your light clearance and airflow devices (fan, filter, duct), and leave an access path for checking plants without disturbing the environment.
Should I defoliate or remove leaves before harvest?
If you are new, avoid heavy defoliation. Instead, remove only dead or clearly damaged leaves and anything that blocks airflow in dense buds. Over-removing green leaf can stress the plant right during late flowering, which may reduce bud swelling and increase mold risk.
Is “flushing” actually necessary, and what if I don’t flush?
Flushing is optional, and skipping it usually does not ruin a grow if your feeding and pH have been steady. If you want to flush, do it briefly and keep your water pH stable. The bigger driver of harshness is often inconsistent late-stage watering or nutrient/pH lockout earlier, not whether you flushed.
How do I know whether a leaf problem is a deficiency versus nutrient lockout?
First check pH at the moment you notice symptoms. Nutrient lockout from wrong pH often looks like common deficiencies, but it responds poorly to simply adding more nutrients. If pH is in range and you still see symptoms, then adjust feeding. If pH is off, fix pH before changing nutrient ratios.
What runoff should I aim for, and can too much runoff cause problems?
Runoff helps measure and reset salt buildup, but excessive runoff every time can drain your medium and wash nutrients out too quickly. A practical target is enough runoff to clear the pot without turning watering into constant runoff. If you consistently flood the medium, consider watering less frequently and only when the pot weight and top inch indicate it’s ready.
How do I safely handle mold or bud rot when I find a problem late in flower?
Remove affected buds immediately, bag them, and avoid handling healthy plants right after. Increase airflow and reduce humidity below 45 percent in late flower. Do not shake infected material near the canopy, because spores can spread. If rot keeps returning, you may need to harvest early to salvage uninfected portions.
Can I use tap water, and how do I deal with hard water?
Tap water can work if you measure and adjust pH, but hard water can raise salt buildup and create hidden imbalance. Let water sit if it’s chlorinated, then test pH after measuring alkalinity or at least check pH after adding nutrients. If runoff EC or salt issues keep appearing, consider filtered or softened water.
What’s the simplest pest prevention routine for indoor grows?
Start with a physical routine: quarantine any new plants, inspect the underside of leaves every few days, and use sticky traps near the tent. For prevention, keep humidity and airflow in the target range so pests are less likely to establish. Only treat with sprays after you identify the pest type to avoid damaging stressed plants.
How long should I cure, and do humidity packs replace burping?
A common beginner target is about 2 to 4 weeks for a noticeable improvement, longer for best flavor and smoother smoke. Humidity packs reduce swings and can lessen how often you burp, but they do not eliminate the need to manage moisture. If jars get too wet, you still need to open briefly and dry out the buds.
My buds smell grassy or like ammonia after jarring, what should I do?
Ammonia or sharp “green” smell usually means incomplete drying or moisture moving through the jar. Open jars, check moisture, and extend dry time 24 to 48 hours in a controlled, low-humidity area before re-jarring. If it repeats, your drying conditions were likely too humid or too warm, so adjust drying temperature and airflow for the next batch.
Next Article
How to Grow 1 Pound Per Plant: Yield Guide for Beginners
Step-by-step plan to grow ~1 lb per plant using strain choice, light, training, feeding, and troubleshooting for beginne