Growing weed with water means running a hydroponic system where your plant roots sit in, or are regularly fed by, a nutrient solution instead of soil. You are not literally submerging living roots permanently underwater (that kills plants), but you are keeping roots in direct contact with oxygenated, nutrient-rich water for most or all of their life. Done right, this is faster than soil, more controllable, and produces some of the best yields a home grower can get. Done wrong, it is a quick path to root rot and dead plants. This guide walks you through every piece of it, from choosing your system to harvest day.
How to Grow Weed With Water: Hydroponic Step-by-Step

Marcus Holbrook
2 Jun 2026
Before anything else: check the cannabis cultivation laws in your jurisdiction. Home growing is legal in some places and illegal in others, and the rules around plant counts, grow space, and personal possession vary widely. Everything in this guide assumes you are operating within whatever your local law allows.
What 'Growing in Water' Actually Means for Cannabis
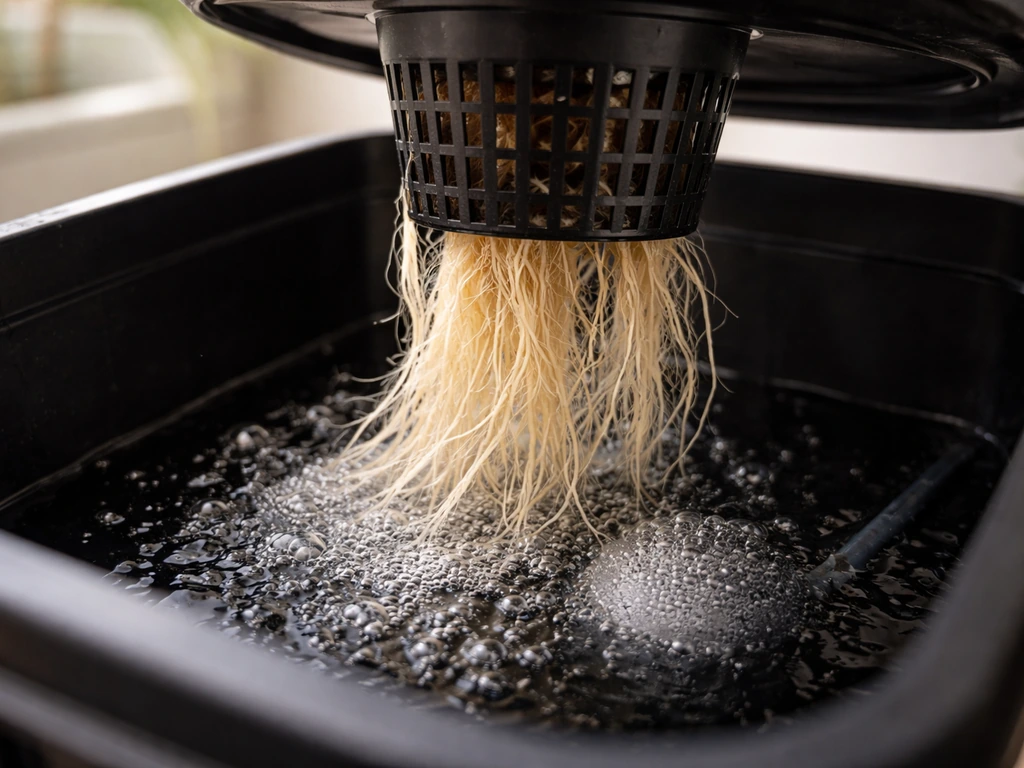
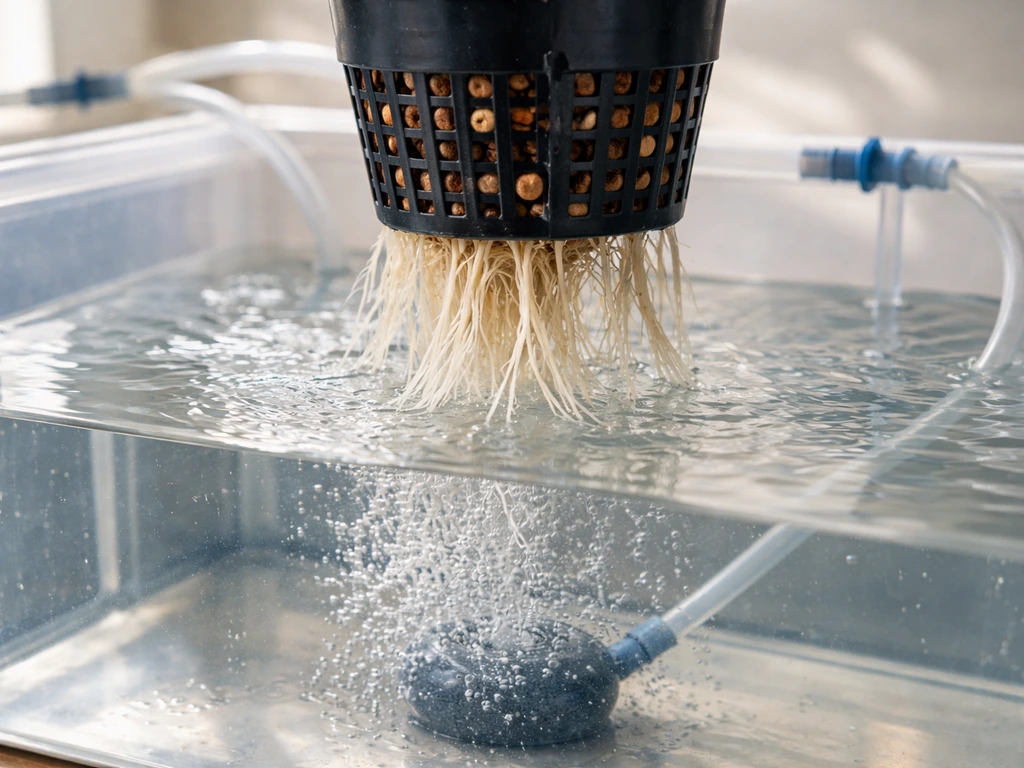
A lot of beginners read 'grow weed in water' and picture roots floating in a bucket like a goldfish tank. That is roughly how deep water culture (DWC) works, but there is a critical detail: the water has to be heavily oxygenated with an air pump and air stones. Roots need dissolved oxygen (DO) to survive and uptake nutrients. Without it, you get hypoxia, then root rot, then dead plants. Fully submerged roots with no aeration is not a grow method, it is a death sentence for your plant.
True hydroponic 'in water' growing suspends roots in or over a nutrient solution while keeping that solution saturated with oxygen. Some systems, like DWC and RDWC (recirculating DWC), keep roots constantly submerged in aerated water. Others, like NFT (nutrient film technique), flow a very thin film of solution over roots that are otherwise exposed to air. Ebb and flow systems flood the root zone periodically and then drain completely, giving roots wet-dry cycles. Each approach is a different answer to the same puzzle: how do you deliver water and nutrients to roots while keeping them oxygenated?
The sibling topics of deep water culture and DWC growing are essentially the same system with slight naming variations. Aeroponics takes a different path by misting roots with nutrient solution rather than submerging them. Aeroponics works similarly to other hydroponic approaches, but instead of submerging roots, you mist them so they get oxygen and nutrients at the same time. This guide focuses on the four most practical systems for home growers: DWC, RDWC, NFT, and ebb and flow.
Choosing Your Water-Based Grow Method
Each hydro system has a different learning curve, cost, and failure risk. Here is an honest breakdown so you can pick the one that fits your situation.
| System | How Roots Get Water | Beginner Friendliness | Main Risk | Best For |
|---|---|---|---|---|
| DWC | Submerged in aerated reservoir | High | Root rot if DO drops or temps rise | First hydro grow, single plants |
| RDWC | Submerged, solution recirculates between multiple buckets and a central res | Medium | Pump failure spreads pathogens system-wide | Multiple plants, scalable setups |
| NFT | Thin 1–3 mm film flows over roots in sloped channels | Low–Medium | Pump stoppage dries roots fast; channels clog with large roots | Smaller plants, experienced growers |
| Ebb & Flow | Periodic flooding then full drainage | Medium | Timer failure causes over or under-watering | Growers who want wet-dry cycles |
DWC: The Best Starting Point
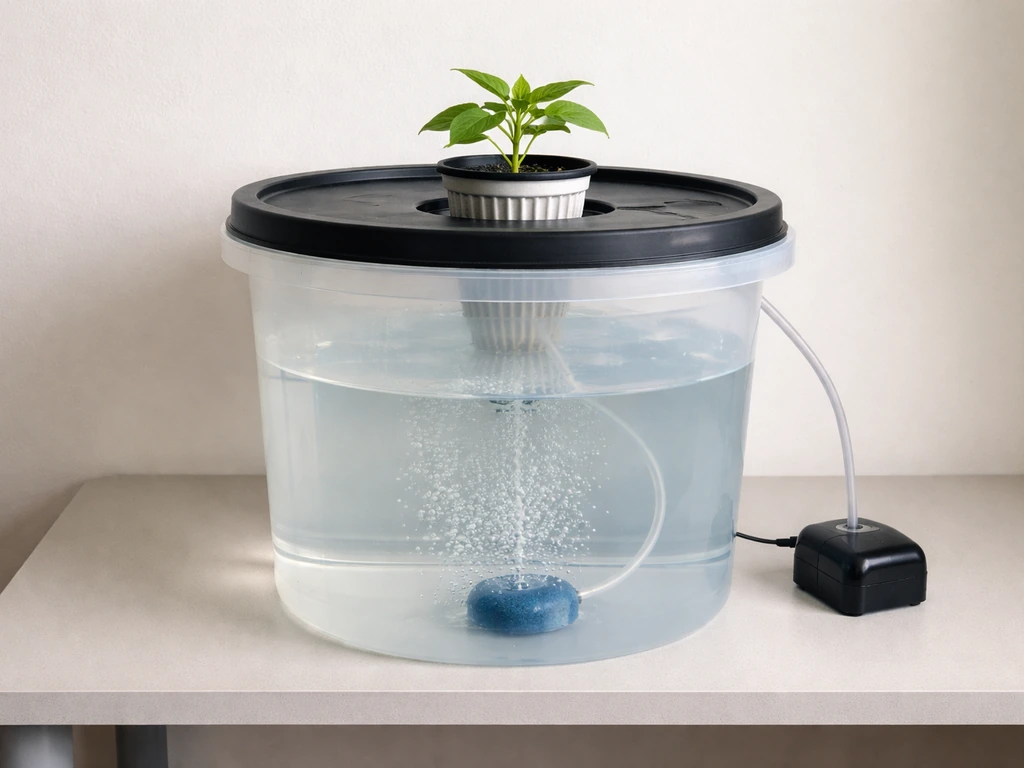
For a first hydro grow, I always recommend DWC. Deep water culture (DWC) is the most beginner-friendly water-based approach because you run a bucket-style reservoir with strong aeration, then dial in dissolved oxygen, pH, and nutrients. It is simple: a bucket or tote filled with nutrient solution, an air pump running air stones to oxygenate the water, and a net pot lid where your plant sits with its roots dangling into the solution. To get the best results, dial in a true DWC setup with strong aeration, stable dissolved oxygen, and a consistent nutrient schedule. A basic single-bucket DWC kit costs $25 to $60 in parts. You can monitor and adjust one reservoir without worrying about recirculation pumps or channel slopes. When something goes wrong, it is easy to isolate.
RDWC: Scaling Up
RDWC connects multiple grow buckets to a central reservoir using tubing and a circulation pump. The pump turns over the total system volume roughly 2 to 4 times per hour, keeping the solution well mixed and oxygenated across all plants. This is great when you want to grow 4 to 8 plants without managing individual reservoirs, but a pump failure or contamination event affects every plant simultaneously. Get comfortable with single-bucket DWC first.
NFT: Efficient but Unforgiving
NFT channels are sloped at around 1.2% to 3% and carry a film of nutrient solution only 1 to 3 mm deep at a flow rate of roughly 1 liter per minute (about 15.8 gallons per hour) per channel. Roots sit in the channel with most of their mass exposed to air, which is excellent for oxygen delivery. The problem is that if your pump stops, that thin film disappears in minutes and roots start drying out almost immediately. Cannabis roots also grow massive in late flower, which can clog channels and block flow. NFT rewards growers who are on top of their system daily.
Ebb and Flow: Built-In Wet-Dry Cycles
Ebb and flow (also called flood and drain) uses a timer to periodically pump nutrient solution up into a growing tray, flood the root zone for 15 to 30 minutes, then drain it all back into the reservoir. Roots get oxygen during the dry phase. This method works well with clay pebbles or rockwool as the grow medium and is a solid middle ground between DWC and soil-style growing. Your main vulnerability is timer or pump failure, so always have a backup timer set.
Water and Root-Zone Targets You Need to Hit
This is where most beginners either nail it or lose their plants. Get these four parameters dialed in and your roots will thrive. Ignore them and you will be troubleshooting root rot within weeks.
Dissolved Oxygen

Dissolved oxygen (DO) is the single most important variable in a water-based system. Aim for 6 to 8+ mg/L (ppm) of dissolved oxygen in your reservoir. Low DO directly causes root stress, kills beneficial microbes, and creates the exact conditions that Pythium and Fusarium love. In DWC, run at least one air stone per 5 gallons of reservoir volume, and size up your air pump generously. In RDWC, the recirculating pump adds some oxygenation, but you still want supplemental air stones in each bucket and the central reservoir. Cold water holds more oxygen than warm water, which is one reason water temperature matters so much.
pH
Keep your reservoir pH between 5.5 and 6.5, with 5.8 to 6.2 being the sweet spot for most cannabis strains in hydro. Outside this range, nutrient lockout happens even when the nutrients are present in the water. Check pH daily during the first few weeks until you understand how your system drifts. Use pH Up (potassium hydroxide) and pH Down (phosphoric acid) in small increments. A digital pH pen is non-negotiable: drops-based test kits are not accurate enough for hydro.
Water Temperature
Keep your reservoir water between 65°F and 72°F (18°C to 22°C). Above 75°F (24°C), dissolved oxygen drops sharply and pathogen pressure skyrockets. Below 60°F (15°C), nutrient uptake slows significantly. If your grow room runs warm, a small aquarium chiller is worth the investment. Wrapping reservoirs in reflective material or keeping them out of direct light also helps.
Reservoir Changes and Top-Offs
Do a full reservoir change every 7 to 14 days. Between changes, top off with plain pH-adjusted water (not more nutrient solution) because plants drink water faster than they consume nutrients, which causes salt buildup over time. Each time you do a full change, clean the reservoir and any tubing with a dilute hydrogen peroxide rinse (3% H2O2 at 1 to 2 ml per liter of water) to prevent biofilm and pathogen buildup.
Nutrients for Weed in Water
Cannabis in hydroponics needs all the same macro and micronutrients it would get from soil, except now you are delivering them directly in the water. There is no buffer the way soil provides. This means mistakes hit plants faster, but corrections also work faster.
Choosing a Hydro Nutrient Line
Use nutrients specifically formulated for hydroponics, not soil nutrients. Hydro nutrients are fully water-soluble and designed to stay in solution without clogging lines. Popular two-part and three-part liquid nutrient lines (like General Hydroponics Flora Series, Canna Aqua, or similar brands available in your region) are well-documented and come with feed charts. Follow the manufacturer's feed chart as a starting point, but always start at 50% of the recommended dose for the first week with new plants or clones.
EC and PPM: Measuring Nutrient Strength
EC (electrical conductivity) is how you measure nutrient concentration in your reservoir. It is expressed in mS/cm (millisiemens per centimeter). Most EC meters also display a PPM (parts per million) reading, but note that PPM conversions differ by meter: the 500 scale multiplies EC by 500, while the 700 scale multiplies by 700. A reading of 1.0 mS/cm is approximately 500 ppm on the 500 scale or 700 ppm on the 700 scale. Always note which scale your meter uses so you can compare readings consistently.
| Growth Stage | Target EC (mS/cm) | Approx PPM (500 scale) | pH Range |
|---|---|---|---|
| Seedling / Early Clone | 0.4–0.8 | 200–400 | 5.8–6.2 |
| Vegetative | 1.0–1.6 | 500–800 | 5.8–6.2 |
| Early Flower | 1.4–1.8 | 700–900 | 5.8–6.2 |
| Peak Flower | 1.6–2.2 | 800–1100 | 5.8–6.2 |
| Late Flower / Flush | 0.0–0.4 | 0–200 | 5.8–6.2 |
Mixing Nutrients the Right Way
Always add nutrients to water, never water to concentrated nutrients. Mix each part of a multi-part nutrient system into the reservoir separately, stirring or aerating between additions. Never mix concentrated nutrient solutions together before adding them to water because some combinations will precipitate and become unavailable to plants. After mixing, let the solution circulate for a few minutes, then check and adjust pH. EC reading after pH adjustment is your final check before use.
Lighting, Airflow, and Environment
Hydroponic roots can deliver unlimited nutrients to your plant, but the plant still needs the right environment above the canopy to use those nutrients efficiently. Get the environment wrong and even perfect water parameters will not save you.
Light Intensity by Stage
Cannabis in veg needs around 400 to 600 µmol/m²/s of PPFD (photosynthetic photon flux density). In flower, push that to 600 to 900+ µmol/m²/s. Modern LED grow lights with quantum board designs are the most efficient choice for home growers in 2026: they run cooler than HPS, which matters a lot when you are already managing reservoir temperatures. For a standard 4x4 foot tent with one plant in DWC, a 400 to 600 watt draw LED (actual draw, not equivalent) is a solid baseline.
Photoperiod Schedules
For photoperiod strains, run 18 hours of light and 6 hours of dark during veg. Switch to 12 hours on and 12 hours off to trigger flowering. Autoflowering strains flower regardless of light schedule, so many growers run them at 18/6 or even 20/4 throughout. Consistent light schedules matter more in hydro than in soil because plants are already primed for rapid growth and any stress hits harder.
Air Temperature, Humidity, and VPD
Target air temperatures of 72°F to 82°F (22°C to 28°C) during the light period and 65°F to 75°F (18°C to 24°C) during dark. Vapor pressure deficit (VPD) is a more precise way to manage the balance between temperature and humidity. Aim for 0.8 to 1.2 kPa during veg and 1.0 to 1. One cannabis-focused monitor example provides VPD targets by growth stage, such as 0.8, 1.2 kPa in veg and 1.0, 1.5 kPa in flower VPD targets by stage (veg and flower). 5 kPa during flower. High VPD in flower helps resin production and reduces mold risk; low VPD in early veg helps young plants transpire efficiently. A basic temperature and humidity controller with a VPD chart (or a grow room monitor that calculates VPD automatically) will save you a lot of guesswork.
Airflow and CO2
Run an inline exhaust fan sized to exchange your grow space air every 1 to 3 minutes. Keep a gentle oscillating fan blowing across the canopy to strengthen stems and prevent hot spots. Good airflow also discourages mold and pests. CO2 supplementation is optional for home growers, but if your lights and nutrients are dialed in and your canopy is producing well, CO2 enrichment to 1000 to 1500 ppm can increase yields in a sealed space.
Troubleshooting Common Hydro Problems
I have dealt with almost every problem on this list at some point. Here is what to look for and what to do.
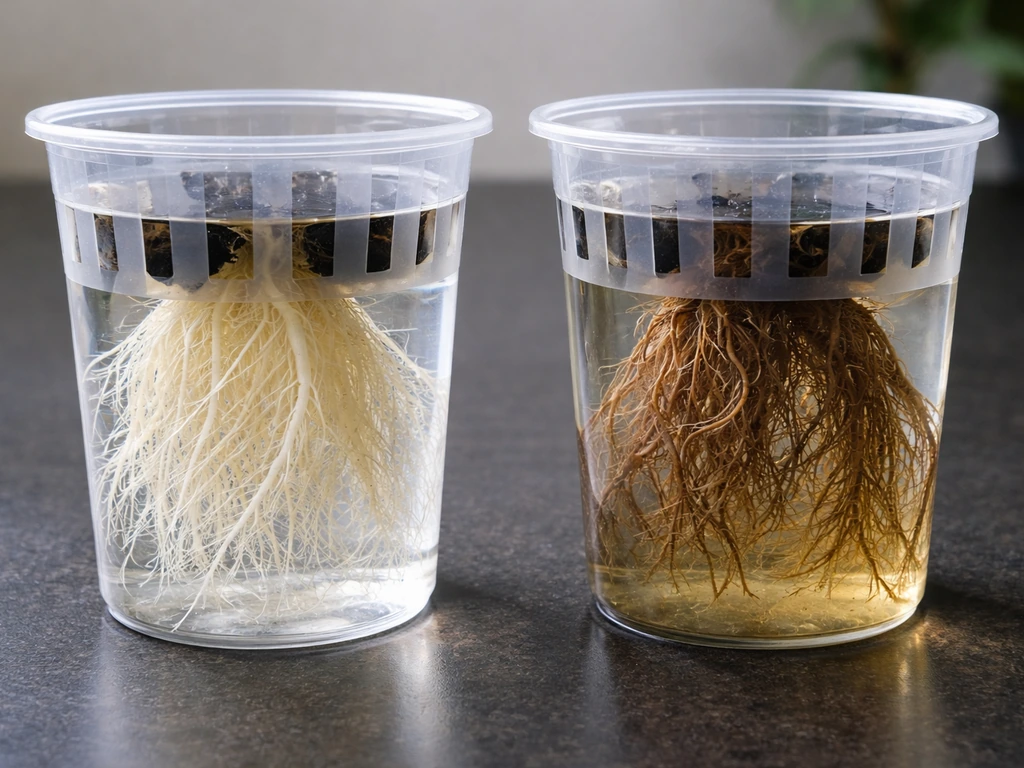
Root Rot (Brown, Slimy Roots)
Healthy hydro roots are white or cream-colored and have a slightly fuzzy texture from root hairs. Brown, slimy, foul-smelling roots mean root rot, usually caused by Pythium or similar water-borne pathogens. The cause is almost always one or more of: water temperature above 75°F, low dissolved oxygen, dirty equipment, or light leaks into the reservoir. Fix it by dropping water temperature immediately, increasing aeration, draining and cleaning the reservoir with a hydrogen peroxide rinse, and treating with a beneficial bacteria product (like Hydroguard/Bacillus amyloliquefaciens). Do not ignore even slightly tan roots. Pythium spreads fast in recirculating systems.
Algae Growth
Green algae on reservoir walls or tubing means light is getting in. Algae competes with plants for oxygen and nutrients and creates a hospitable environment for pathogens. The fix is simple: make your reservoir completely light-proof. Cover all surfaces with black and white poly film or use opaque containers. Wrap any clear tubing in black tape or replace it with opaque tubing. Once algae has established, flush the system and do a full clean.
Pump Stoppage and Clogs
In NFT and ebb and flow systems, a clogged or stopped pump can kill plants within hours during hot conditions. Inspect pumps and lines weekly. Flush lines with clean water during reservoir changes. In NFT, watch for root mass building up in channels in late flower and trim roots if they start blocking flow. Keep a spare pump on hand. In RDWC, check that circulation flow is maintaining 2 to 4 full system volume turnovers per hour.
Nutrient Deficiencies and Toxicities
Yellowing leaves, purple stems, brown leaf edges, and spotting are all signs of nutrient problems. Before assuming a deficiency, check pH first because most apparent deficiencies in hydro are actually lockout caused by pH drift. If pH is correct and you are still seeing symptoms, cross-reference the symptom pattern with a cannabis deficiency chart (yellowing from bottom up is often nitrogen deficiency; interveinal chlorosis often indicates iron or magnesium issues). In hydro, nutrient toxicities from over-feeding show as dark green leaves, claw-like leaf curl, and crispy brown tips. The solution is to flush the reservoir and restart at a lower EC.
Overwatering and Underwatering Effects in Hydro
These terms translate differently in hydro. 'Overwatering' in a DWC context really means insufficient aeration: roots are in water but lack oxygen, so they show the same drooping, yellowing, and wilting you see from overwatered soil plants. Add more air stones and increase your air pump output. 'Underwatering' in ebb and flow means flood cycles are too infrequent or drainage is incomplete, leaving roots without enough nutrient contact time. Adjust your flood timer and check that drain lines are clear.
From Seed or Clone to Harvest: Your Step-by-Step Flow
Here is how a complete DWC grow looks from start to finish. The same general flow applies to other systems with timing adjustments. Upside-down growing uses a similar water and root-oxygen mindset, but you need a setup that keeps nutrients flowing while supporting the plant and preventing root problems water-based systems.
- Germinate seeds in a small rockwool cube or rapid rooter plug, kept moist in a warm (77°F to 82°F / 25°C to 28°C) dark environment until the tap root is 0.5 to 1 inch long (1 to 2 cm). Alternatively, take or purchase rooted clones with 1 to 3 inches of visible roots.
- Prepare your DWC bucket: fill with pH-adjusted water (pH 5.8 to 6.2) and a very dilute nutrient solution (EC 0.4 to 0.8 mS/cm for seedlings). Set air pump and air stones running before transplanting. Check water temperature is 65°F to 72°F.
- Place the seedling plug or clone into the net pot, fill around it with clay pebbles, and set the net pot into the bucket lid. At this stage, lower the water level so it sits about 1 to 2 cm below the bottom of the net pot; air stone splash will keep the media moist and the taproot will reach the solution within a few days.
- Once roots are visibly entering the reservoir (usually days 7 to 14 from transplant), lower the water level to leave a 2 to 4 cm air gap between the water surface and the net pot. This air gap is critical for root oxygenation in DWC.
- Begin the vegetative phase at 18/6 light schedule. Gradually increase EC to 1.0 to 1.6 mS/cm over the first week of veg. Check pH and EC daily or every other day. Top off with plain pH-adjusted water between reservoir changes. Veg typically runs 3 to 8 weeks depending on desired plant size.
- Switch to 12/12 light schedule to trigger flowering (photoperiod strains). Adjust nutrients toward a bloom formula: reduce nitrogen, increase phosphorus and potassium. Raise EC to 1.4 to 2.2 mS/cm depending on plant response. Flowering typically runs 8 to 12 weeks.
- Do full reservoir changes every 7 to 14 days throughout veg and flower. Each change: drain reservoir, clean with dilute H2O2, rinse, refill with fresh nutrient solution, check and adjust pH.
- In the final 1 to 2 weeks before harvest, flush the reservoir with plain pH-adjusted water (EC near 0) to clear residual salt buildup from buds. Some growers run a light clearing solution. Harvest when trichomes are milky white with some amber under magnification and most pistils have darkened.
- After harvest, tear down, clean, and sanitize all system components thoroughly before the next run.
What to Expect on Your First Run
Your first hydro grow will involve more daily checking than subsequent ones. That is normal and actually good: you are learning how your specific system, water source, and strains behave together. Tap water with high starting EC or extreme pH will require more adjustment than reverse osmosis water, which starts nearly neutral. RO water is worth using if your tap water EC is above 0.3 mS/cm before nutrients are added. Most growers find their rhythm by week 3 of veg and have a much smoother second run because they have stopped second-guessing the numbers.
Hydroponic cannabis can finish a full grow cycle faster than soil, with veg and flower together often completing in 10 to 16 weeks depending on strain and training techniques. The control you get over nutrition and the speed of the growth cycle are the main reasons growers move to water-based systems and rarely go back.
FAQ
Can I just use a normal bucket of water to grow weed with water, without pumps and tubing?
You usually cannot. A water-only bucket becomes a low-oxygen, temperature-swing environment quickly, which leads to hypoxia and root rot. Even in the simplest DWC, you need aeration (air stones, properly sized air pump), plus daily pH and EC checks to keep nutrients available.
How do I know my dissolved oxygen is actually high enough in a DWC system?
Don’t rely on air stone bubbles alone. Use a dissolved oxygen meter if possible, or at least verify your reservoir stays in the target temperature range and that your air pump output is sufficient for your water volume. If you see slow growth plus pale roots even when pH and EC look fine, suspect low oxygen first.
What’s the safest way to prevent nutrient salt buildup if I forget to top off between reservoir changes?
Resume top-offs immediately with plain pH-adjusted water, but expect the EC to drift. After you get back on schedule, do one additional EC and pH correction cycle (mix, circulate a few minutes, then recheck). If EC shot up significantly, a partial or full reservoir change may be necessary instead of just topping off.
Should I use reverse osmosis (RO) water or tap water for hydro?
It depends on your tap water baseline EC and pH stability. If your tap EC before nutrients is high (for example above 0.3 mS/cm), starting with RO usually makes it easier to control swings and reduces “mystery” EC. If your tap is low EC, you can often run it, but you still must watch pH drift and adjust daily early in the grow.
Do I need to measure EC in addition to pH?
Yes. pH tells you nutrient availability at the root zone, but EC tells you concentration. If leaves show stress, the fix differs depending on whether the problem is lockout (often pH) or overfeeding (often EC). Also confirm your EC meter scale (500 vs 700) so your target range means the same thing each time.
Can I “fix” root problems by adding more nutrients or stronger nutrients?
No, that often worsens the situation. Root rot and oxygen problems are primarily environment failures, not nutrient underfeeding. In a suspected root issue, prioritize oxygenation, reservoir temperature, light-proofing, and cleaning first, then restart at a lower EC after the reservoir is stabilized.
What are the signs I’m getting light leaks into the reservoir, and how can I confirm?
Green algae on reservoir walls, tubing, or grow room surfaces around the reservoir is the clearest sign. Another clue is worsening root health even when pH and EC are stable. The confirmation step is to inspect all light paths when lights are off and cover or replace any clear materials with opaque alternatives.
How often should I clean tubing and reservoirs in RDWC or recirculating systems?
At minimum, follow your 7 to 14 day reservoir change routine, and do a hydrogen peroxide rinse during each full change as described. For recirculating setups, also inspect and flush return lines when you notice any buildup, odor, or inconsistent flow, since contamination can spread across all connected buckets.
Is it normal for roots to smell unusual in hydro?
Healthy roots are usually mild or neutral with a slightly earthy, clean odor. A foul, rotten, or strong ammonia-like smell is a warning for pathogen activity, commonly associated with root rot. If odor appears along with brown, slimy roots, treat it as urgent, increase oxygen, cool the water, clean the system, and address sanitation immediately.
What should I do if my pump stops during flower in NFT or ebb and flow?
Assume damage can begin within hours in hot conditions. The practical approach is to shut down the grow as safely as possible, restore flow immediately, and then check reservoir temperature and root condition right away. Going forward, keep a spare pump ready and add a backup timer or power protection so the system resumes automatically.
Are there common “mixing order” mistakes that cause nutrient issues in water-based grows?
Yes. A common mistake is mixing multi-part concentrates together before adding them to water, which can cause precipitation and make nutrients unavailable. Another mistake is adding nutrients first and adjusting pH last without mixing and circulating fully, which can lead to misleading pH readings. Always add nutrients to water in the correct sequence, mix between parts, then circulate, then adjust pH and recheck EC.
How should I handle pH drift, especially in the first 1 to 2 weeks?
Expect more drift early because plants and biofilms are stabilizing. Check pH daily during the first weeks until you learn how your water source and system behave. Use small increments for pH Up and pH Down, and avoid large swings, since overshooting can create repeating lockout cycles.
What’s the difference between “overwatering” and “underwatering” symptoms in hydro?
In DWC, what people call overwatering often means insufficient oxygen, so increasing aeration and correcting reservoir temperature usually helps more than “using less.” In ebb and flow, “underwatering” often means flood and drain timing is off or drainage is incomplete, so adjust timers and confirm drain lines are clear and flowing.
Can I grow multiple plants in one water reservoir, and what changes for maintenance?
Yes, but the more plants share one reservoir, the more one problem becomes everyone’s problem (nutrient swings, pH drift, contamination). RDWC spreads risk differently across buckets, but you still need consistent circulation turnover and a stronger sanitation and inspection routine, including more frequent checks for flow and clogs.
When should I expect to see nutrient deficiency or toxicity in hydro, and how fast does it respond?
Hydro responds quickly because there is no soil buffering. If pH is wrong or EC is too high, symptoms can appear sooner than many beginners expect. The practical strategy is to make one change at a time (for example correct pH without changing EC), then reassess after the system has circulated for a while and the roots have had time to adjust.
Next Article
How to Grow 1 Pound Per Plant: Yield Guide for Beginners
Step-by-step plan to grow ~1 lb per plant using strain choice, light, training, feeding, and troubleshooting for beginne