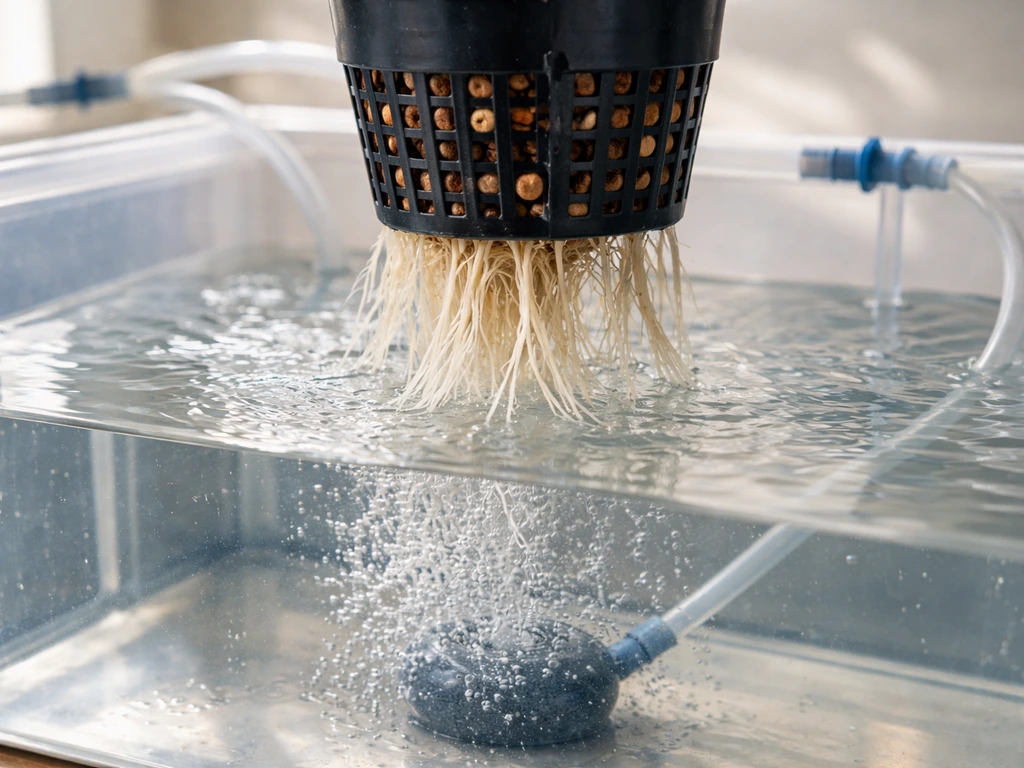
Yes, you can grow cannabis indoors without a grow light or a grow tent, but you need to go in with honest expectations. A bright south-facing window or a sunlit indoor area can carry a plant through its full life cycle, including flowering, if you choose the right strain, manage the environment tightly, and use every light-maximizing trick available. A DWC hydroponics setup can also be used to grow cannabis, but you’ll need to dial in water temperature, oxygenation, and nutrient strength to avoid stressing plants. The yields won't compete with a 600-watt HPS setup, but a well-managed autoflower on a sunny windowsill can realistically produce 0.5 to 1.5 oz of dried bud per plant, which is worth it for plenty of home growers who want a low-cost, low-profile run.
How to Grow Weed Without Lights: Indoor Natural Light Guide

Is this actually feasible, and is it legal where you are?
The feasibility question and the legal question are both worth settling before you spend a dollar. On the feasibility side: cannabis is a sun-hungry plant that evolved outdoors, so natural light from a window is closer to its native environment than you might think. The catch is intensity. Even a bright, unobstructed south-facing window in summer delivers maybe 2,000 to 10,000 lux depending on time of day and cloud cover, while a cannabis plant at peak vegetative growth ideally wants 40,000 to 70,000 lux. That gap is real, and it means slower growth, some stretch, and lighter buds compared to a dedicated grow light. But it doesn't mean the plant fails. With the right strain, good reflectivity, and seasonal timing, a natural-light indoor grow absolutely works.
On the legal side, you need to know your jurisdiction before you start. In the United States, cannabis remains a Schedule I controlled substance under the federal Controlled Substances Act, which means federal law does not permit any home cultivation regardless of state rules. That said, many states have decoupled from federal enforcement and passed their own home-grow provisions. Ohio, for example, allows up to 6 plants per individual at a primary residence, but they must be inside a secured, enclosed space that isn't visible from public areas. Washington D.C. permits up to 6 plants per household with no more than 3 mature flowering plants at one time. Washington State has also published guidance on home cultivation rules with its own plant-count and regulatory conditions. The Washington State Liquor and Cannabis Board (LCB) published a 2026 research brief describing how Washington’s home cultivation rules work, including individual plant limits and regulatory conditions. The specific rules in your state or country may differ significantly, so look them up first, follow them, and keep your grow private and secured. Nothing in this guide is legal advice, and growing legally is the only responsible path.
Indoor setups that work without grow lights or tents
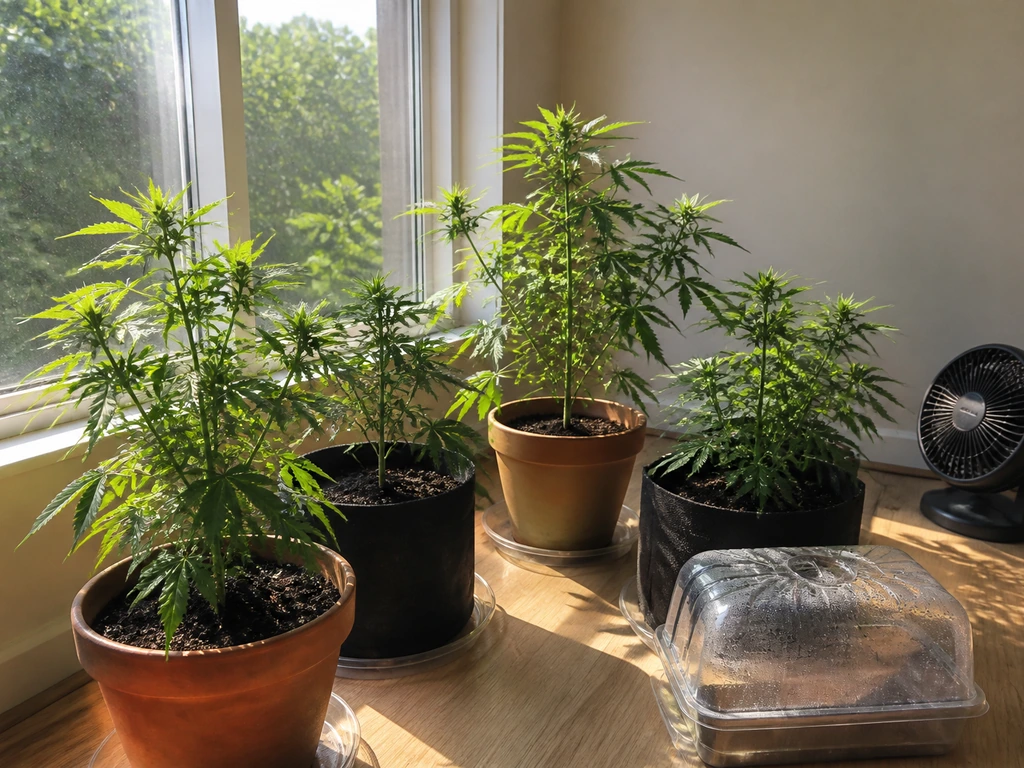
The most workable no-light-fixture setup is a south-facing window with direct sun exposure for at least 6 hours per day during your planned grow period. A large window with no exterior obstruction between roughly 9 a.m. and 3 p.m. gives you the strongest light window of the day. East or west-facing windows can work as a secondary option, but expect noticeably slower growth and more stretch. North-facing windows in the Northern Hemisphere are generally not worth the effort for cannabis.
A sunroom, enclosed porch, or conservatory is actually the best natural-light indoor environment if you have access to one. These spaces gather light from multiple angles, stay warmer than the rest of the house, and still give you the privacy and enclosure that most home-grow laws require. A glassed-in balcony or an indoor atrium with a skylight can function the same way. The goal is maximum direct sun exposure during peak hours while keeping the plant sheltered from outdoor weather, pests, and visibility.
If your only option is a room window rather than a dedicated sunroom, position the plant as close to the glass as possible without touching it, since leaves touching cold glass in winter can cause stress. Rotate the pot a quarter turn every day or two so all sides of the plant receive even light exposure rather than the plant leaning hard toward the light source.
Setting up your grow space: containers, airflow, and smell
Container choice matters more in a no-tent setup because you're working with whatever room conditions exist rather than a controlled microenvironment. Fabric pots in the 3- to 5-gallon range are the best starting point for a windowsill or sunroom autoflower. They allow air pruning of roots, reduce overwatering risk, and drain freely, which matters because lower light intensity means the plant uses water more slowly than it would under a grow light. Overwatering is actually a more common problem in low-light grows than underwatering. Let the top inch of medium dry out before you water again, and always water to runoff.
Airflow is critical in a no-tent grow because you don't have an inline fan and carbon filter handling it automatically. A small USB desk fan or a standard box fan set to low, positioned a few feet from the plant to create gentle leaf movement, does two important things: it strengthens stems (which helps fight stretch) and it reduces the stagnant humid air around leaves that leads to mold. If you want to take things further with a more controlled system, you can also look at how to grow weed aeroponically. Aim for continuous gentle airflow without blasting the plant. If your space has poor air exchange with the rest of the home, crack a window slightly when outdoor temps allow.
Smell control is one of the real challenges when you're not using a carbon filter inside a tent. Cannabis in flower can be intensely aromatic, and in a room with open air circulation to the rest of the house, that smell will travel. Activated carbon odor-absorbing gel containers (not a full filter system, just passive absorbers) placed near the plant help reduce ambient odor. ONA gel or similar products work, though keep them a few feet away from the plant during flowering since some growers report they can subtly affect terpene profiles when placed directly next to buds. For stronger odor control without a full exhaust setup, a small HEPA plus carbon combo air purifier placed in the same room is a practical upgrade that doesn't require tents or ducting.
Full growing workflow from seed or clone to harvest

Choosing the right strain for a no-light setup
Strain selection is arguably the single biggest factor in whether this grow succeeds. Autoflowering strains are strongly recommended for natural-light indoor grows for two reasons. First, they don't depend on a 12/12 light cycle to trigger flowering, so you don't need to worry about light pollution from the room disrupting a photoperiod cycle. Second, they have shorter life cycles (typically 70 to 90 days from seed to harvest), which lets you time the grow to coincide with the sunniest months of the year. Compact autoflower varieties like Northern Lights Auto, Blueberry Auto, or any strain marketed as 'small' or 'compact' are best because they naturally stay shorter, which reduces the stretch problem that plagues low-light grows.
If you want to grow a photoperiod (non-auto) strain, it's doable but requires more management. You'll need to ensure the plant gets uninterrupted darkness for 12 hours per night to trigger and maintain flowering, which means being deliberate about blocking any ambient light from streetlights, hallway lights, or electronics. A thick curtain or a cardboard box placed over the plant at the same time each evening works, but consistency is non-negotiable. One night of light interruption during flowering won't ruin the plant, but repeated disruptions can cause hermaphroditism or reversion to veg.
Germination and seedling stage (days 1 to 14)
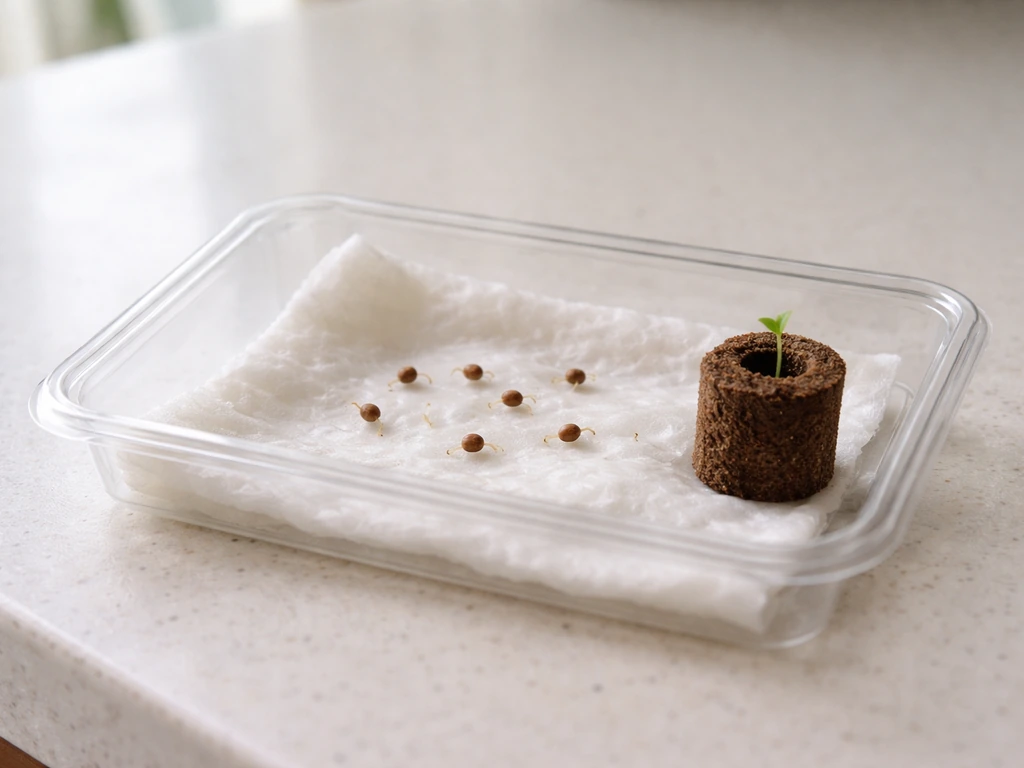
Germinate seeds using the paper towel method or directly in a small starter plug, then transplant to your final container once the taproot is visible (about 1 to 2 cm). Seedlings are light-sensitive but don't need intense light yet. A bright windowsill is fine at this stage. Keep temps between 70 and 77 degrees Fahrenheit (21 to 25 Celsius) and humidity around 65 to 70 percent. Seedlings damping off at the base (a fungal problem called damping-off) is common in humid, low-light conditions, so don't mist seedlings and make sure there's always gentle airflow.
Vegetative stage (weeks 2 to 5 for autos, longer for photoperiods)
Once your plant has 3 to 4 nodes, it's in active veg. This is when low-light stretch becomes most noticeable. If the internodal spacing looks long (more than 2 to 3 inches between nodes), the plant is reaching for light. Your first response should be to maximize light exposure by repositioning the plant closer to the window and adding reflective material around it. Low-stress training (LST) is your most important tool here: gently bend the main stem and tie it down horizontally to open up the canopy and encourage lateral branching. This spreads the plant wide and flat rather than tall, which works better in low-light conditions where more of the canopy can access window light simultaneously. Start LST once the stem is flexible, usually around week 3.
Transition and flowering stage (weeks 5 to 10+ for autos)
Autoflowers will begin showing pre-flowers and transitioning to flowering on their own at around weeks 4 to 5. For photoperiod plants, you'll initiate this by switching to a strict 12/12 light-dark schedule. During early flower, stretch continues for another 2 to 3 weeks. Continue LST and tuck any leaves blocking bud sites from window light. Nutrient needs shift here: reduce nitrogen slightly and increase phosphorus and potassium. A basic bloom-phase nutrient like a PK 13/14 booster mixed at half the recommended dose works well for beginners. Bud development in natural light is slower and the buds will be smaller and airier than under a grow light, but they will develop and mature. Watch trichomes (a jeweler's loupe or cheap digital microscope makes this much easier) for harvest timing: mostly cloudy trichomes with some amber means peak potency for most effects.
Harvest, dry, and cure
Harvest workflow is the same regardless of how you lit the grow. Harvest workflow is the same regardless of how you lit the grow, so if you want to try a different orientation like growing weed upside down, follow the same drying and curing targets afterward. Cut branches, remove large fan leaves, and hang upside down to dry in a space with 60 to 65 percent relative humidity and 65 to 70 degrees Fahrenheit with good airflow, targeting a slow dry of 7 to 14 days. Rushing the dry causes harsh smoke. Once stems snap rather than bend, jar the buds loosely and burp the jars twice daily for the first two weeks. A 4- to 8-week cure dramatically improves flavor and smoothness.
Environment targets and how to fix common problems
| Stage | Temp (°F) | Humidity (%RH) | Common Problem | Fix |
|---|---|---|---|---|
| Seedling | 70–77 | 65–70 | Damping-off at base | Better airflow, less surface moisture |
| Vegetative | 70–82 | 50–65 | Excessive stretch | LST, maximize window light, add reflectors |
| Early flower | 68–78 | 45–55 | Slowed bud development | Maximize sun hours, check nutrient pH |
| Late flower | 65–75 | 40–50 | Bud mold (botrytis) | Reduce humidity, improve airflow immediately |
| Drying | 65–70 | 60–65 | Mold during dry | Slow dry with consistent airflow, no sealing |
The most common problem in a no-grow-light indoor run is stretch during veg and early flower. Plants getting fewer than 6 direct sun hours per day can develop internodal spacing of 4 to 6 inches or more, creating tall, weak, spindly plants that are hard to support and produce loose buds. LST is the main defense. If stretch is extreme, you can also try super-cropping: firmly pinching a section of stem between your fingers and bending it to a 90-degree angle. The internal tissue breaks slightly and the stem heals thicker at that point, keeping the plant lower and strengthening the structure.
Bud mold (botrytis, or gray mold) is the other major risk, and it's higher in no-tent setups because you have less control over ambient humidity. Late-flowering buds in a room that hits 60 percent RH or above are at real risk. Keep a small hygrometer next to your plant so you actually know what's happening. If humidity climbs, run a dehumidifier, increase fan airflow, or move the plant to a drier part of the house during lights-out hours. Check inside dense bud clusters every few days in late flower. If you see gray-brown fuzz inside a bud, cut it out immediately, well below the affected tissue, and dispose of it away from the plant.
Nutrient uptake issues are also more common in low-light grows because the plant's metabolic rate is slower. If you want to push beyond a simple windowsill setup, you can also adapt deep water culture hydroponics to keep roots consistently oxygenated. This means it uses nutrients more slowly, and overfeeding is a real risk. Start nutrients at half the recommended dose and only increase if you see deficiency symptoms (yellowing lower leaves late in veg is normal nitrogen mobilization, not a problem). Keep root-zone pH between 6.0 and 7.0 for soil, or 5.5 and 6.5 for a coco or hydroponic medium. pH drift is one of the most common reasons plants show nutrient problems that aren't actually nutrient deficiencies.
Light-adjacent strategies that make a real difference
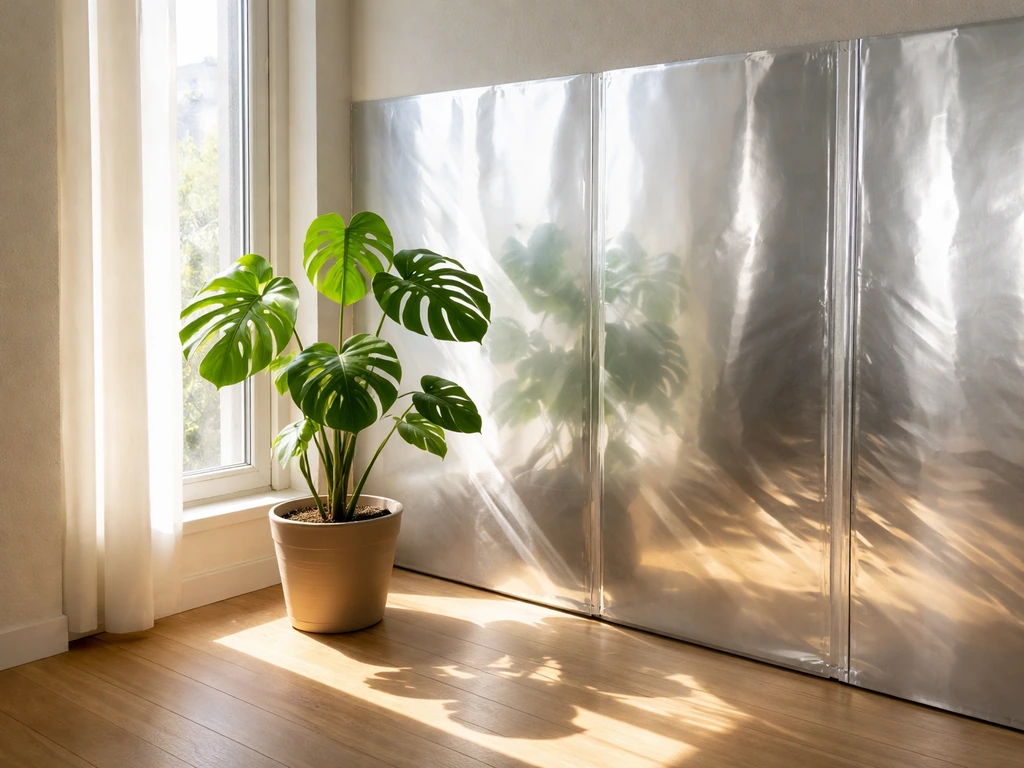
You don't need a grow light to improve the light your plant receives. Reflective material is one of the most underrated tools in a natural-light grow. Lining the walls around your plant with Mylar emergency blankets, or even plain white foam board, bounces ambient light back toward the plant from angles that the window alone can't cover. White walls are already partially reflective, but flat white paint or foam board reflects around 85 to 90 percent of light versus a typical off-white wall at closer to 70 to 75 percent. Creating a three-sided reflective enclosure open toward the window can meaningfully increase the effective light your plant receives without adding any electrical load.
Seasonal timing is your other major lever. If you're starting a grow in July, you're at or near peak sun hours in the Northern Hemisphere. An autoflower started now will spend its vegetative phase during summer and move into flowering in late August and September as days shorten, which aligns perfectly with natural light cycles. Starting a grow in November with a south-facing window in a northern climate means you're fighting weak winter sun angles and short days. If you have to grow in winter, an autoflower is still your best bet since it doesn't need the darkness cue, but expect 20 to 30 percent slower development and lighter yields than a summer run. If you are thinking bigger than windows, look into specialized methods for how to grow weed underwater, including the right light, filtration, and water conditions.
The question of supplemental light often comes up here, and it's worth addressing directly. A single low-watt LED desk lamp (6 to 10 watts) positioned to supplement your window light during morning or evening hours is technically adding artificial light, but it's a far cry from a dedicated grow-light setup. If your goal is specifically to avoid grow lights entirely, skip it. But if you're open to a very minimal supplement just to extend your effective light window by an hour or two on cloudy days, a basic full-spectrum LED bulb in an adjustable desk lamp is a practical bridge. This is different from running a full grow-light cycle, and it keeps the spirit of a low-cost, low-complexity setup intact.
One thing worth noting: growers who want more control over their environment and are open to exploring other growing methods often find that natural-light approaches pair well with soil-based or water-based cultivation techniques. If you mean water-based cultivation, you can also look at hydroponic methods that feed cannabis with a controlled nutrient solution rather than soil water-based cultivation techniques. Low-maintenance growing methods that focus on simplicity share a lot of DNA with the no-light-fixture philosophy.
Planning your first run: what to watch at each stage
Before you start, confirm that home cultivation is legal in your jurisdiction, that your grow space is private and not visible from public areas (as most home-grow laws require), and that you understand the plant-count limits that apply to you. For example, D.C. law places specific plant-count limits for personal cultivation in a principal residence plant-count limits that apply to you. Then pick a start date that puts your vegetative period during the highest-sun-hours months for your location.
- Week 1 to 2: Germinate and place seedling on your brightest windowsill. Confirm temps stay above 68°F at night. Set up your small fan for gentle airflow from day one.
- Week 2 to 4: Watch internodal spacing. If nodes are more than 2 inches apart by week 3, begin LST immediately and set up reflective material around the plant.
- Week 4 to 5: For autos, watch for first pistils (white hairs) signaling pre-flower. For photoperiods, begin 12/12 darkness management at a consistent time nightly.
- Week 5 to 7: Early flower stretch. Continue LST, tuck fan leaves blocking bud sites, and transition to bloom nutrients at half-dose. Check humidity daily.
- Week 7 to 10: Bud development. Drop humidity toward 40 to 45 percent if possible. Inspect bud sites for mold every 2 to 3 days. Stop all nutrients 10 to 14 days before expected harvest and flush with plain pH-adjusted water.
- Week 10 to 12 (autos) or week 8 to 10 of flower (photoperiods): Check trichomes with a loupe. Harvest when mostly cloudy with 10 to 20 percent amber for balanced effects. Cut, trim, and hang to dry in controlled conditions.
The honest reality of a first no-light run is that you'll probably make mistakes, and that's fine. I've had plants stretch badly because I underestimated how weak February window light was, and I've had buds with early mold because I didn't check humidity closely enough in a room that felt dry but wasn't. Each run teaches you something specific about your space. Keep a simple grow journal, even just notes on your phone, and record what you observe at each stage. By your second run in the same space, you'll already know the problems to anticipate and the fixes to have ready before they become serious.
FAQ
Can I grow photoperiod cannabis without lights if I use a window?
No, not for a photoperiod strain. Cannabis needs uninterrupted darkness to trigger and maintain flowering, so you would have to fully block any streetlights, hallway LEDs, and even small electronics glow every night. Autoflowers are the safer choice because they do not rely on a 12/12 schedule.
What if my window is bright but not sunny for 6 hours a day?
Aim for direct sun, not just bright ambient light. If you cannot get at least 6 hours of direct sun during your planned growth period, expect more stretch, smaller buds, and a higher chance of mold in late flower. Before planting, test the spot by tracking the sun path for several days.
How often should I rotate the plant in a no-light-fixture setup?
Rotate the pot more often in low-light grows, especially during early veg when the plant is still establishing symmetry. A quarter turn every day or two can help, but if growth still leans hard toward the glass, reposition closer and add reflective material on the dark sides.
Is a small desk lamp acceptable if I want “no grow lights”?
Yes, but keep it minimal and controlled. If you use a desk lamp, use it only to extend light during natural sunrise or after, and avoid turning it on during your intended darkness window (especially for photoperiod plants). Treat it like an hour or two of help on cloudy days, not a replacement for a grow-light schedule.
Will I need to water more or less when growing without grow lights?
Not necessarily. In low-light conditions, plants drink more slowly, so overwatering is a bigger risk than underwatering. Let the top inch dry, use containers with good drainage, and make sure you are not leaving runoff standing in a saucer.
How do I prevent bud mold if humidity is hard to control?
More than most beginners expect. Use a hygrometer you can read at plant height, and watch humidity especially after lights-out and during late flowering, when dense buds trap moisture. If RH routinely approaches or exceeds 60%, plan on running a dehumidifier or increasing airflow.
What is the best time to start LST if my plant is already stretching?
Start LST once the stem is flexible and stop short of snapping it. If your plant stretches early, you can do lighter, earlier bending rather than waiting, because a heavily stretched stem becomes harder to train without stressing the plant.
What should I do if my plant keeps stretching between nodes?
If internodal spacing is getting long, try three quick fixes in order: increase direct sun exposure first, then improve reflectivity around the plant (three-sided reflector toward the window), and finally start or intensify LST. Nutrients will not compensate for missing light.
Will odor absorbers be enough without a carbon filter or tent?
Yes. Passive odor absorbers can help, but they are not a full substitute for a carbon filter with exhaust, especially in tight rooms. For stronger control without ducting, a small HEPA plus carbon air purifier in the same room can noticeably reduce smell spread during flower.
How much lower will my yield likely be compared with a traditional grow light?
Expect smaller, airier buds and slower development compared with a dedicated fixture, even with good window placement. Also expect more variable results year to year because cloud cover and sun angles change, so your best performance usually comes from starting in peak-sun months and using compact autoflowers.
Do I still need to monitor pH and nutrients when using natural light only?
Prepare for nutrient dilution and pH management because metabolism slows in lower light. If you use nutrients, start at half strength, check for deficiency symptoms before increasing, and keep pH in the recommended range for your medium to prevent lockout that looks like deficiency.
Is DWC or another hydroponic method better than soil for no-light grows?
You can, but choose the method based on what you can maintain. Water-based systems can keep roots oxygenated, yet they require tighter control of nutrient strength and water temperature to avoid stress. If you are new, windowsill soil and autoflowers are usually simpler, with fewer moving parts.
If I find gray-brown fuzz in a bud, should I cut it off or discard the whole plant?
Remove affected bud material immediately and dispose of it away from the plant, and improve conditions right after. Increasing airflow and reducing humidity usually works best as a prevention step, but once botrytis fuzz appears, trimming plus stricter environment monitoring is the key.
How do I decide the harvest date when I am growing by window light?
Track your timing with a journal, but do not rely only on calendar weeks. Natural light intensity can shift week to week, so confirm harvest readiness by checking trichomes (cloudy mostly with some amber) rather than harvesting on a fixed date.
Does drying and curing differ when the buds were grown without grow lights?
Treat drying and curing the same as any other harvest, but be extra careful about dry conditions because room airflow can vary. Dry to the point where stems snap, keep RH around 60 to 65% during drying, and avoid rushing because it is the fastest path to harsh smoke.
How to Grow Weed With Water: Hydroponic Step-by-Step
Step-by-step hydroponics for growing weed with water: setup, pH, oxygen, nutrients, light, and troubleshooting to harves