Growing cannabis at home is genuinely one of the most rewarding things you can do as a gardener, and it is far more approachable than most beginners expect. The core process is the same regardless of your setup: start with a seed, get it to germinate, grow the plant through its vegetative stage, trigger flowering, then harvest and dry your buds. From first sprout to cured flower, most home grows take somewhere between 3 and 8 months depending on the strain and method you choose. This guide walks you through every stage in sequence so you can [follow along step by step]. how to grow weed seedlings. how to grow weed from weed
How to Grow Weed: Step-by-Step Seed to Harvest Guide

Marcus Holbrook
24 Mar 2026
Before you start: check your local laws
Home cultivation laws vary enormously by location, and this is the first thing to sort out before you spend a dollar on equipment. In Virginia, adults 21 and over may grow up to four plants per household for personal use. Oregon allows up to four plants per residence. Connecticut permits three mature and three immature plants per adult.
New York has its own regulatory framework through the Office of Cannabis Management. In Canada, Health Canada's personal production rules tie your plant count to a registered medical certificate and set firm possession limits.
In Canada, Health Canada publishes guidance for personal production that explains how to respect applicable limits such as those tied to your registration certificate and maximum plant or possession limits [Health Canada's personal production rules tie your plant count to a registered medical certificate and set firm possession limits. ](https://www. canada. ca/en/health-canada/services/drugs-medication/cannabis/personal-use/growing-cannabis-home-safely.
html). If you are in New Zealand or another country, check your national and local rules carefully because home cultivation remains illegal in many jurisdictions. Growing within your legal limits and storing your plants and harvest in a locked space (especially if children are in the home) is non-negotiable. Everything else in this guide assumes you are growing where it is legal to do so.
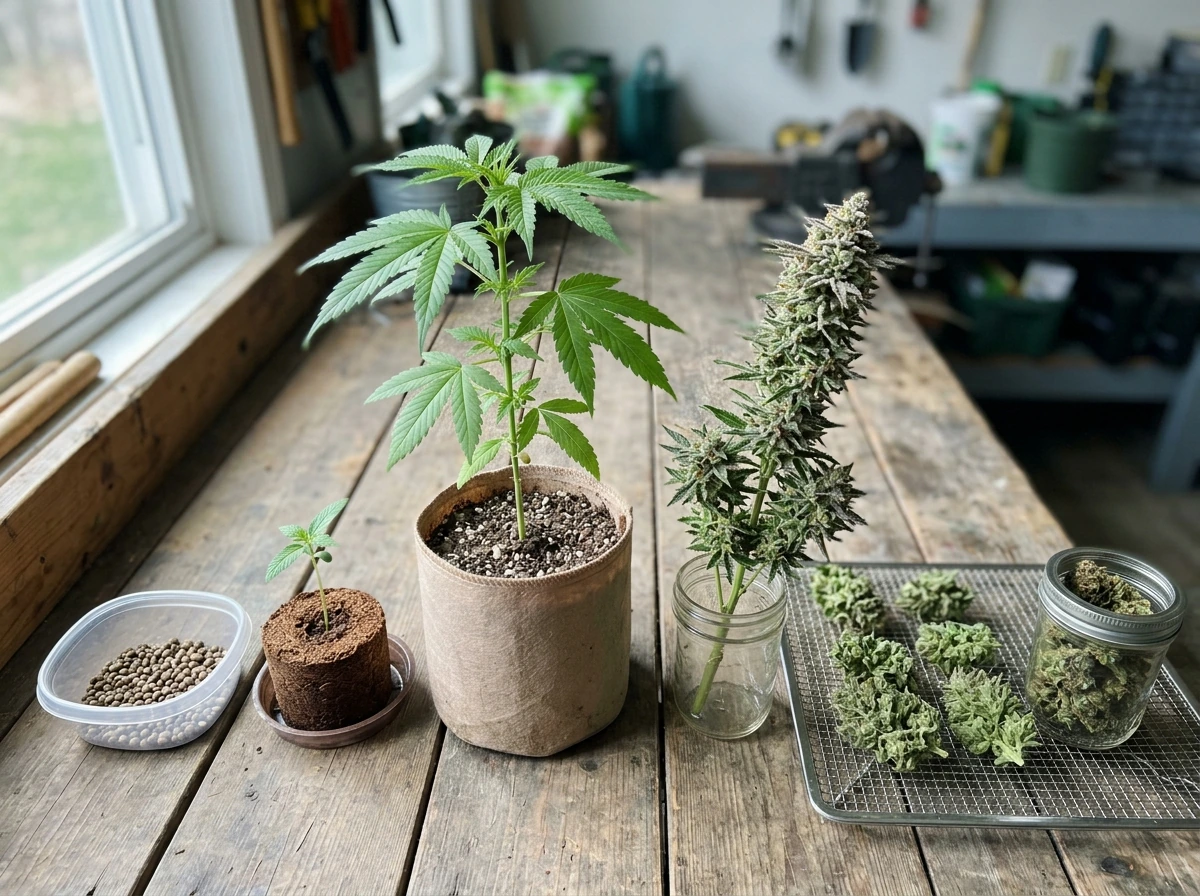
How cannabis grows: the plant lifecycle from seed to harvest
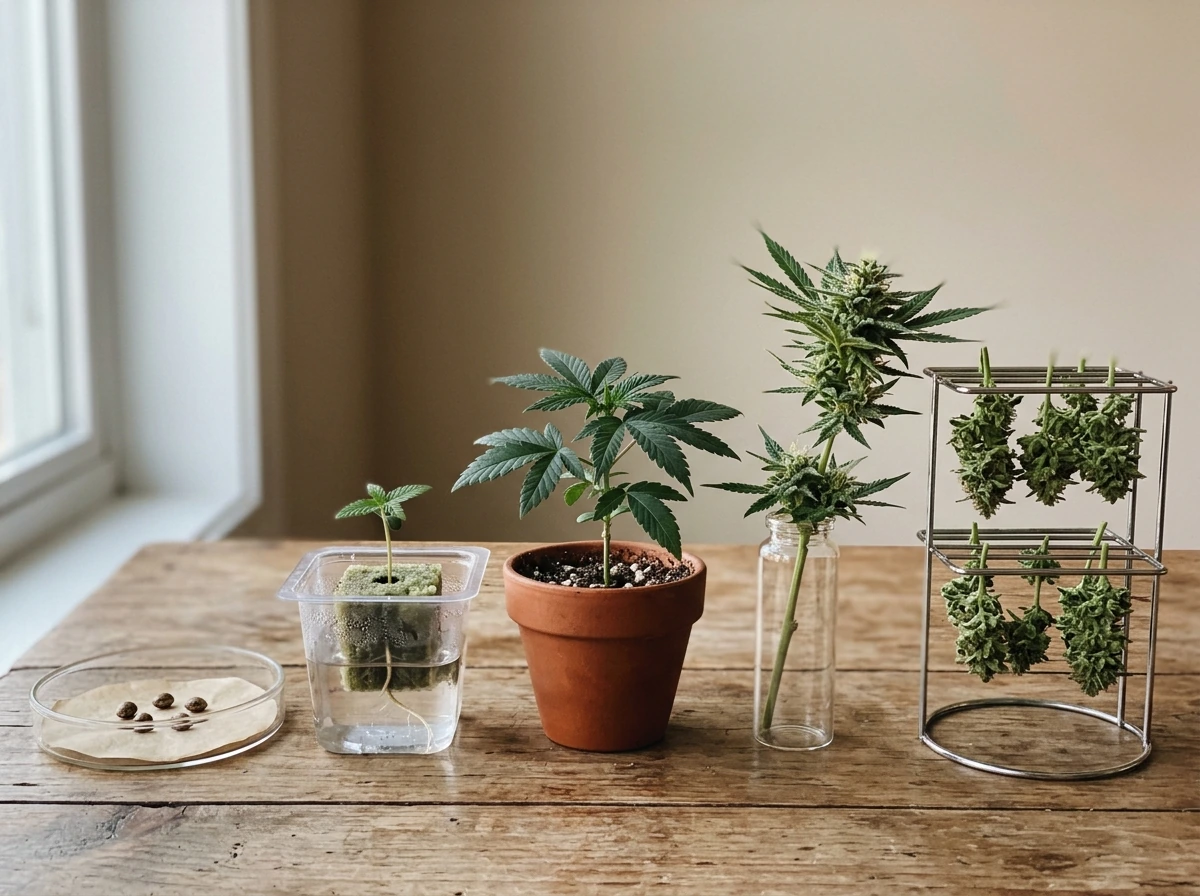
Cannabis is an annual plant, meaning it completes its entire life cycle in one growing season. Understanding the lifecycle helps you make smart decisions at every stage instead of just following instructions blindly. Here is how the stages break down in rough timeframes:
| Stage | Typical Duration | What's Happening |
|---|---|---|
| Germination | 1–7 days | Seed absorbs water, taproot emerges |
| Seedling | 2–3 weeks | First leaves appear, root system establishes |
| Vegetative growth | 4–12 weeks | Rapid stem, leaf, and branch development |
| Flowering | 6–12 weeks | Buds form and mature; trichomes develop |
| Drying and curing | 4–8 weeks | Moisture is drawn out; flavor and potency stabilize |
Cannabis is what botanists call a short-day plant. In nature, it flowers when autumn nights grow long enough to signal the end of the season. Indoors, you control this by adjusting the light schedule. During the vegetative stage you keep lights on for 18 hours and off for 6. When you are ready to trigger flowering, you switch to a 12-hour on, 12-hour off schedule. That uninterrupted dark period is what tells the plant to start producing buds, so it matters that your grow space has no light leaks during dark hours. Autoflowering strains sidestep this entirely by flowering on their own schedule regardless of light cycle, which makes them popular with beginners.
Choose your grow setup: indoor, outdoor, or hydroponic
Your growing environment shapes almost every decision that follows, so it is worth spending real time here. There is no universally best method. Each path has genuine advantages and trade-offs depending on your space, budget, and goals.
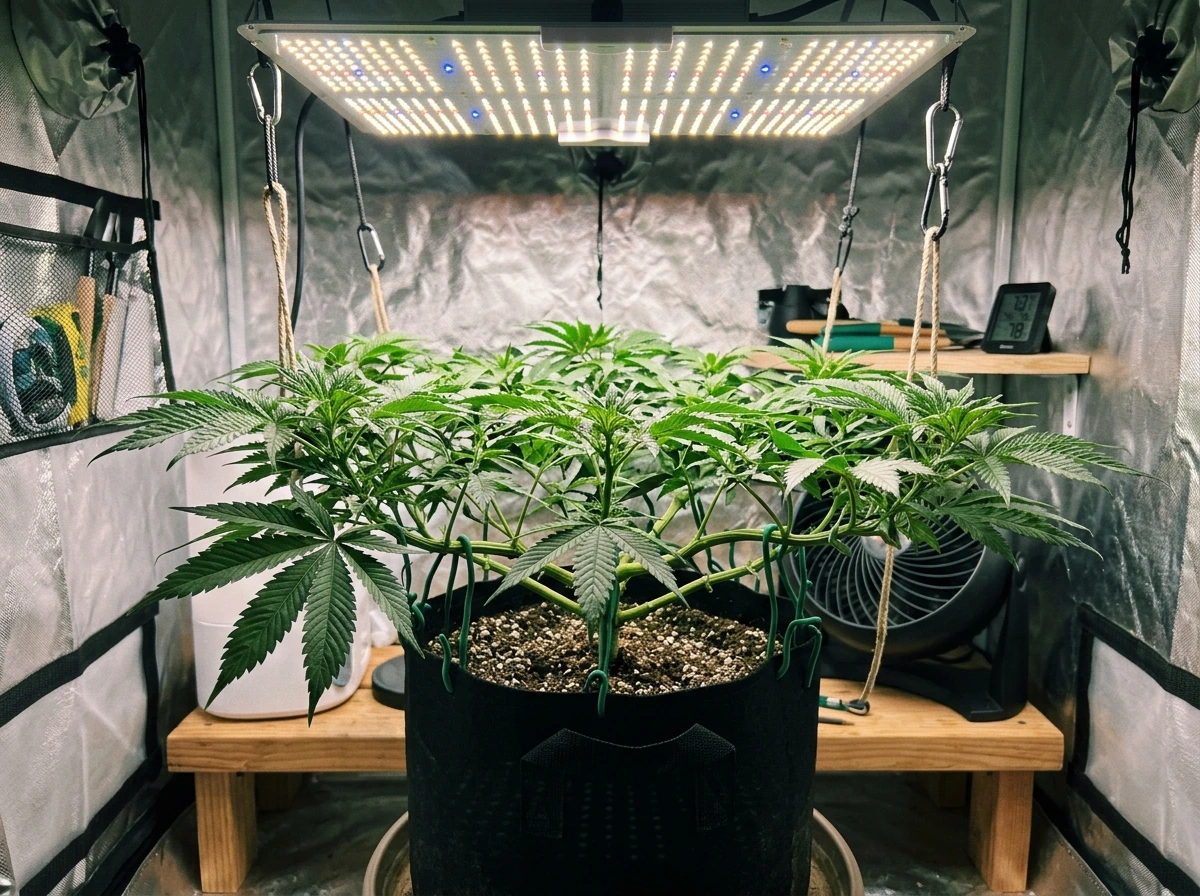
Indoor growing
Growing indoors gives you full control over temperature, humidity, light, and airflow year-round. A basic 2x4 foot grow tent with an LED light, a small inline fan, and a carbon filter is enough to get started with two to four plants. You control the entire environment, which means you can dial in conditions precisely and run multiple harvests per year. The trade-off is upfront cost and ongoing electricity use. LEDs have improved dramatically and are the most beginner-friendly option today because they run cooler and use less power than HPS lights.
Outdoor growing
Outdoor growing uses the sun, which costs nothing and produces plants that can grow very large if given the space. Cannabis planted outdoors in spring will vegetate through summer and flower naturally as days shorten in late summer and autumn. You are dependent on your local climate and season length, and you have less control over pests, humidity swings, and weather events. That said, many home growers produce excellent harvests outdoors with minimal equipment. You need well-draining soil or large containers (20 gallons or more for big plants), good sun exposure (6 or more hours of direct light daily), and some basic pest and disease management.
Hydroponic growing
Hydroponics means growing without soil, delivering nutrients directly to the roots through a water-based solution. Common beginner-friendly systems include deep water culture (DWC), where roots hang in an oxygenated nutrient reservoir, and growing in coco coir, which looks like soil but is actually a pH-neutral fiber medium. Hydro grows tend to be faster and more efficient because roots access nutrients so easily, but they require more precision on pH and nutrient concentration, and a pump or reservoir failure can harm plants quickly. Coco coir is often recommended as a stepping stone because it behaves somewhat like soil but rewards the feeding precision that true hydro demands.
| Factor | Indoor (Soil) | Outdoor (Soil) | Hydroponic (Coco/DWC) |
|---|---|---|---|
| Setup cost | Medium | Low | Medium–High |
| Ongoing control | High | Low | Very High |
| Harvest speed | Moderate | Seasonal | Fastest |
| Beginner difficulty | Easiest | Easy (climate-dependent) | Moderate |
| Electricity needed | Yes | No | Yes |
| Year-round growing | Yes | No | Yes |
My recommendation for most beginners: start with a small indoor soil grow in a tent. You learn the plant's needs in a controlled environment, mistakes are contained, and you can dial in your process before exploring hydroponics or scaling up outdoors.
Strain selection and planning
Strain choice affects your timeline, your space requirements, how difficult the grow will be, and what you end up with at harvest. Broadly, you have three categories to consider.
- Autoflowering strains: flower automatically based on age (usually 8–10 weeks from seed to harvest), stay compact, and tolerate beginner mistakes better. Ideal for first-time growers and small spaces.
- Photoperiod feminized strains: require a light schedule change to flower, can be kept in veg as long as you want for larger yields, but take longer overall (typically 4–7 months seed to harvest).
- Regular (non-feminized) strains: produce both male and female plants, so you need to identify and remove males before they pollinate your females. Not recommended for beginners.
When planning your grow, think about ceiling height (indica-leaning strains stay shorter; sativa-dominant plants can stretch dramatically in flower), total grow time versus your patience and electricity budget, and the reported difficulty of the strain. Many seed banks rate strains by grow difficulty. Start with something rated easy or beginner-friendly. A shorter autoflowering strain in a 2x2 or 2x4 tent is a very forgiving first project. You can find detailed strain-by-strain guidance in our full seed-to-harvest walkthrough.
Germination and seedling stage: step by step
Germination is the moment a seed cracks open and the taproot emerges. It sounds simple, and it is, but a few details make the difference between seeds that pop in two days and seeds that sit dormant or rot.
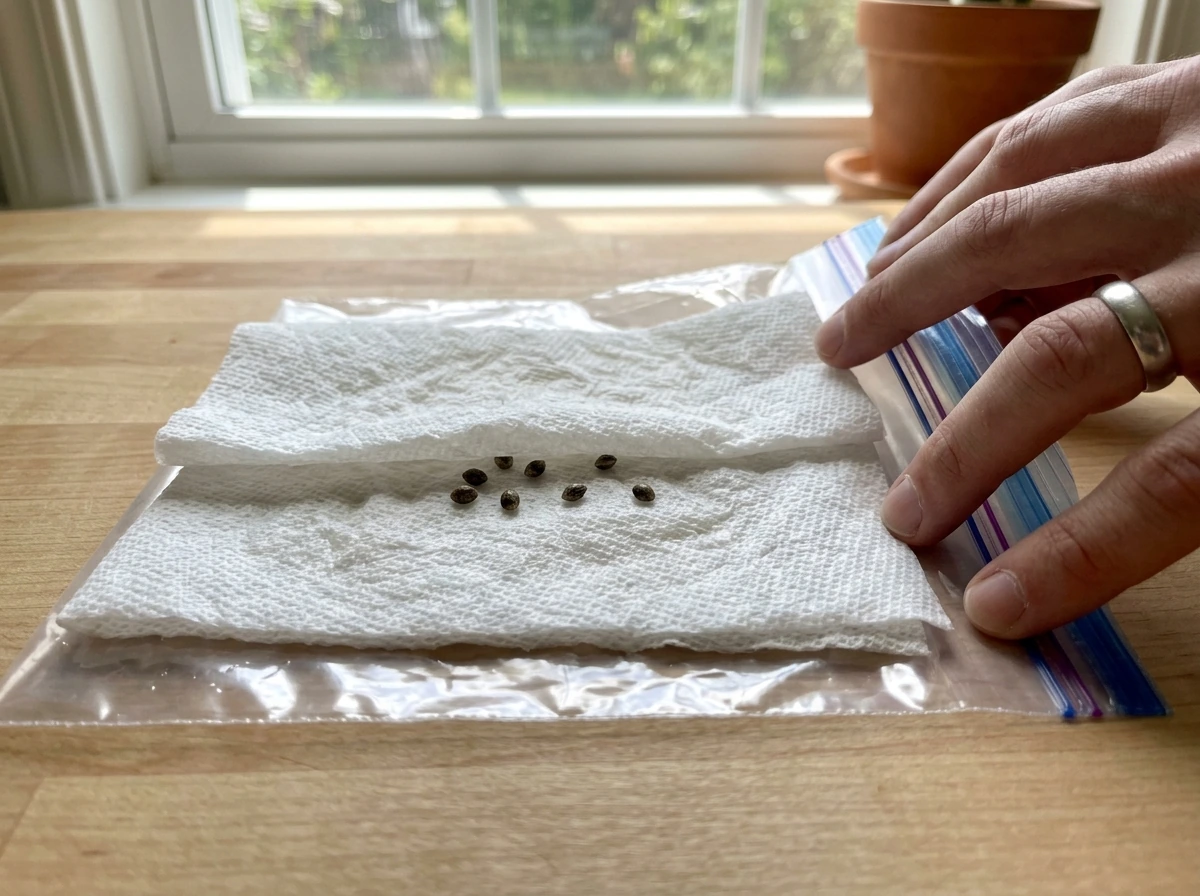
The paper towel method (recommended for beginners)
- Dampen two paper towels until moist but not dripping. Place your seeds between them.
- Slide the towels into a zip-lock bag or place them on a plate and cover with another plate to retain moisture.
- Keep the setup somewhere warm: 70–85°F (20–30°C) is the working range, with 77°F (25°C) being the sweet spot. A seedling heat mat works well here.
- Check every 12–24 hours. Most seeds will show a taproot within 1–5 days.
- Once the taproot reaches about 0.5–1 cm, transfer the seed (taproot pointing down) into a small starter pot filled with moist growing medium, about 0.5 inches deep.
Seedling care (weeks 1–3)
Once the seedling emerges from the soil, it needs gentle light, moderate humidity, and careful watering. Use a humidity dome over the seedling for the first few days to retain moisture around the plant, but remove it as soon as the first set of single-fingered leaves appears. Leaving the dome on too long creates the warm, humid conditions where damping-off (a fungal stem rot that kills seedlings at the base) thrives. I made this mistake on my second grow and lost three seedlings in one afternoon.
The single biggest seedling killer is overwatering. The top of the medium should dry out slightly between waterings. If it is still wet, do not water. Seedlings in small cups or pots need very little water at this stage because their root system is tiny. Signs of overwatering include drooping leaves and, if the problem persists, green algae growing on the soil surface. Watering in small amounts around the edge of the root zone (not drenching the entire container) encourages roots to spread outward in search of moisture.
- Light: 18 hours on, 6 hours off (or 20/4 for autos). Keep LED lights at manufacturer-recommended seedling distance, usually 24–36 inches above canopy.
- Temperature: 70–80°F (21–27°C) in the grow space.
- Humidity: 60–70% RH is ideal for seedlings.
- Watering: small amounts, let the medium surface dry slightly between sessions.
- pH of water/feed: 6.2–6.7 for soil, 5.8–6.2 for coco coir, 5.5–6.2 for hydro.
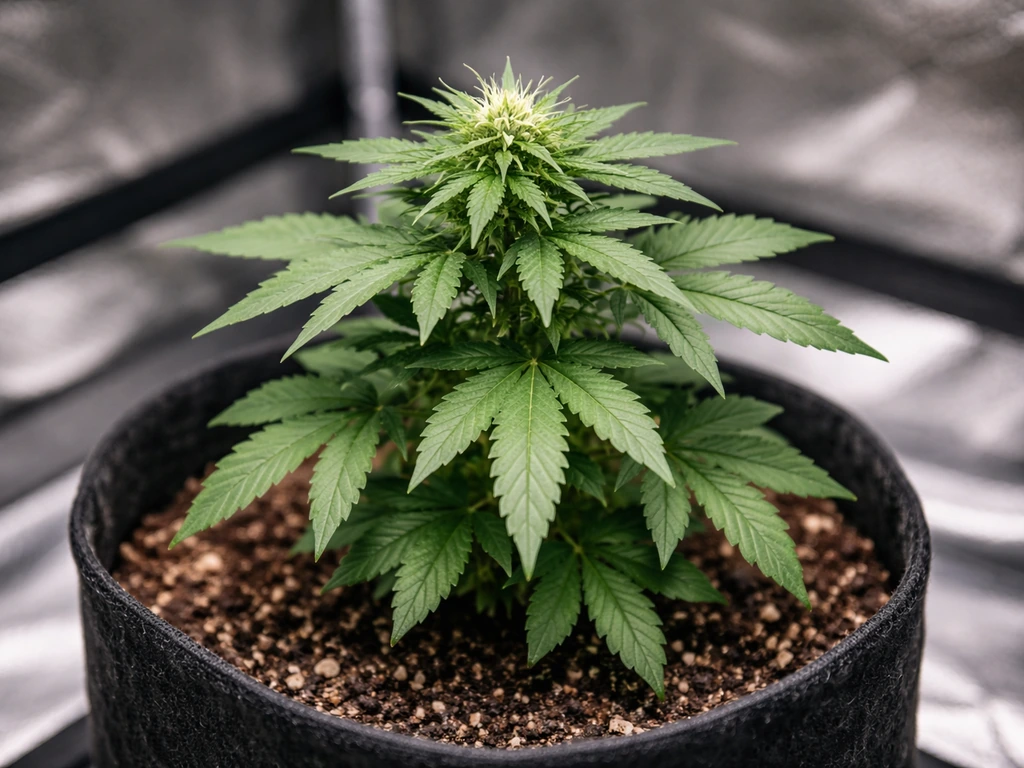
Vegetative stage: training, lighting, nutrients, and targets
Once your plant has developed its first few sets of true leaves (with multiple leaf fingers), it has entered the vegetative stage. This is when growth accelerates. The plant is building the structure that will eventually support your buds, so your job is to give it strong light, the right nutrients, and ideally to shape it so that light reaches as much of the canopy as possible.
Environmental targets for veg
- Light schedule: 18 hours on, 6 hours off for photoperiod strains; same or 20/4 for autos.
- Temperature: 70–85°F (21–29°C) during lights-on; aim for the lower end during lights-off.
- Humidity: 50–70% RH.
- LED height: follow manufacturer specs; a rough starting point is 18–24 inches above canopy for most mid-range LEDs in veg.
- pH: maintain the medium-appropriate range (soil 6.2–6.7, coco 5.8–6.2, hydro 5.5–6.2).
Nutrients in veg
Cannabis in the vegetative stage is hungry for nitrogen, which drives leafy green growth. Most beginner-friendly nutrient lines have a dedicated veg formula. Start at half the recommended dose on the bottle and work up only if the plant shows signs of deficiency (yellowing lower leaves, slow growth). It is much easier to add nutrients than to flush out excess, and most beginners over-feed rather than under-feed. Always pH your nutrient solution after mixing it, not before, because the additions change the pH.
Training techniques
Training shapes the plant to maximize your light and space. Low-stress training (LST) involves gently bending branches outward and tying them down so the canopy spreads horizontally rather than growing as a single tall column. This exposes lower bud sites to direct light and dramatically improves yield without stressing the plant. Topping, where you cut off the main growing tip to create two main colas instead of one, is another popular technique but does stress the plant temporarily. For a first grow, LST alone is enough. Avoid heavy defoliation or high-stress techniques until you understand how your plant responds.
Flowering and harvest: triggering bloom, reading ripeness, and cutting down
Triggering and managing the flowering stage
For photoperiod strains indoors, switch your timer from 18/6 to 12/12 when your plant has reached roughly half the final height you want (plants typically double in size during the first two weeks of flower, known as the stretch). Make absolutely sure your grow space has no light leaks during the 12-hour dark period. Even small amounts of stray light during darkness can disrupt flowering or cause hermaphroditism, where a female plant starts producing pollen sacs. If you are growing outdoors, your plant will transition naturally as days shorten past the 12-hour threshold in late summer.
For autoflowering strains, you do nothing to trigger flowering. The plant will do it on its own at around 3–5 weeks from germination regardless of light schedule. Many growers keep autos on 18/6 or 20/4 throughout their entire life cycle.
During flowering, drop humidity progressively as the buds develop. Aim for 45–55% RH in early flower and pull it down to 40–50% in the final weeks. High humidity during late flower creates the conditions for bud rot (Botrytis), which can wipe out a harvest in days. Keep good airflow moving through the canopy. Nutrients should shift to a lower-nitrogen, higher-phosphorus and potassium formula during flower. Most nutrient lines label these clearly as bloom or flower formulas.
Knowing when to harvest
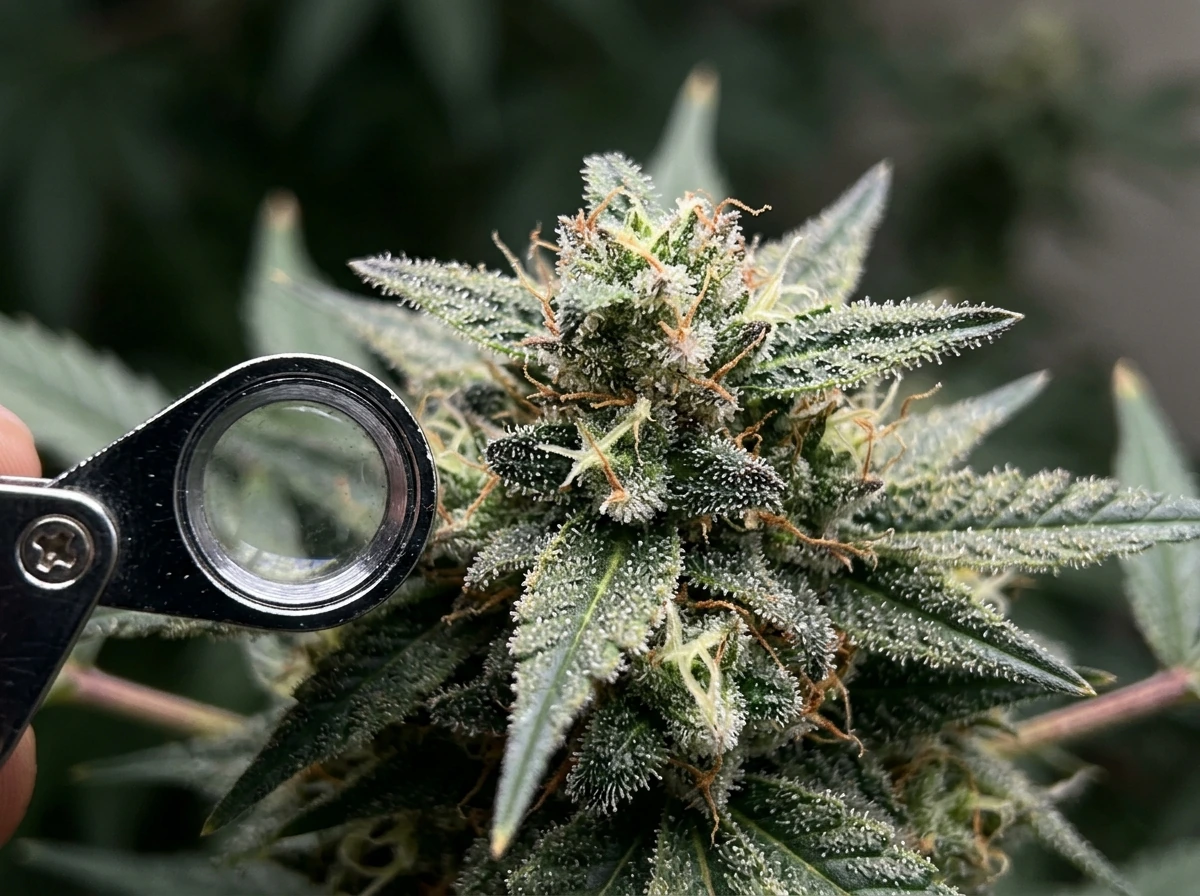
Harvest timing is one of the most important decisions you make as a grower, and the only reliable way to time it is by looking at trichomes under magnification. A 30–60x jeweler's loupe or a digital microscope works well. Trichomes are the tiny crystal-like resin glands that cover your buds and sugar leaves. Here is what to look for:
- Clear trichomes: too early, the plant is still building potency. Do not harvest yet.
- Cloudy or milky white trichomes: peak THC content, effects tend to be more cerebral and energetic.
- Amber trichomes: THC is degrading into CBN, effects become more sedating and body-heavy.
- The sweet spot for most growers: mostly cloudy with 10–20% amber, which balances potency with a well-rounded effect.
Also watch your pistils (the hair-like structures on buds). When 70–90% of pistils have darkened from white to orange or red, you are likely in the harvest window. Use both trichome color and pistil color together. Flowering typically runs 6–10 weeks for most strains, but always let the plant tell you rather than relying purely on the calendar.
Harvesting, drying, and curing
- Flush (optional but common): run plain pH-adjusted water through the medium for the final 1–2 weeks before harvest to clear residual nutrients from the buds.
- Harvest: cut branches or the whole plant at the base. Work in a clean, cool space.
- Trim: remove large fan leaves immediately (wet trim) or after drying (dry trim). Most beginners find wet trimming easier.
- Hang to dry: hang branches upside down in a dark space with good airflow. Target around 60°F (15°C) and 60% RH. Drying typically takes 7–14 days. Buds are ready when small stems snap rather than bend.
- Cure in jars: place dried buds loosely in glass mason jars and store in a cool, dark place. Open the lids for 10–15 minutes daily (called burping) for the first 2 weeks to release moisture and gases. Aim for 55–65% RH inside the jars.
- Curing period: minimum 2 weeks, but 4–8 weeks produces noticeably better flavor, smoothness, and shelf stability.
Troubleshooting, common problems, and responsible next steps
Common problems and how to fix them
| Problem | Likely Cause | Fix |
|---|---|---|
| Drooping leaves | Overwatering or underwatering | Check medium moisture; water only when top inch is dry |
| Yellow lower leaves | Nitrogen deficiency or pH lockout | Check and correct pH first; then adjust nutrients |
| Damping off (seedling collapse) | Excess humidity and moisture at stem base | Remove humidity dome earlier; improve airflow; do not overwater |
| Stretchy seedlings | Lights too far away | Move light closer or increase intensity gradually |
| Bud rot in flower | High humidity and poor airflow | Drop RH below 50%; increase fan circulation; remove affected material immediately |
| Burnt leaf tips | Nutrient burn from overfeeding | Flush medium with plain pH water; reduce feed concentration |
| Hermaphrodite plant (pollen sacs) | Light leaks or stress during flower | Seal all light leaks; remove pollen sacs immediately or quarantine plant |
pH is the thing most beginners overlook
If your plant looks sick and you cannot figure out why, check your pH before anything else. Out-of-range pH locks out nutrients even when they are present in the medium, causing deficiency symptoms that lead beginners to add more nutrients (making the problem worse). Get a decent digital pH meter, calibrate it regularly, and hit these ranges every time you water or feed: soil 6.2–6.7, coco coir 5.8–6.2, hydro 5.5–6.2. I ignored pH on my first grow and spent weeks trying to diagnose a deficiency that was simply lockout caused by water sitting at pH 7.4. Do not repeat that mistake.
Responsible growing practices
Stay within your legal plant count, which varies by jurisdiction as covered at the start of this guide. Store all plants, seeds, and harvested material in locked, child-resistant storage. Be discreet: a carbon filter and inline fan will control odor indoors, but outdoor grows may attract unwanted attention in neighborhoods or jurisdictions where growing remains sensitive. Dispose of plant waste responsibly (do not leave cuttings or trim where others can access them). If you are in a medical growing program under Health Canada or a similar authority, keep your registration documentation current and adhere strictly to the production limits on your certificate.
Where to go from here
This guide gives you the full framework from seed to jar. Once you have completed your first harvest, even a modest one, the next grow will be dramatically better because you will have first-hand experience with how your specific environment behaves. For deeper dives, we have detailed guides covering seedling care in its own dedicated walkthrough, the full seed-to-harvest timeline with week-by-week breakdowns, and specific guidance for growers in different regions including New Zealand. Each grow teaches you something the last one did not. Keep notes, take photos, and do not be discouraged by imperfect results. Most experienced growers will tell you their first harvest was rough, and their fifth was genuinely excellent.
FAQ
Is it safe or legal to start growing, even if I am not sure what the rules are where I live?
If you cannot legally grow, the safest next step is to skip cultivation and focus on understanding the plant only at a high level (lifecycles, light schedules, drying basics) or pursue legal options in your jurisdiction (licensed producers or approved medical pathways). Do not buy equipment or seeds with the assumption that legality will be “figured out later,” since rules often change around plant counts, storage, and where plants may be kept.
How do I know the exact harvest day, and what if my trichomes and pistils disagree?
A common beginner mistake is harvesting too late because the calendar says you should be done. Use trichomes plus pistils, and also consider what you want from the effect, more amber trichomes usually shift toward more sedating results. If you see clear trichomes or very few have matured, wait longer rather than assuming pistils alone are enough.
What should I check first if my plant looks droopy or stressed?
If leaves are drooping after feeding, check for both overwatering and nutrient strength. Drooping can happen from root oxygen problems, not just “too much fertilizer.” Confirm the medium moisture, then measure pH and only adjust nutrients after you verify the water and pH are in range.
How can I avoid misleading pH readings when mixing nutrient solutions?
For pH testing, calibrate your meter before each session if you use it regularly (and at least periodically if you do not), then rinse probes with clean water between tests. Also measure after mixing, because nutrient additions and water temperature can affect readings.
What are real-world causes of light leaks indoors, and how do I detect them?
Light leaks are not only about turning lights fully off. Even small indicators, under-door light, or LED status lights during the dark period can interfere. Use opaque blackout material, block gaps, and confirm by checking the tent interior with your eyes fully dark-adapted or with a phone light turned off.
How do I prevent bud rot if humidity occasionally spikes during late flower?
During late flowering, you should tighten humidity and airflow even if the plant seems healthy. If humidity spikes for a few nights, bud rot can start internally before you see obvious damage. Consider using a thermometer-hygrometer with min/max history so you catch brief spikes you might miss.
How do I decide the right time to switch from veg to flower if I am doing LST or topping?
When switching photoperiods to 12/12, wait until plants are about half the height you want, since they stretch for the first part of flower. If you already topped or LSTed aggressively, the stretch pattern can differ, so do a quick “final-height estimate” by measuring current height, adding expected stretch, then leaving headroom for lights and ventilation clearance.
Can autos handle training or repotting, and what makes them different from photoperiod plants?
Autoflowers are not immune to stress, they simply have less control over timing. If you stunt an auto early, yield and size can drop, and “fixes” like repotting can be risky. Try to germinate into the final container size, or at minimum minimize root disturbance during early growth.
What is the difference between odor control airflow and enough airflow for healthy plants?
Plan for airflow like a safety system. A carbon filter and inline fan help with odor and exchange, but you also need circulation inside the canopy so leaves do not stay stagnant. If you see uneven canopy color or hotspots, reposition fans to keep air moving across lower branches too.
How many plants can I fit in a grow tent without constantly fighting issues?
Most beginners under-plan plant size and end up with overcrowded tents. Before you buy anything, estimate final plant height and width, then assign at least enough space for airflow around each plant and access for maintenance. If your planned canopy will nearly touch the light or fabric walls, consider fewer plants or a smaller starting training plan.
What is the best way to diagnose yellow leaves without overcorrecting?
If you see yellowing lower leaves in veg, that can be nutrient-related, but it can also be natural leaf fade or nitrogen deficiency from a dry medium. Check soil or coco moisture first, then confirm pH, then adjust feed strength gradually rather than jumping straight to higher doses.
Should I check trichomes from one bud only, or multiple parts of the plant?
When you are trying to take trichome samples, take them from multiple bud sites, because maturity can be uneven across the plant. Sample both top colas and lower areas, then use the “most mature majority” as your harvest decision instead of a single branch.
Does the drying and curing process change the final quality that much?
After harvest, curing matters because it smooths harshness and improves consistency. At a minimum, store buds in airtight jars, open them briefly for fresh air for the first phase, and keep humidity in a safe curing range. Do not skip curing and expect the same quality as a properly controlled cure.
What are the most common outdoor mistakes that reduce yield, even when sunlight is good?
For outdoor grows, timing the start matters, even if your plant naturally flowers as days shorten. If you plant too late, you may not get enough vegetative growth before late-season weather turns (and humidity rises). Also scout your local pests and plan simple protections early rather than trying to “cure” infestations late in flower.
Next Article
How Much Weed Can One Seed Grow and How to Maximize It
Realistic yield from one cannabis seed, what limits it, and steps to maximize flower at home from seed to harvest.