Here is the short answer: you can grow cannabis from seed to harvest in roughly 3 to 5 months, depending on your strain and setup. The process breaks down into six stages: germination, seedling, vegetative growth, flowering, harvest, and cure. Every stage has a handful of decisions that either set you up for a great grow or create problems you spend weeks fixing. This guide walks through all of them in order, with real numbers and honest advice, so you can finish with a confident plan for your specific situation.
How to Grow Weed From Seed to Harvest: Complete Guide

Marcus Holbrook
24 Mar 2026
One thing before we start: blank" rel="noopener noreferrer">cannabis cultivation laws vary significantly by location. In Canada, adults may grow up to 4 plants per household under the Cannabis Act. In Colorado, the limit is 6 plants per resident over 21 (with no more than 3 flowering at once), though blank" rel="noopener noreferrer">Denver caps any residence at 12 plants total regardless of how many adults live there. Oregon allows up to 4 plants per residence. As of early 2026, Washington State still prohibits recreational home growing for non-medical use, with a bill under consideration that would change that. Always check your local and municipal rules before you start, because state or provincial law may be just the starting point.
Picking Your Seeds and Setting Up Your Grow
The seed and setup decisions you make before you ever water anything will shape everything that follows. Get these right and the rest of the grow becomes much more manageable.
Choosing the right strain and seed type
There are three seed types worth knowing: regular, feminized, and autoflowering. Regular seeds produce roughly half male and half female plants, which means you will need to sex them and remove males before they pollinate your females. Feminized seeds are bred to produce only female plants (the ones that grow the buds you are after), which removes that step. Autoflowering seeds, usually feminized, flower automatically based on age rather than light cycle, making them faster and much more forgiving for beginners growing outdoors or in non-dedicated spaces. If this is your first grow, start with feminized photoperiod or autoflowering seeds from a reputable seed bank. You will have fewer variables to manage.
Strain choice matters too. Indica-dominant strains tend to stay shorter and finish flowering faster (8 to 9 weeks), which suits small indoor spaces. Sativa-dominant strains stretch taller and can take 10 to 14 weeks to finish, so they need more headroom and patience. Hybrids fall somewhere in between. For beginners, look for strains described as 'easy to grow,' 'resilient,' or 'mold-resistant,' especially if your environment is hard to control.
Indoor, outdoor, or hydroponic: matching setup to your situation
Indoor growing gives you the most control over light, temperature, and humidity, and you can grow year-round. A basic 2x4-foot tent with a quality LED (around 200 to 300 true watts for that space), an inline fan with carbon filter, and a good timer is enough to produce respectable harvests. Outdoor growing relies on natural sunlight, which is free and powerful, but your harvest window is fixed to the season and your plants are exposed to pests and weather.
Hydroponic setups, including deep water culture (DWC) or coco coir systems, can produce faster growth and higher yields but require more attention to pH and nutrient management daily. None of these is the 'best' option in the abstract; the best setup is the one you can consistently maintain.
| Setup | Cost to Start | Control Level | Best For | Main Challenge |
|---|---|---|---|---|
| Indoor tent | Moderate ($300–$800+) | High | Year-round growing, privacy | Electricity cost, ventilation |
| Outdoor | Low ($50–$200) | Low | Large plants, natural light | Season-dependent, pests, weather |
| Hydroponic (DWC/coco) | Moderate–High ($400–$1,000+) | Very High | Fast growth, high yields | Daily monitoring, pH management |
Whichever setup you choose, you need five things: a light source appropriate for the space, airflow to prevent stale humid air, a way to monitor and adjust temperature and humidity, a reliable watering method, and containers or a reservoir sized correctly for your plant count.
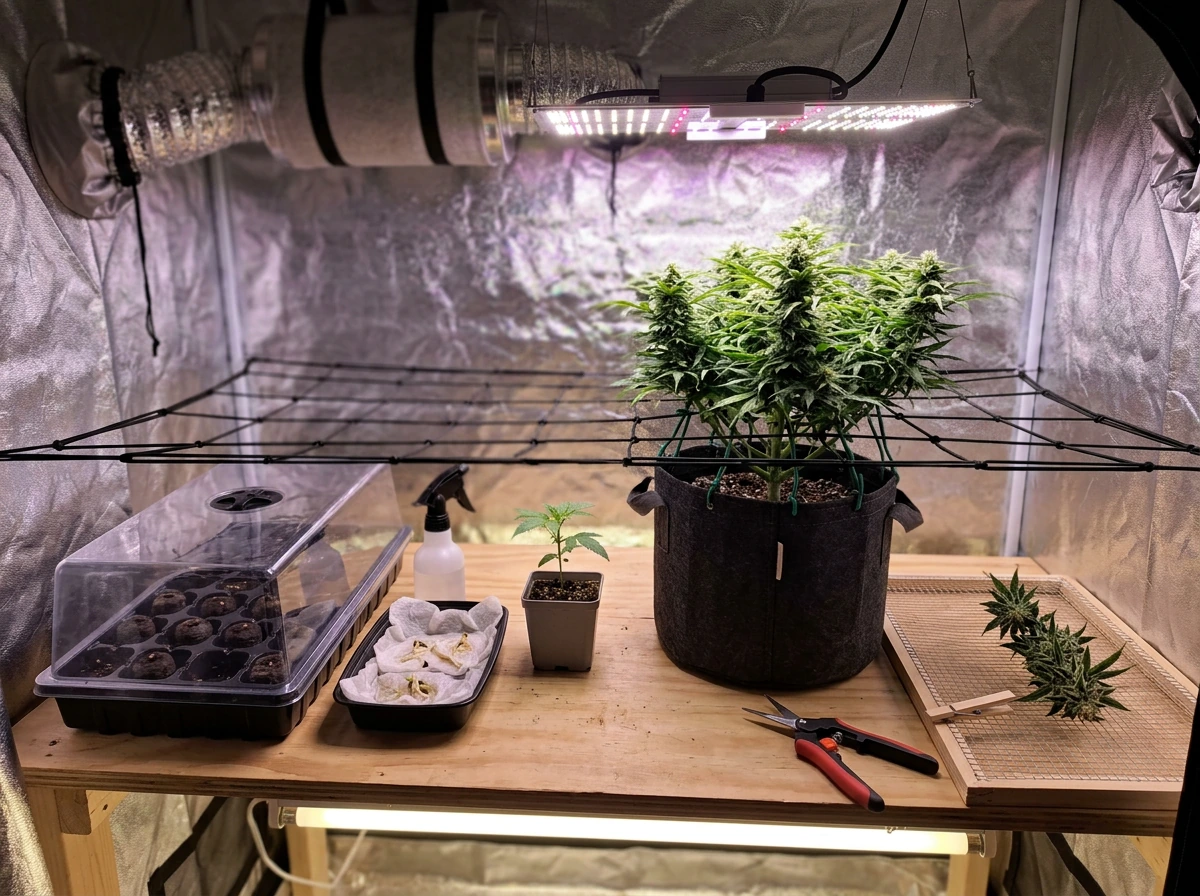
Germination and Getting Your Seedlings Off to a Strong Start
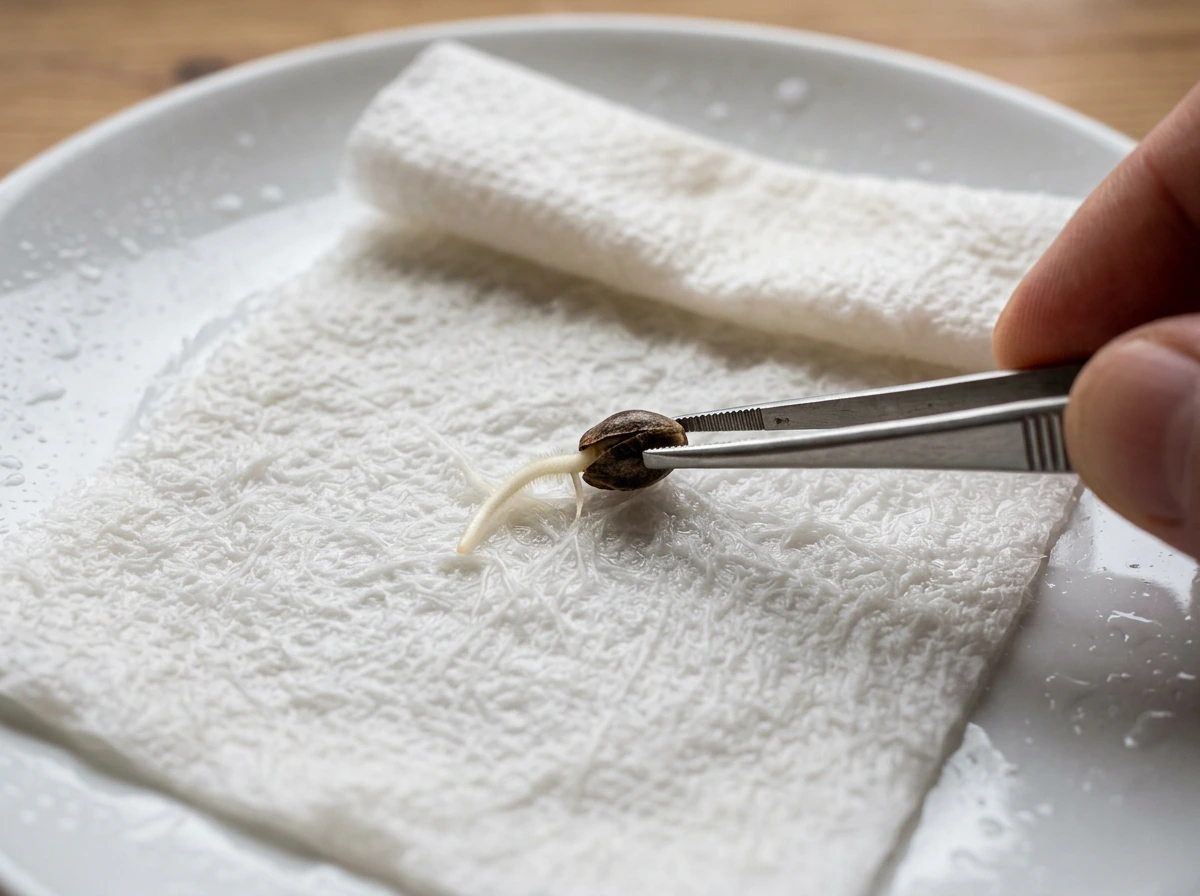
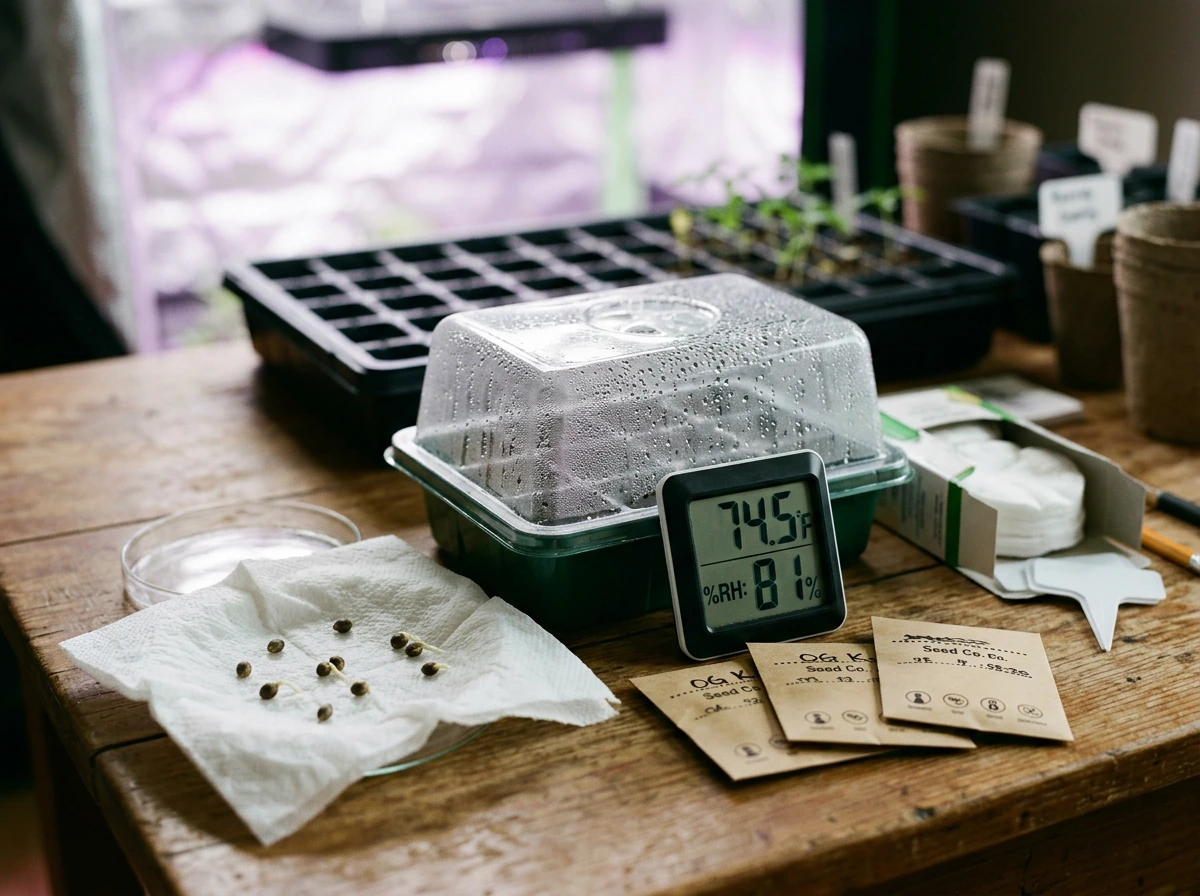
Germination is straightforward. The goal is to get that taproot to emerge and get it into your medium before it dries out or gets damaged. The paper towel method works reliably: dampen two paper towels, place your seeds between them, seal them in a zip-lock bag or on a plate covered by another plate, and keep them somewhere warm, around 70 to 77°F (21 to 25°C). Most viable seeds will crack and show a taproot within 24 to 72 hours. Once the taproot is 0.5 to 1 cm long, it is time to plant. Handle it carefully because that root is fragile.
Plant the seed with the taproot pointing down, about 1 cm deep, in a small starter container (a Solo cup or 4-inch pot works well). Use a light, airy medium like a seed-starting mix or lightly amended potting soil. Cover it loosely and keep the top of the medium consistently moist but not soaked. Put a plastic dome or loose plastic wrap over the cup to retain humidity at 70 to 80% relative humidity (RH). Your seedling should break the surface within 2 to 5 days.
The seedling stage: days 1 to 14 approximately
Once the seedling is above soil, it is in the most vulnerable phase. Light intensity should be low to moderate, around 5,000 to 15,000 lux or roughly 200 to 300 PPFD if you are measuring with a PAR meter. Keep your light on an 18-hours-on, 6-hours-off schedule for indoor seedlings. Temperature should sit between 70 and 79°F (21 to 26°C) with lights on. Humidity stays high at 65 to 80% RH during this phase because seedlings absorb moisture through their leaves before their root systems are established.
Water sparingly at this stage. Overwatering is the most common killer of seedlings. The medium should be moist but never waterlogged. A good test: lift the container. If it feels light, it needs water. If it feels heavy, wait. Do not feed nutrients for the first 10 to 14 days; a quality starter mix has enough to support the plant. Once you see 2 to 3 sets of true leaves and the plant looks healthy and vigorous, you can transition to vegetative care.
Vegetative Growth and Training for a Better Yield
The vegetative stage is when your plant builds the structure it will use to support flowers later. Indoor plants typically spend 4 to 8 weeks in veg, though you have control over this. Outdoors, veg is controlled by the natural lengthening days of spring and early summer. During veg, you want to maximize canopy coverage without letting plants outgrow their space.
Light, temperature, and humidity in veg
Indoors, maintain your 18/6 light schedule. Ramp up light intensity gradually: aim for 400 to 600 PPFD early in veg, stepping up to 600 to 900 PPFD by mid-to-late veg. Temperature can be slightly warmer than in seedling stage, around 72 to 82°F (22 to 28°C) with lights on. Drop humidity gradually as the plant grows: 55 to 70% RH is a solid range for veg. Good airflow from an oscillating fan will strengthen stems and prevent the stagnant air conditions that invite mold and fungus gnats.
Training techniques that actually pay off
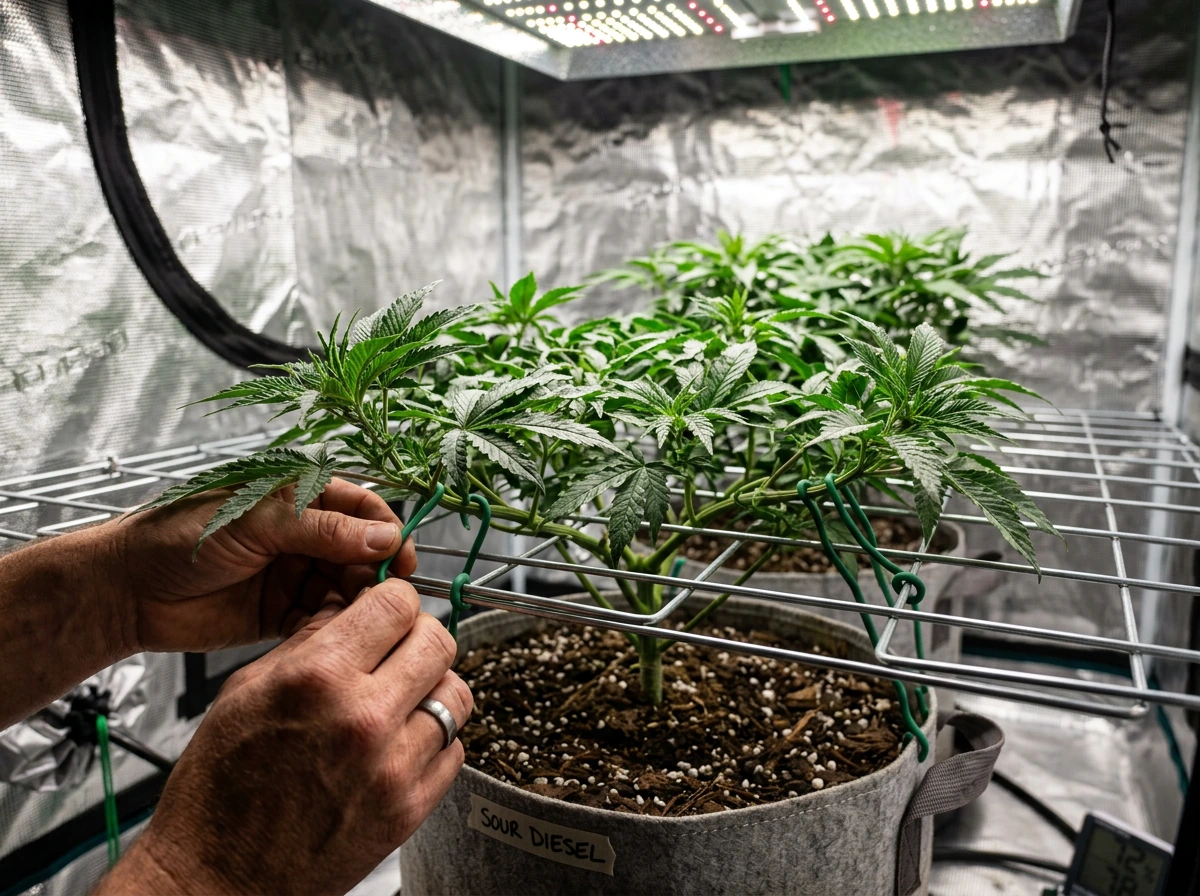
Training your plant during veg significantly improves your harvest without adding cost. The two easiest techniques for beginners are low-stress training (LST) and topping. LST involves gently bending the main stem horizontally and securing it with soft ties, encouraging the plant to grow a flat, wide canopy rather than a single tall cola. This exposes more bud sites to light and keeps height manageable. Topping means cutting the main stem just above a node, which splits the plant into two main colas instead of one. Done once or twice during veg, this creates a bushier plant with more even light distribution.
A screen of green (ScrOG) combines LST with a horizontal screen: you weave branches through the screen as they grow, creating an even canopy. This is one of the most efficient methods for indoor growing under a fixed light. Avoid aggressive defoliation or high-stress techniques like super-cropping until you have a successful grow under your belt. They add risk without a guaranteed benefit when you are learning.
Flowering: Light Control, Photoperiod, and Sex Management
Flowering is triggered by a shift in the light cycle for photoperiod strains. Indoors, you initiate it by switching your timer to 12 hours of light and 12 hours of uninterrupted darkness. Outdoors, this happens naturally as days shorten in late summer. Autoflowering strains skip this entirely and just start flowering on their own after about 3 to 5 weeks from germination, which is one major reason beginners love them.
Identifying and managing plant sex
If you are growing regular (non-feminized) seeds, you need to identify plant sex and remove males before they pollinate your females. Males show small, round pollen sacs clustered at nodes, usually appearing within 1 to 2 weeks of the 12/12 flip. Females show white, hair-like pistils emerging from a small calyx structure at the nodes. One male plant can ruin an entire crop by seeding your females, so if you spot a male, remove it from the grow space immediately and do not shake it around on the way out. Feminized seeds make this a non-issue for most home growers, which is why I recommend them to beginners.
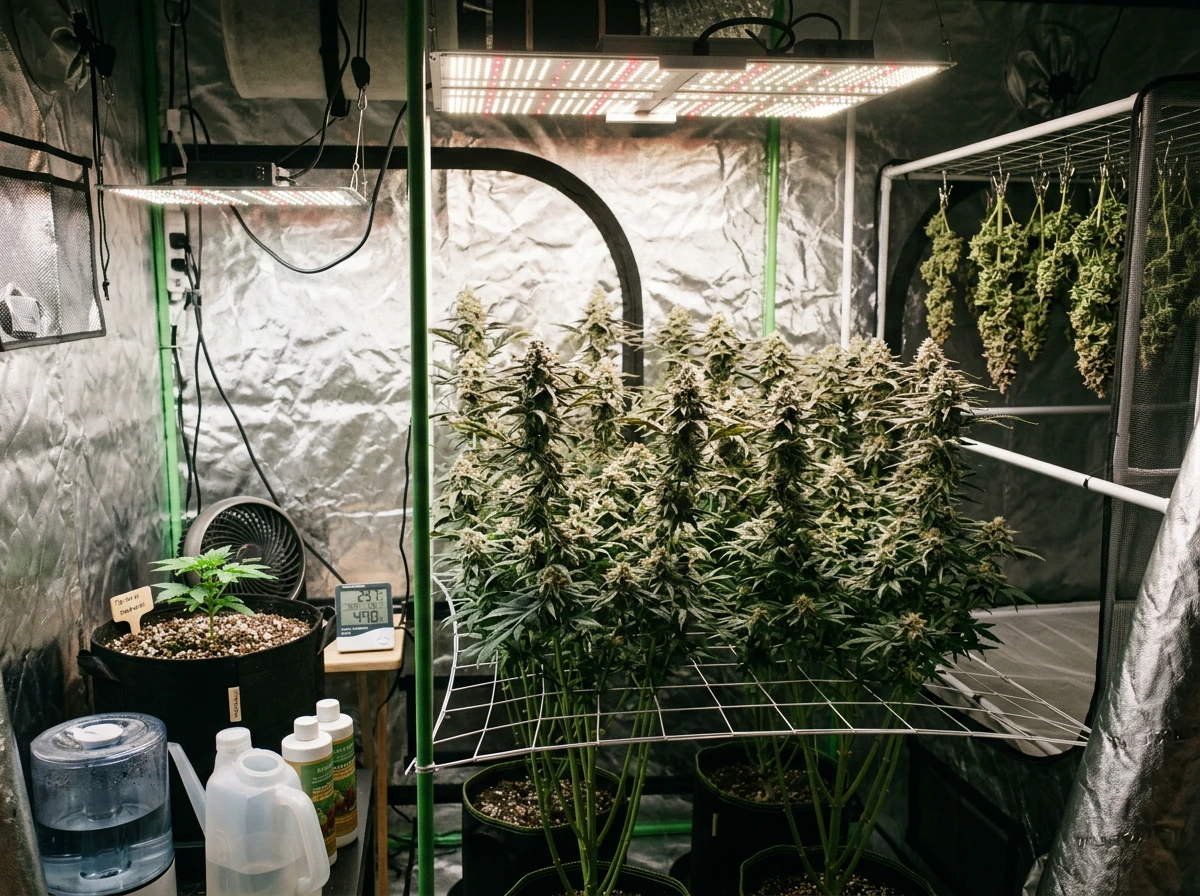
What to expect during flowering
The first two weeks of flowering (called the pre-flower or stretch phase) often see the plant double or even triple in height. Plan for this, especially indoors. After that rapid stretch, bud sites begin to form and develop through weeks 3 to 6, and the flowers bulk up and mature from weeks 6 through to harvest. Light intensity during flowering should increase to 800 to 1,000+ PPFD. Drop temperature slightly to 68 to 78°F (20 to 26°C) with lights on, and bring humidity down to 40 to 50% RH to reduce mold risk as buds become dense. In late flowering (last 2 weeks), some growers drop RH further to 35 to 45%.
The dark period during 12/12 must be truly dark. Even a small light leak from a crack or a timer indicator light can interrupt flowering and stress the plant, sometimes triggering hermaphroditism (where a plant develops both male and female parts). Seal your tent or room properly and check it with the lights off.
Nutrients, pH, and Watering: Getting the Basics Right for Your Medium
This is the section most beginners overthink, and also where most problems originate. The fundamentals are: the right nutrients in the right amounts, delivered at the right pH, and watered at the right frequency. Your medium (soil, coco, or hydro) shapes all three.
pH: the most important number in your grow
pH controls whether your plant can actually absorb the nutrients in its root zone, regardless of how much you feed it. Get pH wrong and you will see deficiency symptoms even when nutrients are present. Target ranges by medium: soil should be 6.0 to 7.0 (ideal 6.2 to 6.8); coco coir should be 5.5 to 6.5 (ideal 5.8 to 6.2); hydroponic systems should be 5.5 to 6.5 (ideal 5.8 to 6.0). Always measure and adjust the pH of your water or nutrient solution before it hits your plant. A digital pH pen is a must-have tool; drops are too imprecise.
Nutrient protocols by medium
In soil, especially a quality amended potting mix, you often do not need to add nutrients for the first 3 to 4 weeks. The soil has enough. After that, introduce a balanced veg formula with a higher nitrogen (N) ratio relative to phosphorus (P) and potassium (K). When you flip to flowering, transition to a bloom-focused formula with lower N and higher P and K. Follow the manufacturer's feeding schedule but start at 50 to 75% of the recommended dose to avoid burning, then work up as needed.
Coco coir is technically an inert medium, so it contains essentially no nutrients of its own. You feed at every watering from early seedling onward, using a coco-specific nutrient line or a standard line with added calcium and magnesium. Coco grows fast and rewards more frequent watering and feeding, often daily once plants are established. Hydroponic setups require a full nutrient solution at all times, managed by measuring EC (electrical conductivity) alongside pH. Target EC ranges from about 0.8 to 1.2 during seedling, stepping up to 1.6 to 2.4 during peak veg and flowering.
Watering frequency and technique
The single most reliable watering guide for soil and coco: water thoroughly until 10 to 20% runoff comes out the bottom of the pot, then wait until the top inch of the medium is dry and the pot feels noticeably lighter before watering again. This wet-dry cycle encourages roots to grow in search of water. The mistake most beginners make is watering on a fixed schedule regardless of how the medium actually feels. Young plants in large containers are especially prone to overwatering. In hydro, your roots are in the solution constantly, so the concern is keeping your reservoir clean, oxygenated, and at the right temperature (around 65 to 70°F or 18 to 21°C to prevent root rot).
Environmental Optimization and Troubleshooting Problems Before They Get Serious
Most grow problems are environmental before they are anything else. A plant under chronic stress from heat, poor airflow, or humidity swings becomes susceptible to almost everything else on this list. Getting your environment dialed in is the best pest and disease prevention you have.
Environmental targets at a glance
| Stage | Temperature (lights on) | Humidity (RH) | Light (PPFD) | Light Schedule |
|---|---|---|---|---|
| Seedling | 70–79°F (21–26°C) | 65–80% | 200–300 | 18/6 |
| Vegetative | 72–82°F (22–28°C) | 55–70% | 400–900 | 18/6 |
| Early Flower | 70–79°F (21–26°C) | 45–55% | 800–1,000+ | 12/12 |
| Late Flower | 65–77°F (18–25°C) | 35–50% | 800–1,000+ | 12/12 |
Airflow is non-negotiable. You need a gentle oscillating fan moving air across your canopy and a properly sized inline fan exhausting air and pulling fresh CO2-rich air in. As a rough rule, your inline fan should exchange the full volume of air in your tent every 1 to 3 minutes. A 4x4 tent (roughly 128 cubic feet) needs at minimum a 4-inch inline fan rated at 200 to 300 CFM. If you are in a sealed room and considering CO2 supplementation, that is an advanced topic with meaningful cost, and it only makes a difference once all other environmental factors are already dialed in.
Common problems and what to actually do about them
- Yellowing lower leaves with green upper leaves in veg: usually nitrogen deficiency or pH lockout. Check and correct pH first, then assess your feeding schedule.
- Brown leaf tips or edges: often nutrient burn from feeding too strong. Flush with plain pH-adjusted water and reduce your nutrient dose by 25 to 30%.
- Slow or stunted growth: overwatering is the most common cause. Let the medium dry properly between waterings and check that roots are not root-bound.
- Stretching (tall, spindly stems between nodes): your light is too far away or too weak. Lower it (following manufacturer guidelines for distance) or increase intensity gradually.
- Fungus gnats (tiny flies around soil): the larvae live in wet topsoil and damage roots. Let the top 2 inches of soil dry out between waterings. Yellow sticky traps catch adults. Beneficial nematodes or a hydrogen peroxide drench (1 part 3% H2O2 to 4 parts water) can address larvae.
- Spider mites (tiny dots on leaves, webbing): often arrive when temperature is too high and humidity too low. Neem oil spray or insecticidal soap applied every 3 days for 2 weeks is effective in veg. Avoid spraying anything on buds during flower.
- Powdery mildew (white powdery coating on leaves): a humidity and airflow problem. Remove affected leaves, increase airflow, lower humidity, and treat with a dilute potassium bicarbonate or diluted hydrogen peroxide spray in veg.
- Bud rot or gray mold (brown, mushy interior on dense buds): this is the most serious late-flowering risk. Prevention is the only real answer: keep humidity below 50% during flower, especially at night when temperature drops and RH spikes. Improve airflow through the canopy. Remove any affected buds immediately and check surrounding buds carefully.
Harvesting at the Right Time, Then Drying and Curing Properly
Harvest timing is one of the most misunderstood parts of the grow. Harvest too early and you sacrifice potency, yield, and flavor. Harvest too late and THC degrades to CBN, producing a heavy, sedating effect most people did not sign up for. The right window is specific to your strain and goals.
How to know when your plant is actually ready
Start by using the pistil method as your early warning system. Pistils are the white hairs covering your buds. As the plant approaches maturity, they change from white to orange, red, or brown. When roughly 70 to 80% of pistils have darkened and curled inward, you are getting close. This is a rough guide only.
The most accurate method is checking trichomes with a jeweler's loupe (at least 30x) or a USB digital microscope. Trichomes are the tiny resin glands on the buds and sugar leaves. They start clear, then turn milky or cloudy white, then amber. Mostly cloudy trichomes mean peak THC and a more energetic effect. A mix of cloudy and amber (20 to 30% amber) generally signals peak potency with a slightly more relaxing quality. Mostly amber means THC has largely converted to CBN. Most growers harvest in the cloudy-to-mostly-amber window based on their preference.
Two weeks before your planned harvest date, many growers begin a flush: feeding only plain pH-adjusted water. This is intended to clear excess salts and nutrients from the medium and plant. The scientific evidence on flushing is debated, but it is low-risk and widely practiced. In hydro, a final rinse of the system with clean water serves the same purpose.
How to harvest your plant
- The night before harvest, put your plant in total darkness for 24 to 48 hours. This is thought to push trichome production one final time. Optional, but easy to do.
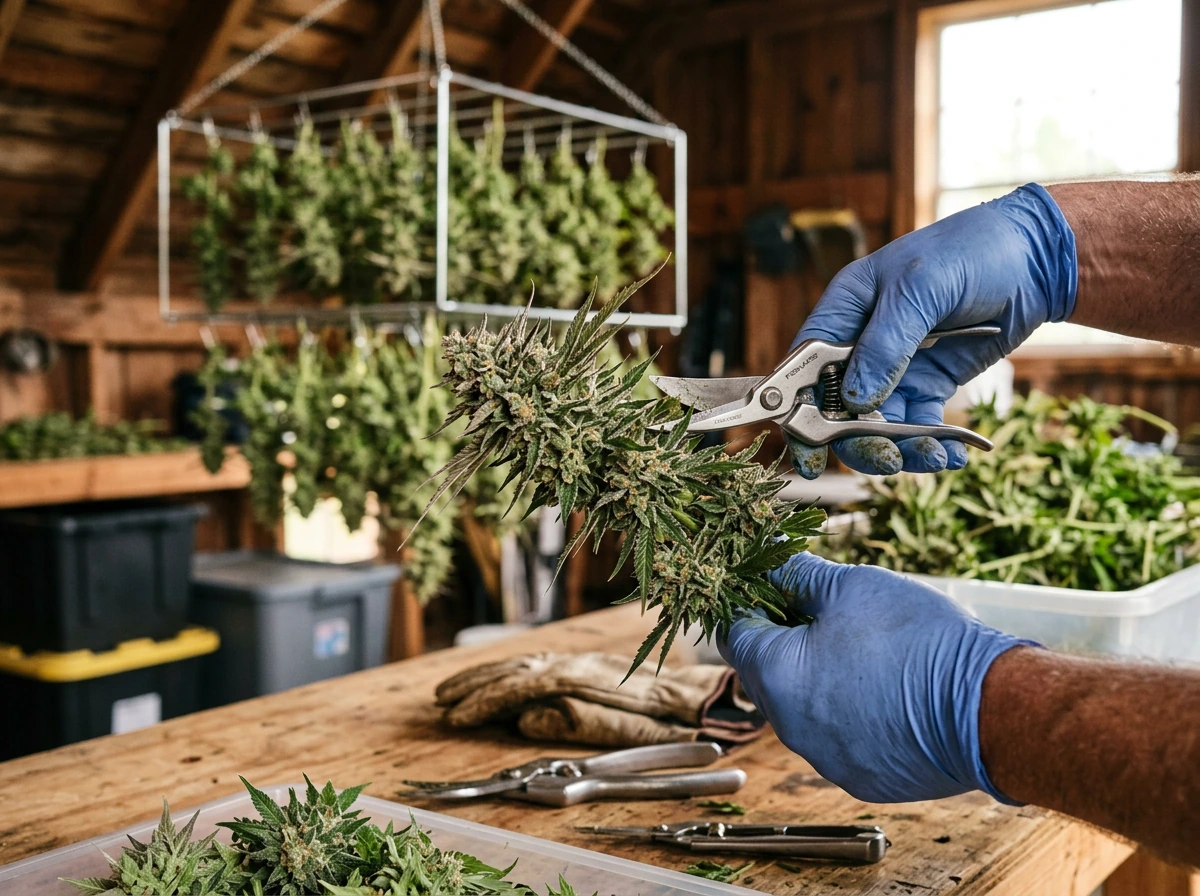
- Cut the main stem at the base. Work in a cool, dim space: heat and light degrade trichomes quickly once cut.
- Trim off large fan leaves first (wet trim), or leave them on and trim after drying (dry trim). Dry trimming is gentler on trichomes and easier to execute, though it takes longer.
- Hang whole branches upside down or lay them on drying racks in a dark, well-ventilated room.
Drying: the foundation of a quality cure
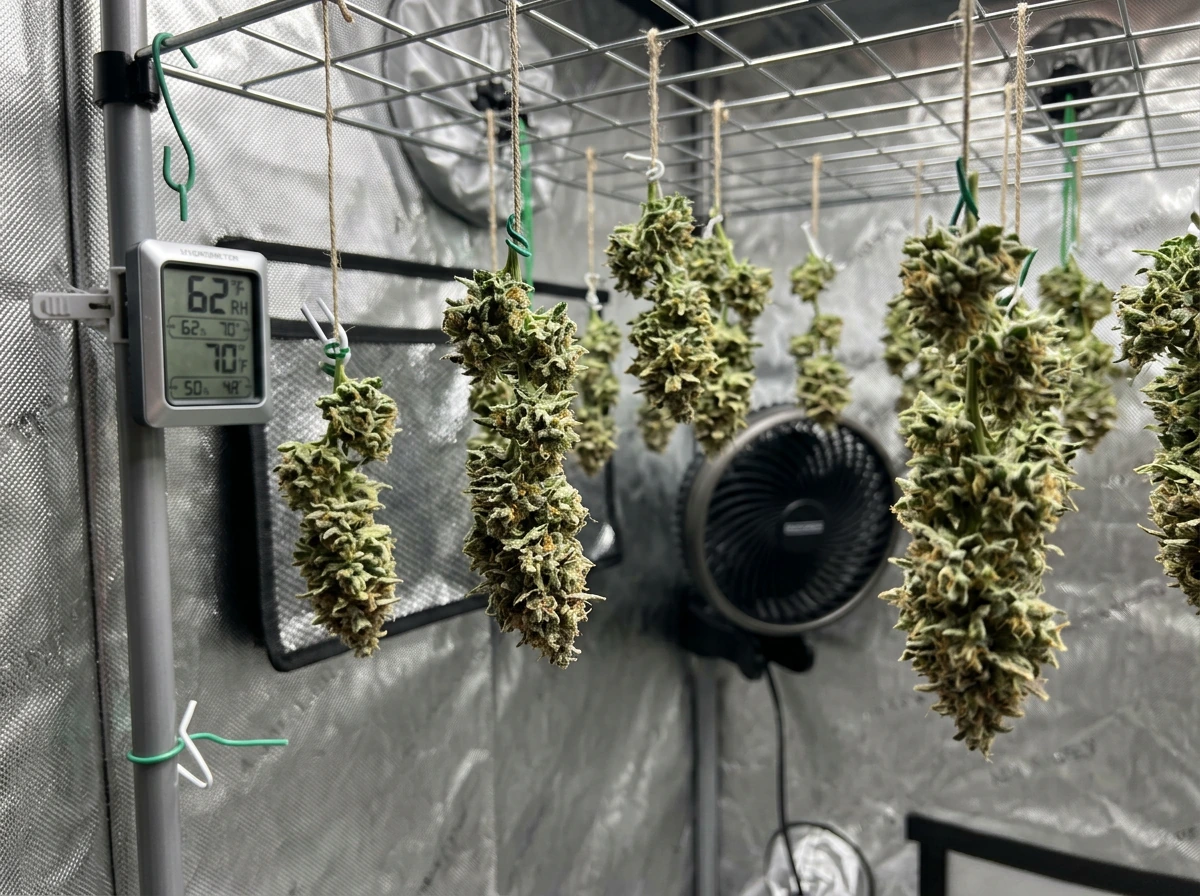
Drying conditions matter enormously. Target 60 to 65°F (15 to 18°C) with 55 to 65% relative humidity and gentle airflow from a fan (aimed at the wall, not directly at the buds). Do not try to speed-dry with heat: terpenes (responsible for flavor and aroma) are highly volatile and will evaporate rapidly above 70°F. A proper slow dry takes 7 to 14 days. You will know buds are ready when the smaller stems snap cleanly rather than bending, and the outside of the bud feels dry to the touch. If the stem bends but does not snap, keep drying.
Curing: the step that separates good weed from great weed
Once buds are properly dried, trim any remaining leaves and place them loosely in wide-mouth glass mason jars. Fill jars to about 75% full so there is air space. Seal the jars and store them in a cool, dark place. For the first week, open the jars for 15 to 30 minutes, two to three times per day. This is called burping, and it allows moisture and gases trapped inside to escape. If you open a jar and the buds smell like ammonia or hay, leave the lid off for an hour or more before resealing because the buds are still too wet. After week one, burping can reduce to once daily for another week, then every few days.
A minimum cure of 2 weeks produces noticeably better buds than uncured product. Four to 6 weeks brings out significantly more flavor and smoothness. Some strains peak at 8 weeks. Use a hygrometer (small humidity sensor) inside your jars to monitor: aim for 58 to 65% RH inside the sealed jar. Integra Boost or Boveda 62% packs help regulate this automatically once your cure is underway.
Your Next Steps: A Practical Checklist Before You Start
Before you order seeds or set up a single piece of equipment, run through this checklist. If you're specifically planning your next steps, this overlaps with how to grow weed from seed workflows, including choosing your seed type and setup before you start. It will save you time, money, and a lot of frustration.
- Confirm your local laws: how many plants are permitted, whether home growing is allowed at all, and whether there are storage or security requirements in your jurisdiction.
- Choose your setup: indoor tent, outdoor spot, or hydroponic system based on your space, budget, and how much time you can commit.
- Select your seeds: feminized photoperiod for maximum control, autoflowering for speed and simplicity, from a reputable seed bank.
- Gather your tools before you start: pH pen, EC meter (for coco or hydro), thermometer/hygrometer, grow light, timer, fan, containers, medium, and a basic nutrient line appropriate for your medium.
- Set your environmental targets and check that your space can hit them before you germinate anything.
- Germinate one or two seeds first to test your setup before committing your full plant allowance.
- Keep a simple grow journal (dates, watering amounts, feeding notes, and photos) so you can diagnose problems quickly and improve with each grow.
Growing cannabis from seed to harvest is genuinely one of the most rewarding projects a home gardener can take on. If you are specifically figuring out how to grow weed from seed in NZ, make sure you match your seed type and outdoor or indoor setup to local conditions and regulations. The learning curve is real, but it flattens fast once you have one grow behind you.
Stick to the fundamentals: correct environment, proper pH, avoid overwatering, and give the plant time at harvest and cure, if you’re searching for <a data-article-id="05041203-D8D7-4C8F-A4FB-8F667CB28EC6">how to grow weed from weed</a>, start here and then follow the stage-by-stage guidance above. Everything else is refinement.
For deeper dives into specific stages, the guides on how to grow weed seedlings and full start-to-finish walkthroughs on this site will give you the additional detail for whichever part of the process you want to master first. how to grow weed seedlings
FAQ
Do I need to switch the light cycle for flowering, and does it differ for autoflowers?
If you are using photoperiod seeds, you only change to flowering when you switch the light cycle to 12/12 (and keep darkness uninterrupted). Autoflowering plants do not respond well to “forcing” flowering with light changes, they flower on their own schedule. For your setup, that means you should label each plant type and timer-program accordingly before you start.
What’s the best way to germinate multiple seeds, and should I plant them directly into final pots?
You can germinate multiple seeds, but you should not plant them all into their final containers. Start in small cups, then transplant once roots are established and the seedling is healthy. This reduces shock and prevents overwatering in big pots where the medium stays wet too long.
How can I tell if my seedlings are overwatered versus just stressed?
Overwatering often looks like drooping plus consistently heavy, wet medium (not just a temporary midday sag). The fix is to let the top layer dry and reduce watering frequency, then improve drainage and airflow. If the pot never lightens, check whether runoff is happening and whether you are using a medium that holds too much water for young plants.
What should I do if my seeds sprout but I can’t plant them immediately?
If your taproot has emerged and you delay planting, it can dry out or get damaged. Once the taproot is about 0.5 to 1 cm, plant it promptly, handle by the seed shell or leaves, and keep the medium consistently moist (not soaked) until the seedling establishes.
How do I transition seedlings outdoors without slowing growth?
For outdoor grows, avoid scheduling your transplant when you cannot protect from wind, sudden cold nights, or heavy rain. Harden seedlings gradually (increasing time outside over several days) so leaf tissue adapts to stronger sun and outdoor temperature swings. This prevents transplant shock that can slow veg for weeks.
My plant looks yellow or stunted early in veg, how do I troubleshoot nutrient versus pH issues?
If you are seeing signs of nutrient problems early, first verify pH and watering before adding fertilizer. Many early “deficiency” symptoms are actually lockout from pH mismatch, especially in coco and hydro. A practical approach is to run pH-corrected water for a few days, then resume feeding only at a low concentration.
What should I do if humidity is high during flowering and I’m worried about mold?
Temperature and humidity targets matter most when the plant is dense with flowers. If you cannot maintain RH in late flowering, prioritize dehumidification or ventilation changes, and avoid defoliation that you cannot manage. A common mistake is trying to cure mold risk with “less watering” only, when airflow and RH control are the real levers.
How do I prevent light leaks on the 12/12 dark period?
In a tent, light leaks are more common from small gaps around zippers, power strips, or indicator LEDs, and from opening the door during dark period. The safe rule is to keep the room closed, cover LEDs that shine, and confirm darkness with the lights off and the door shut for a full cycle.
What’s the fastest safe way to handle a male plant found late, and how do I avoid pollinating females?
For regular seeds, remove males as soon as you can identify pollen sacs, and do it without shaking plants. If you wait too long, pollen can drift and seed entire branches. For worst-case prevention, consider isolating males immediately in a separate area until you confirm identity.
Do I need to flush before harvest, and what’s the safest way to do it if I choose to?
If you use the “flush” idea, treat it as a short transition, not a period of dehydration. Keep pH-adjusted water consistent and make sure the medium does not fully dry out. If you see major leaf decline or drooping near the end, stop the flush approach and return to a light feeding regime rather than stressing the plant.
How can I fix drying and jar-smell problems if my buds are drying too fast or too slow?
Aim for a slow, controlled dry. If you dry too hot or too fast, terpenes fade and buds can feel crispy outside while still holding moisture inside. A practical check is stem snap, if the stem bends, keep drying, and if the bud smells ammonia or hay right after jar sealing, it is still too wet.
What if I harvest too early or too late, can I correct it during curing?
If you miss your ideal harvest window, you can still salvage quality by harvesting based on trichome stage and curing properly, but effects will likely shift more sedating as amber increases. The decision aid is to check multiple bud sites, not just one, because maturity can vary across the plant.
During curing, how do I adjust if jar humidity is too high or too low?
Humidity during curing is the controllable lever. If jar RH goes above your target and buds feel springy, burp longer and reseal only after RH drops. If jar RH is too low and buds feel dry, you can reintroduce controlled humidity using proper humidity packs, but do it gradually to avoid rewetting the outer layer too aggressively.
Next Article
How to Grow Weed From Start to Finish Seed to Harvest
Seed-to-harvest step by step guide to grow cannabis indoors or out, with enviro, nutrients pH, pests, harvest and curing