One seed is enough. You can grow a fully mature, harvest-ready cannabis plant from a single seed with nothing more than the right conditions, a little patience, and a clear plan. Following this guide step by step will help you grow one weed plant from seed to harvest with solid, beginner-friendly results. The key is treating that one seed like it matters, because it does. That means nailing germination, giving the seedling a strong start, managing the environment consistently through veg and flower, and knowing what to watch for when something goes sideways. This guide walks you through every stage, from cracking that seed open to drying and curing your final buds.
How to Grow Weed With One Seed: Step-by-Step Guide
Marcus Holbrook
3 May 2026
Start with the one seed: germination plan and best conditions
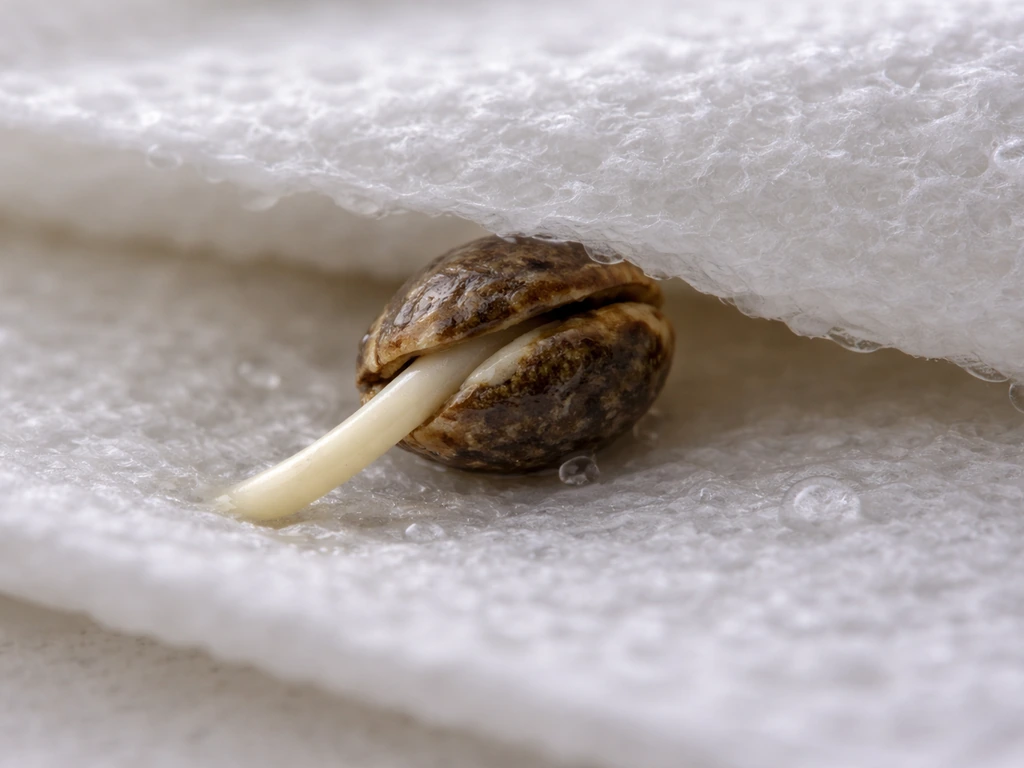
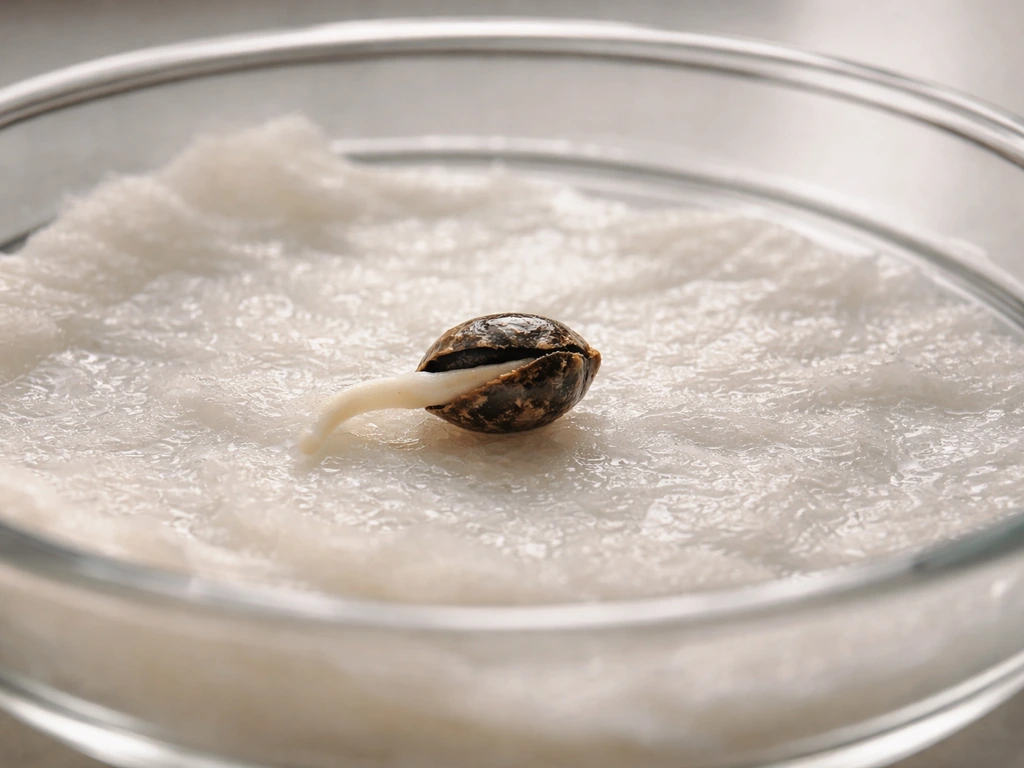
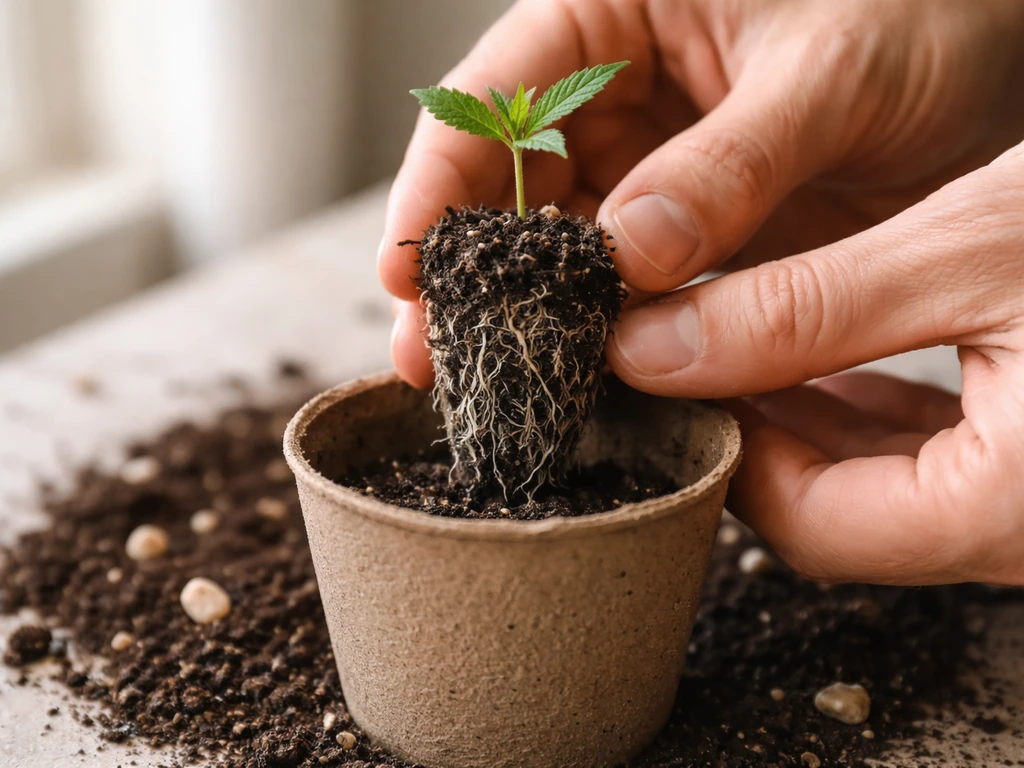
Before you even think about pots or lights, you need that seed to sprout. The paper towel method is the most reliable way to do this, and it gives you a clear visual confirmation that your seed is viable before you commit it to soil. Dampen two paper towels so they are moist but not dripping, place your seed between them, fold them over, and put the whole thing on a plate or in a zip-lock bag. Store it somewhere dark and warm, ideally between 70 and 85°F (21 to 29°C). A shelf above a warm appliance or a seed heating mat set to around 78°F works well. Check it every 12 hours or so without disturbing it too much.
Most healthy seeds will crack open and show a small white taproot within 24 to 72 hours under those conditions. If you hit day 7 with no taproot at all, that seed is almost certainly not viable. This is the hard truth about working with a single seed: you are taking on a small but real risk. If you can source a backup seed, do it. Even keeping a second seed in reserve costs almost nothing and could save you weeks. If you only have the one, handle it carefully, and give it every possible advantage: sterile setup, the right temperature, consistent moisture, and darkness.
If you prefer to germinate directly in soil, use a light, airy, low-nutrient starter mix and plant the seed about half an inch deep with the pointed end down. Water gently, cover the pot with a clear plastic dome or plastic wrap (keeping it at least 1.5 inches from the surface so heat does not build up), and place it somewhere warm and out of direct sunlight. Either method works, but the paper towel method gives you faster confirmation of viability, which matters a lot when you only have one shot.
Choose the setup and location: indoor vs outdoor for a single plant
For most beginners growing one plant, indoors is the better call. You control everything: the light cycle, temperature, humidity, and airflow. That control means fewer surprises, and with only one plant, surprises are expensive. Outdoors can produce big yields if conditions are right, but you are at the mercy of your local climate, pest pressure, and seasonal timing. If you live somewhere with a long, warm growing season and a private outdoor space, outdoor growing is absolutely a valid path. If you are in an apartment or a climate that does not cooperate, go indoors.
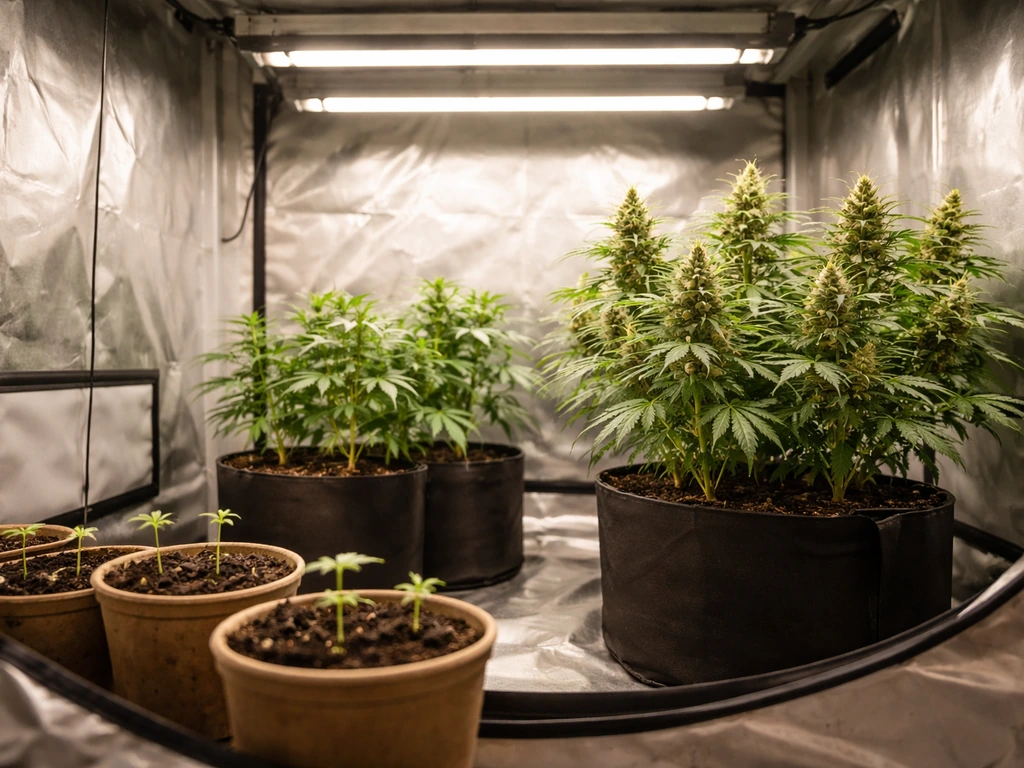
Indoor setup basics

For one plant, you do not need a large space. A 2x2 foot or 2x4 foot grow tent is plenty. You will need a grow light (a quality LED panel in the 200 to 300 watt range works great for a single plant and keeps heat manageable), a small inline fan with a carbon filter for odor control, a circulation fan inside the tent, and a way to monitor temperature and humidity. A basic digital thermometer and hygrometer combo costs almost nothing and is non-negotiable.
Outdoor setup basics
Outdoors, your main job is picking the right spot and the right timing. Cannabis needs at least 6 to 8 hours of direct sunlight daily. Start your seedling indoors in late spring (in the northern hemisphere, after your last frost, typically May), then transplant outdoors once nighttime temps stay consistently above 50°F. A 5 to 10 gallon fabric pot gives roots room to breathe and lets you move the plant if needed. Privacy and security matter too, so choose a location accordingly and always check your local laws before you plant anything outside.
Strain choice matters more when you only have one plant
Pick a forgiving, beginner-friendly strain. Autoflowering varieties are excellent for single-plant grows because they flower automatically based on age rather than light cycle, they tend to stay compact, and the grow time from seed to harvest is often just 8 to 10 weeks. Indica-dominant or autoflower strains like Northern Lights, Blue Dream (auto versions), or White Widow are well-documented performers with good resilience. If you want more control over timing and potentially larger yields, a feminized photoperiod strain works well too, just know you will be managing the light schedule yourself.
Seedling care: light, watering, temperature, humidity, and potting
Once your taproot has emerged (paper towel method) or your seedling has broken the soil surface, you are in seedling stage. This phase runs roughly from day 1 to day 14 or 21, and it is the most delicate window of the grow. The seedling is fragile, its root system is tiny, and it can easily be killed by overwatering, too much light, or temperature extremes.
Light for seedlings
Indoors, keep your light on an 18-hours-on, 6-hours-off schedule during the seedling and vegetative stages. Position your LED panel higher than you will during veg, around 24 to 30 inches above the seedling, to avoid light stress. Watch for stretching (long, thin stem reaching toward the light), which tells you the light is too far away, and for leaf curling or bleaching, which tells you it is too close.
Watering seedlings without drowning them
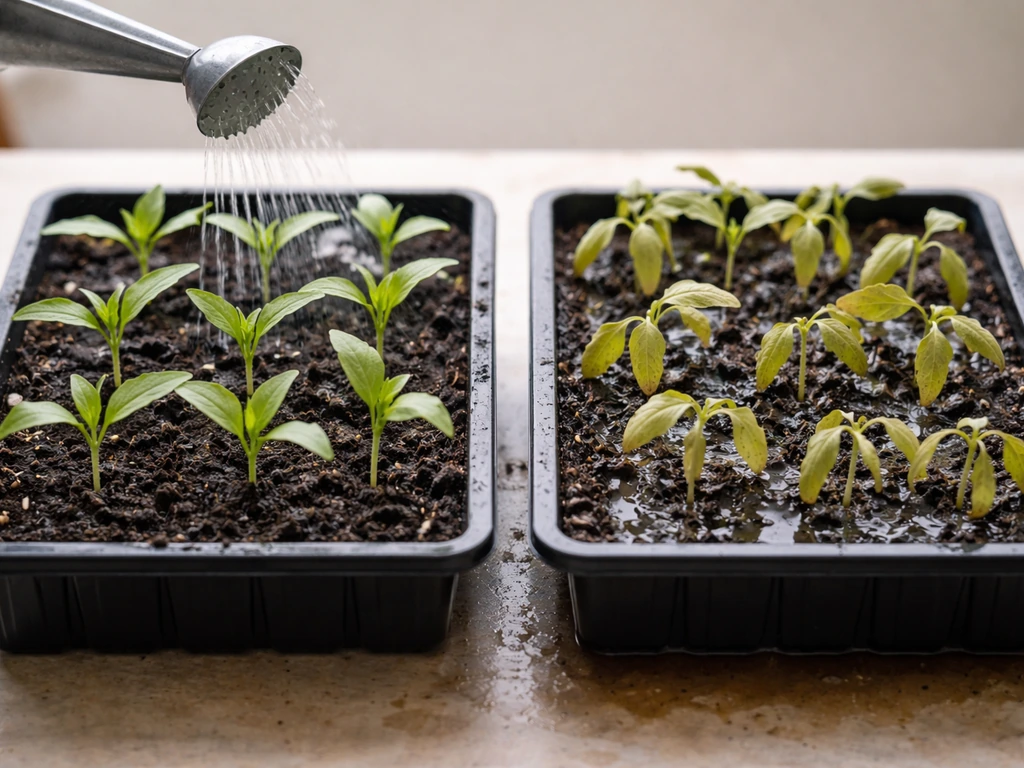
Overwatering kills more seedlings than almost any other mistake, and it is easy to do when the plant is tiny. Water lightly around the base of the seedling (not flooding the whole pot), and then wait until the top inch of soil is dry before watering again. With a small seedling in a small pot, that might only be every 2 to 3 days. Lift the pot after watering and again when it feels light and dry. You will quickly develop a feel for when it needs water. Do not water on a schedule, water based on what the plant and soil are telling you.
Temperature, humidity, and potting
Keep seedling-stage temperatures between 70 and 80°F (21 to 27°C) with relative humidity around 60 to 70 percent. Higher humidity at this stage supports the plant while its root system is still developing. Start your seedling in a small container, a solo cup or a 4-inch pot works well, using a light seedling or starter mix with no added nutrients. You want gentle, airy soil that drains well. Transplant into a larger pot (1 to 3 gallons for veg, up to 5 gallons for a full-term photoperiod plant) once you see roots beginning to circle the bottom of the starter container, typically around week 2 to 3.
Vegetative growth: routines that keep one plant thriving
Vegetative stage is when your plant builds the structure it will use to support buds. For photoperiod strains indoors, this stage lasts as long as you let it under an 18/6 light schedule. For autoflowers, the plant will transition on its own after 3 to 5 weeks of veg regardless of light schedule. Most beginners do well with 4 to 8 weeks of veg for a photoperiod plant, depending on how large they want it to get.
During veg, your daily and weekly routine is simple but consistent. Check the plant every day: look at the leaves for color changes, check the soil moisture, look at the stem for any drooping or twisting, and check under leaves for pests. Weekly, check your pH and nutrient solution if growing in soil or a hydro setup, and adjust your light height as the plant grows. Move your LED down to around 18 to 24 inches above the canopy once the seedling is established, and dial in the intensity as the plant matures. Target temperature of 70 to 82°F (21 to 28°C) and relative humidity of 50 to 70 percent during veg.
One healthy plant given enough veg time and space can produce a significant amount of bud. How much depends on genetics, growing conditions, and training. If you are curious about realistic yield expectations for a single plant, that is a topic worth exploring on its own. If you’re aiming for how to grow 1 pound per plant, focus on matching genetics and optimizing light, nutrients, and training from veg through flower. Yield varies widely, so if you are wondering how much weed can one seed grow, it depends on strain, conditions, and how you train and size your plant.
Flowering and bud development: environment, light schedule, and pollination
For photoperiod strains, you trigger flowering by switching your light schedule to 12 hours on and 12 hours off. Do this consistently, and make sure your dark period is completely dark. Even a small light leak during the dark period can stress the plant into hermaphroditism (developing both male and female reproductive structures), which can pollinate your buds and fill them with seeds. Seal any light leaks in your tent before you flip to 12/12.
After you flip the light schedule, you will typically see the first signs of flowering (white hairs, called pistils, emerging at bud sites) within 1 to 2 weeks. The full flowering period for most strains is 8 to 12 weeks. Autoflowers skip all of this and simply begin flowering on their own timeline, which is one reason they are so beginner-friendly.
During flowering, drop your humidity to 40 to 50 percent to reduce the risk of bud rot (botrytis), especially in the last few weeks when buds are dense and retain moisture. Keep temperatures between 65 and 80°F (18 to 27°C). Good airflow inside the tent is critical now. Make sure your circulation fan is moving air through the canopy without blasting the plant directly.
Pollination prevention is essential if you want seedless, high-potency buds (called sinsemilla). Growing from a feminized seed eliminates most of the risk since feminized seeds are bred to produce female plants almost exclusively. If you are growing a regular (non-feminized) seed, you need to identify and remove any male plants before they open pollen sacs, which happens in the first 2 to 3 weeks of flowering. Males produce small, round, clustered pollen sacs instead of the elongated pistil-covered calyxes of females. If you spot one, remove it immediately, away from your grow space.
Nutrients and feeding: from seedling to harvest
Cannabis has different nutrient needs at each stage of life, and feeding a single plant is actually simpler than managing a full garden because you can give it your full attention. The three main nutrients are nitrogen (N), phosphorus (P), and potassium (K), and the ratio you feed changes as the plant grows.
| Stage | Duration | N-P-K Focus | Notes |
|---|---|---|---|
| Seedling | Weeks 1 to 3 | None or very low | Good starter soil has enough; no added nutrients |
| Early veg | Weeks 3 to 5 | High N, low P and K | Start at quarter strength, increase to half strength |
| Late veg | Weeks 5 to 8 | High N, moderate P and K | Full strength nutrients once plant is established |
| Early flower | Weeks 1 to 4 of flower | Lower N, higher P and K | Transition to bloom formula |
| Late flower | Weeks 5 to harvest | Very low N, high P and K | Flush or taper nutrients in final 1 to 2 weeks |
| Flush (if desired) | Final 1 to 2 weeks | Plain water only | Debated practice; plain water at minimum |
Always mix nutrients to a lower concentration than the label suggests, especially with a single plant where a mistake affects your entire harvest. Start at 25 to 50 percent of the recommended dose and watch how the plant responds. Yellow lower leaves can signal nitrogen deficiency; dark, clawing leaves that curl down often signal nitrogen toxicity. pH matters enormously here: if your water or nutrient solution is outside the acceptable pH range, the plant cannot absorb nutrients even if they are present. For soil grows, target a pH of 6.0 to 7.0 (6.5 is ideal). For hydro or coco, aim for 5.5 to 6.5. A basic pH meter and pH up/down solution are essential tools.
Training and space management with one plant
When you only have one plant, training is your best tool for maximizing yield without adding more plants. The goal is to spread the canopy out and create multiple bud sites that all receive direct light, rather than having one tall main cola with smaller, less productive branches below. With a single plant, even modest training can meaningfully increase your harvest.
Low-stress training (LST)
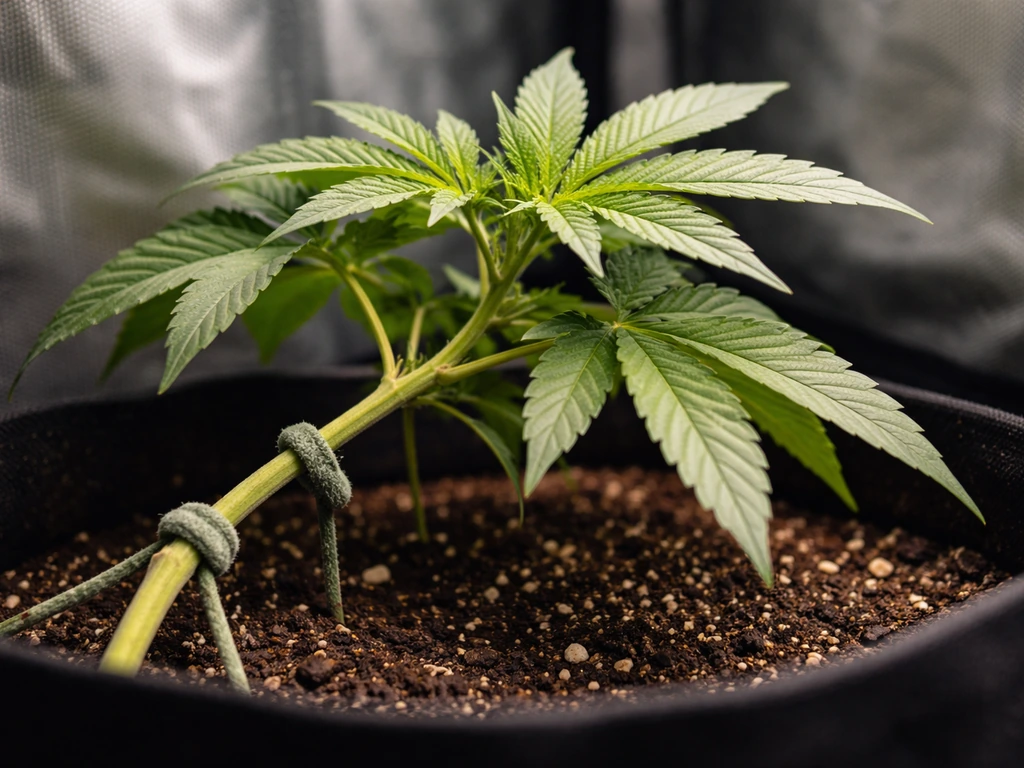
LST is the most beginner-friendly option and works great on both photoperiod and autoflower plants. Starting in early veg, you gently bend the main stem sideways and tie it down using soft plant ties, twist ties, or even strips of pantyhose attached to hooks on the pot rim. This encourages lower branches to grow upward and creates a more even canopy. The plant is not cut, so recovery is fast and stress is minimal. Check and adjust your ties every few days as the plant grows.
Topping and FIMing
Topping means cutting the main growing tip (the apical meristem) to force two main colas instead of one. It is more aggressive than LST but very effective for photoperiod plants. Do not top autoflowers as a beginner, since they have a fixed timeline and may not recover well enough to benefit. If you decide to top a photoperiod plant, do it once the plant has 4 to 6 nodes (sets of leaves) and allow at least 10 to 14 days of recovery before flipping to flower. FIMing is a similar technique that aims to produce 4 tops from one cut, with slightly less precision required, but the results are less predictable for beginners.
ScrOG (Screen of Green)
A ScrOG involves stretching a horizontal screen or net above the canopy and weaving branches through it as they grow. This is excellent for a single photoperiod plant because it maximizes the use of your light footprint. It takes a bit more setup but is very manageable with one plant. The screen typically sits about 8 to 12 inches above the base of the plant, and you fill it out during the last few weeks of veg before flipping to flower.
Troubleshooting, harvest timing, and what comes next
Common problems and what to do
- Seedling stretching (long, thin stem): Light is too far away. Lower your light or add a small CFL closer to the seedling. Bury some of the stretched stem when you transplant.
- Yellow leaves (starting from lower, older leaves): Likely nitrogen deficiency, especially in late veg. Increase N feeding slightly and confirm pH is in range.
- Dark green, claw-shaped leaves curling down: Nitrogen toxicity. Flush the pot with plain pH-corrected water and reduce nutrient concentration.
- Brown spots on leaves: Could be calcium or magnesium deficiency, or nutrient burn. Check pH first, then assess your feeding schedule.
- White powder on leaves: Powdery mildew. Increase airflow, lower humidity below 50 percent, and apply a diluted hydrogen peroxide or potassium bicarbonate spray.
- Tiny bugs or webbing under leaves: Spider mites or fungus gnats. Treat with neem oil or insecticidal soap spray, let the soil dry more between waterings for gnats.
- Soft, gray, moldy buds: Botrytis (bud rot). Remove affected material immediately with clean scissors, lower humidity, and increase airflow. Inspect daily in the final weeks of flower.
- Plant not growing or wilting despite correct watering: Check root health. Root rot (brown, slimy roots) can occur in hydro or in waterlogged soil. Improve drainage and aeration.
When to harvest
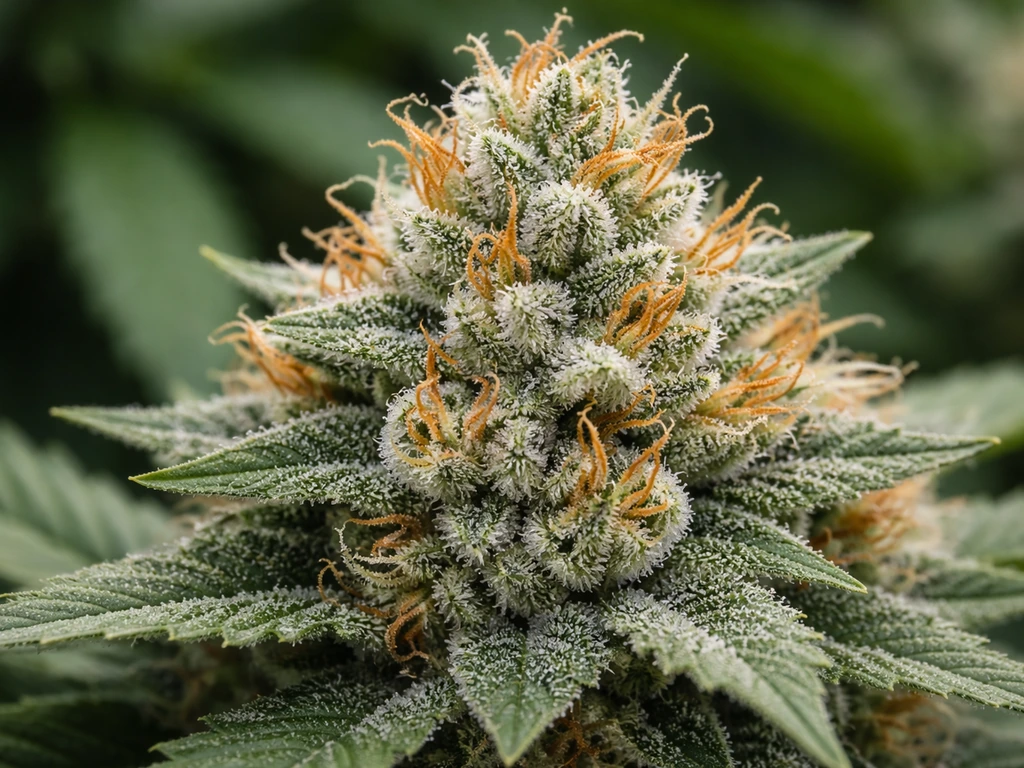
Harvest timing is one of the most important decisions of the whole grow, and it is something a lot of beginners get wrong by harvesting too early. The most reliable method is examining the trichomes (the tiny, mushroom-shaped resin glands on the buds and surrounding leaves) with a jeweler's loupe or a digital microscope at 60x magnification or higher. Clear trichomes mean the plant is not ready. Milky or cloudy trichomes signal peak THC. Amber trichomes indicate THC is beginning to convert to CBN, producing a more sedating effect. Most growers aim to harvest when trichomes are mostly milky with about 10 to 30 percent amber, depending on the effect they want.
Other signs of approaching harvest: most pistils (hairs on the buds) have turned orange or red, the fan leaves begin yellowing and falling, and bud growth has visibly slowed or stopped. Seed pack timelines are a rough guide, not a guarantee; always confirm with trichome inspection.
After harvest: drying and curing
After cutting your plant, hang branches upside down in a dark, well-ventilated space with temperatures around 60 to 70°F (15 to 21°C) and humidity between 45 and 55 percent. This slow dry takes 7 to 14 days. You will know the buds are ready for curing when the small stems snap cleanly rather than bending. Trim your buds (either before or after drying, both methods have their fans) and place them in sealed glass mason jars. For the first two weeks of curing, open the jars once or twice a day for 15 to 30 minutes to let moisture escape, a process called burping. After two weeks of consistent burping, you can open them less frequently. Four to eight weeks of curing noticeably improves flavor, smoothness, and potency. Six weeks is a solid minimum if you can wait.
Your next steps checklist
- Source a quality feminized or autoflower seed from a reputable seed bank, and a backup if possible.
- Set up your germination area: paper towels, a plate or bag, and a warm dark spot at 70 to 85°F.
- Prepare your grow space and equipment before the seed sprouts so you are ready to act the moment it does.
- Have your starter soil, small container, pH meter, and basic nutrients ready before the seedling hits the soil.
- Follow the light, humidity, and temperature targets for each stage and adjust based on what the plant shows you.
- Start low-stress training in early veg if you want to maximize your single plant's yield potential.
- Monitor trichomes weekly starting around week 6 to 7 of flower to nail your harvest window.
- Dry slowly and cure properly. Do not rush the finish, it is where a lot of the quality lives.
One seed, grown with care and attention, is genuinely enough. The process is not complicated, but it does reward consistency and patience. Every decision you make, from germination to curing, adds up. If you want long-term consistency, learn how to grow a good mother plant so you can take reliable cuttings for future grows. Get these fundamentals right and that single seed will take you all the way to a jar full of quality homegrown cannabis. To grow a mother plant, keep a healthy vegetative clone or plant, maintain stable light conditions, and regularly feed, prune, and monitor it so you can take cuttings over and over.
FAQ
What should I do if my single seed germinates but the seedling dies a few days later?
If you want a truly “one seed” outcome, the biggest deciding factor is whether you can tolerate the germination risk. A paper towel check can confirm viability quickly, but it cannot predict how well the seedling will survive the first 1 to 2 weeks. If your goal is zero setbacks, keep a second backup seed offsite so your calendar and setup do not get derailed.
Can I assume a single seed grown indoors will be female if I start with a feminized seed?
Not always. A seed can sprout yet still be a male or hermaphrodite later, especially if stress occurs (light leaks during flowering, heat spikes, or major nutrient swings). With a feminized seed you greatly reduce the risk, but you still need to inspect for sex traits during early flower (pistils on females, pollen sacs on males) and act fast.
How do I know my light height is correct when I’m growing from one seed?
To avoid light stress, don’t raise or lower your light based on guesswork during germination. Use a height target and confirm with plant response, for example, gentle early leaf angle and no bleaching. Once you see stretching, adjust the light upward immediately, then re-check 24 hours later because seedlings react quickly to changes.
What’s the best way to prevent overwatering in a small solo cup from a single seed?
Treat the first watering like a calibration step, not a routine. If you see the top inch staying wet for more than a couple of days, you are overwatering for your pot size and conditions. The practical fix is smaller, more frequent sips at first, or a drier growing medium, then wait to water again only when the surface and pot weight indicate dryness.
Can I switch to 12/12 early if I’m only growing one plant?
Yes, but it changes your management. Photoperiod plants need a consistent dark period and a clean 12/12 transition, while autoflowers should stay on the light schedule you choose from early on (commonly 18/6 or 20/4). If you accidentally switch an autoflower into 12/12, it may slow growth or reduce yield, so plan your seed type before you start.
How can I tell if leaf yellowing is from nutrients or from pH issues when I only have one plant to save?
Nutrient problems can look similar, so use a simple decision rule. If the newest growth is pale, that often points to nitrogen issues or pH lockout, while problems starting on older leaves can indicate overfeeding or deficiencies. In a one-plant grow, prioritize checking pH first, then reduce nutrient strength before changing multiple variables at once.
How do I avoid ruining my single-plant harvest during drying and curing?
No, curing timing affects quality but also risk. If you dry too fast, buds may feel crisp on the outside yet stay overly moist inside, which can lead to harshness and inconsistent cure. If you dry too slow, mold risk rises, especially in humid rooms. The concrete checkpoint is dry-to-cure transition, when small stems snap, then cure with consistent burping and jar conditions.
If I want sinsemilla, what are the most common ways pollination happens even in a one-plant setup?
You usually cannot guarantee perfect seedless buds without controlling pollination risk, because even tiny male flowers can appear on stressed plants. If you grow from regular seeds, remove males early (first pollen sacs) and keep airflow and human traffic from mixing with other cannabis areas. For one-plant grows, the simplest approach is feminized seeds and strict flowering light control.
When is the safest time to top or LST a single photoperiod plant so it still finishes strong?
Plant training is most effective when the plant has enough flexibility and recovery capacity. A good rule for one photoperiod plant is to start training early in veg, keep stress mild, and avoid major cuts right before you flip to flower. For topping, wait for the right node count and allow the full recovery window so new growth re-establishes before buds begin forming.
Is it okay to use a seedling heat mat or warm appliance for germinating the one seed?
A heater mat can work, but it must be controlled, not just powered on. Warmth should support germination, not bake the seed, especially inside a sealed plastic bag where humidity and heat rise together. If the setup gets too warm, the seed can fail or produce weak roots, so check temperature periodically and prioritize stable conditions over maximum heat.
Next Article
How to Grow Weed Seed Indoors: Seed-to-Harvest Guide
Step-by-step seed-to-harvest guide for growing cannabis indoors: germination, seedlings, light, climate, feeding, flower