To grow cannabis with high THCa levels, you need to start with the right genetics, keep your environment tight (think temperatures below 26°C, VPD between 1.2 and 1.6 kPa in late flower), harvest at peak trichome ripeness, then dry and cure slowly at cool temperatures to avoid accidentally converting your THCa to THC before you ever intend to. Every decision from seed selection to storage either protects or destroys that acidic cannabinoid, and this guide walks you through all of it.
how to grow thc a: maximize and preserve THCa at home step-by-step guide

Marcus Holbrook
4 Aug 2026
What this guide covers and a word on legal compliance
This is a practical, step-by-step guide for home growers who want to produce and preserve THCa specifically. It covers strain selection, propagation, vegetative and flowering stage management, harvest timing, drying, curing, storage, and potency testing, for indoor, outdoor, and hydroponic setups. The same principles apply regardless of your grow method, though I'll call out technique differences where they matter.
Before anything else: cannabis cultivation laws vary enormously by country, state, and even municipality. In some US states, home growing is fully legal for adults with a plant count limit (commonly 3 to 6 plants). In others, any cultivation is still a criminal offense. Canada permits adults to grow up to four plants per household under federal law, but some provinces have additional restrictions. The UK, most of the EU, and many other jurisdictions prohibit home cultivation entirely. It is your responsibility to know and follow the rules where you live. Nothing in this guide constitutes legal advice, and I'd encourage you to check your local regulations before you germinate a single seed.
One regulatory nuance worth flagging upfront: in the United States, hemp-derived THCa products currently occupy a complex legal space at the federal level because THCa itself is not THC. However, the DEA and some states evaluate "total THC" using a formula that includes THCa converted to THC upon decarboxylation. The distinction matters for compliance, so keep that in mind if you're also growing for any commercial or gifting purposes.
THCa explained: the chemistry behind the cannabinoid you're actually growing
Every cannabis plant makes THCa, not THC. This is a critical point that gets lost in casual conversation. THCa (delta-9-tetrahydrocannabinolic acid) is the acidic precursor synthesized in the trichome heads during flowering. The enzyme THCA synthase (THCAS), a FAD-dependent oxidocyclase, converts CBGA (cannabigerolic acid), the central prenylated precursor cannabinoid, into THCa through an oxidative cyclization reaction. In a living, intact plant, CBGA is the fork in the road: THCAS pulls it toward THCa, CBDAS pulls it toward CBDA, and CBCAS pulls it toward CBCA. The ratio of active enzyme expression in a given plant's genetics determines its chemotype.
THCa itself is non-intoxicating. It only becomes the psychoactive THC you're likely familiar with through decarboxylation, the loss of a carboxyl group (CO2) triggered by heat. Thermal decarboxylation follows roughly first-order kinetics. Measurable conversion begins around 100°C, accelerates significantly above 120 to 140°C, and at 150°C for 15 minutes you'll see substantial conversion alongside oxidation byproducts like CBN. This is exactly why a drying room that gets too warm, a cure jar left in a sunny windowsill, or a storage space near a heat source will silently erode your THCa levels long before you ever apply intentional heat.
For growers, this has two practical implications. First, your entire post-harvest chain, drying, curing, and storage, needs to be managed at cool temperatures to preserve the THCa you worked hard to produce. Second, if you are intentionally trying to preserve THCa rather than convert it (for raw consumption, tinctures, or legal reasons related to the acidic form), you need to be especially careful about heat exposure at every stage. The flip side is that when you do want THC, gentle, controlled heating is all it takes. But that conversion is irreversible, so protect your THCa until you're ready.
Choosing genetics built for high THCa
Not all cannabis genetics express high THCa, and even within a single strain, phenotype variation can be substantial. The ceiling on THCa production is largely set by genetics, specifically, the expression level and activity of THCAS. No amount of expert cultivation will push a mid-range genetic into 30%+ THCa territory. So start by choosing strains with documented, lab-verified THCa performance.
Traits to look for in high-THCa genetics
- Lab COAs (Certificates of Analysis) from the breeder or dispensary showing flower THCa above 20% by dry weight — look for multiple test results across different phenotypes, not just a single cherry-picked number
- Type I chemotype classification (THC-dominant, CBGA directed primarily toward THCA synthase)
- Dense, resinous trichome structure — this is where THCa is stored, so high trichome density correlates with higher potential THCa
- Photoperiod genetics rather than autoflowering, generally, since photoperiod plants allow more control over flowering duration and trichome ripeness
- Stable F1 or IBL lines from reputable breeders who provide genetic data — avoid unverified bag seed if THCa maximization is the goal
Strains with strong THCa track records
Bruce Banner (especially Bruce Banner #3) is one of the most documented high-THCa cultivars in the commercial cannabis space. Phylos Bioscience variety records and multiple dispensary COAs place top phenotypes in the mid-20s to low-30s percent total THCa by dry weight. Bruce Banner 2.0 COAs have been published showing total THC/THCa above 20%. See the Certificate of Analysis, Bruce Banner 2.0 (example COA) for an example dispensary-published COA showing total THC/THCa above 20% Certificate of Analysis — Bruce Banner 2.0 (example COA). It's a demanding strain, she stretches hard in flower and has significant water and nutrient needs, but for THCa density, few cultivars compete at this level. GG4 (Gorilla Glue #4) is another frequently tested high-THCa performer with mid-20s percent showing regularly on lab reports. Both strains reward experienced growers especially, though beginners can succeed with them given careful environmental control.
Other strains worth researching for high-THCa expression include Ghost Train Haze, Chemdog lineages, and certain Wedding Cake phenotypes. Always verify with multiple COAs from different batches before committing to a genetics purchase. Single-batch results can flatter or deceive.
Strain-specific deep dives: Bruce Banner, GG4, and Gorilla Glue
Because growing high-THCa strains like Bruce Banner and GG4/Gorilla Glue each involves strain-specific quirks around stretch management, feeding schedules, and environmental tolerances, this site has dedicated growing guides for each. For a step-by-step walkthrough specifically for Gorilla Glue/GG4, see the dedicated how to grow gorilla glue guide. For a full, strain-specific walkthrough, see the dedicated guide on how to grow GG4. If you're planning to grow Bruce Banner specifically, the Bruce Banner strain guide covers its aggressive vegetative growth, training needs, and how to manage its intense nitrogen demand through mid-flower. GG4 and Gorilla Glue each get their own full treatment as well, including the sticky resin production that makes these strains rewarding but also somewhat challenging to trim and handle.
The principles in this article apply universally across all high-THCa cultivars, but I'd encourage you to cross-reference strain-specific pages once you've decided on your genetics. The difference between a 24% and a 29% THCa result on the same strain often comes down to strain-specific execution rather than general technique.
Seeds vs clones: which propagation path suits you
This is one of the first real decisions you'll make, and both options are genuinely valid. I've used both extensively and they each have real advantages and real drawbacks. The right choice depends on your situation, not on any universal hierarchy.
| Factor | Seeds | Clones |
|---|---|---|
| Genetic consistency | Variation between phenotypes — can require phenohunting | Genetically identical to mother — no variation |
| Disease/pest status at start | Generally clean if from reputable seed bank | Can carry pests, pathogens, or viruses from the mother |
| Availability | Wide variety available globally by mail | Require a local mother plant or clone supplier |
| Legal compliance | Seeds are legal to possess in more jurisdictions | Requires an active grow already, or a trusted local source |
| Vigor | Tap root and full root architecture — often vigorous | No taproot, but established genetics — can match seed plants once rooted |
| Cost | Moderate upfront cost, especially for premium genetics | Often free or low cost if you have a mother plant |
| Time to harvest | Slightly longer due to seedling stage | Can save 1 to 2 weeks versus starting from seed |
| Feminization | Feminized seeds widely available, eliminating male risk | Clones from a female are always female |
Propagation selection checklist
- If using seeds: purchase feminized seeds from a breeder with publicly available COAs for the strain
- If using clones: inspect the donor plant for any signs of spider mites, russet mites, fungus gnats, powdery mildew, or viral mosaic patterns before taking cuttings
- Confirm the genetics match what you expect — ask for COAs if purchasing clones commercially
- For beginners: feminized seeds from a well-documented breeder are usually the lower-risk starting point
- For growers focused on replicating a proven high-THCa phenotype: verified clones from a confirmed high-testing mother plant are hard to beat
Propagation step-by-step: germination through early rooting
Germinating seeds
- Soak seeds in room-temperature, pH-adjusted water (6.0 to 6.5 for soil; 5.8 to 6.2 for coco or hydro) for 12 to 18 hours until you see the seed crack or a tap root emerge up to 2 to 3 mm
- Transfer to a moist (not saturated) germination medium — a folded, damp paper towel inside a sealed plastic bag works well, as does a rapid rooter plug or jiffy pellet
- Keep at 22 to 26°C with high ambient humidity around 70 to 80% RH — a propagation dome over a seedling tray is ideal
- Most quality seeds show a tap root within 24 to 72 hours; discard any seeds that show no movement after 5 to 7 days
- Transplant into your starting medium (small pot with seedling mix, rockwool cube, or coco plug) root-side down, about 5 to 10 mm deep
- Keep lighting gentle at this stage — 18 hours on, 6 hours off; T5 fluorescents or an LED at low intensity and height (around 50 to 75 cm above the canopy) is sufficient
Seedling care (days 1 to 14)
Seedlings are fragile. Overwatering is the single most common beginner mistake I see, and I've done it myself. Water only when the top centimeter of medium feels dry, and never let seedlings sit in standing water. Maintain 22 to 26°C canopy temperature and 60 to 70% RH (target VPD of approximately 0.4 to 0.8 kPa) under the dome. Remove the dome briefly each day to exchange air and prevent damping-off. Your seedlings don't need nutrients yet, a quality seedling mix or diluted starter solution (EC around 0.4 to 0.6 mS/cm) is plenty for the first two weeks.
Rooting clones
- Take cuttings from actively growing branch tips, 10 to 15 cm long, with at least two to three node sets
- Cut at a 45-degree angle with a sterile blade — clean the blade with isopropyl alcohol between cuts
- Remove lower leaves and trim large fan leaves by half to reduce transpiration while roots develop
- Dip the cut end in rooting gel or powder (indole-3-butyric acid-based products are effective) immediately after cutting
- Place in your rooting medium (rockwool cubes, rapid rooter plugs, or an aero-cloner with misted water) and cover with a humidity dome
- Maintain 22 to 24°C, 80 to 90% RH, and gentle indirect light (no direct high-intensity light during rooting)
- Roots typically emerge in 7 to 14 days depending on the cultivar and rooting conditions; check for resistance when gently tugging the cutting — that's your sign roots have taken
Vegetative stage roadmap: building the plant that produces THCa
Vegetative growth is where you build the architecture that will hold your flowering sites, and more productive flowering sites, properly lit and ventilated, means more trichomes and more THCa. Don't rush this stage. A plant that has been well-trained and allowed to develop a strong, even canopy in veg will consistently outperform a cramped, untrained plant in flower, both in yield and in cannabinoid density.
Veg timing and transplant windows
For most indoor photoperiod grows, a vegetative period of 4 to 8 weeks produces well-developed plants ready for a productive flowering stage. Smaller grow spaces warrant shorter veg (4 to 5 weeks); larger tents or rooms can benefit from 6 to 8 weeks. Transplant from seedling containers to final pots when roots begin to circle the container base or emerge from drainage holes, typically at 2 to 3 weeks from germination into a 1-litre pot, then again at 4 to 6 weeks into the final container (typically 11 to 19 litres for soil, or your chosen hydroponic vessel). Always transplant when the medium is slightly dry so the root ball holds together, and water in gently immediately after transplant to reduce stress.
Training techniques that support THCa production
Training is about light distribution. Every flowering site that receives adequate PPFD (photosynthetic photon flux density) produces more trichomes than one buried in shade. The goal is a flat, even canopy where all bud sites sit at roughly the same height and all receive direct light. The three main techniques home growers use are LST, topping, and ScrOG, and they're not mutually exclusive.
- LST (Low Stress Training): bend branches outward and downward using soft ties or garden wire, anchoring them to the pot rim or a support structure. Start LST early (once plants have 4 to 5 nodes) and continue throughout veg. This is the lowest-risk technique and is beginner-friendly
- Topping: remove the apical growing tip (the very top of the main stem) cleanly with sterile scissors above the 4th or 5th node. This causes the two nodes below to develop into two main colas instead of one, dramatically increasing productive flowering sites. Allow 5 to 7 days recovery before resuming aggressive training. Avoid topping within 2 weeks of flipping to flower
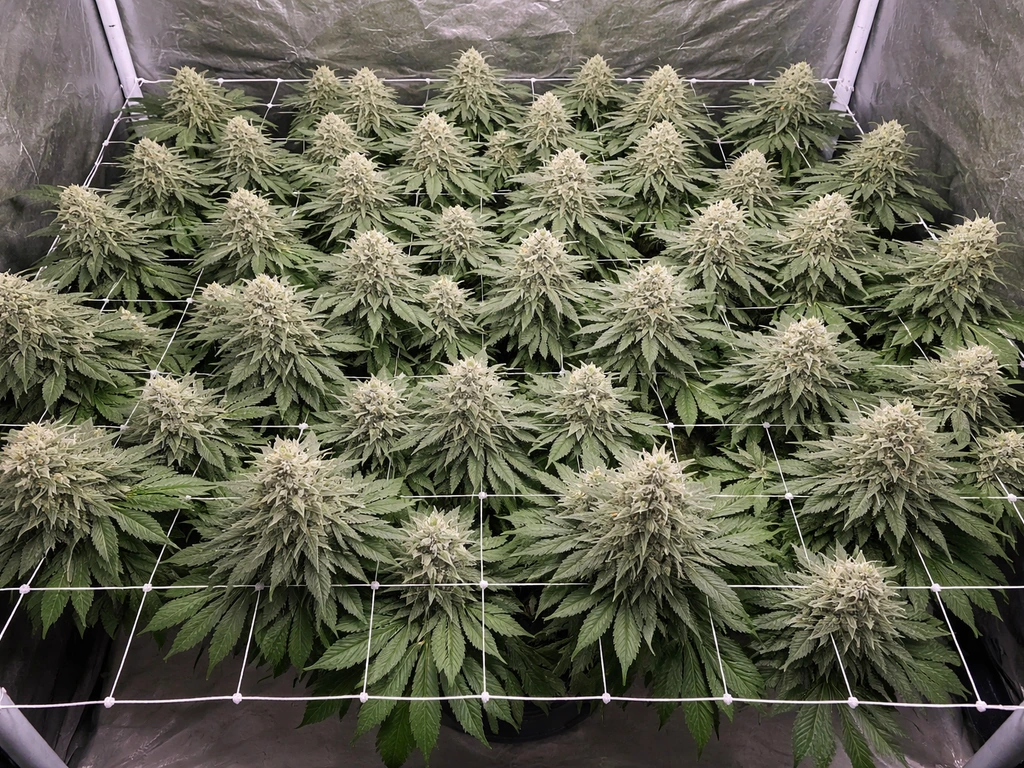
- ScrOG (Screen of Green): stretch a horizontal mesh or net 30 to 40 cm above the pots and train branch tips through the screen openings as they grow, creating an even canopy layer. This technique takes more setup but produces excellent light uniformity and is highly effective for high-THCa cultivars with dense cola structure like Bruce Banner or GG4
Environmental targets during veg: canopy temperature 22 to 26°C, RH 50 to 65% (VPD approximately 0.8 to 1.2 kPa), light at 18 hours on and 6 hours off, PPFD around 400 to 600 µmol/m²/s at the canopy is sufficient for vigorous veg growth. Nutrient EC in the range of 1.2 to 1.8 mS/cm for most cultivars in soilless or hydroponic setups, with nitrogen as the primary macronutrient driver at this stage.
Flowering stage strategy: maximizing THCa without converting it
The flowering stage is where THCa is synthesized, accumulated, and, if you're not careful, degraded. Getting this stage right is the single biggest lever you have on final THCa content, and there are several interlocking variables to manage simultaneously.
Flipping the light schedule and photoperiod management
For photoperiod (non-autoflowering) cannabis, flowering is triggered by shifting the light schedule from 18/6 to 12 hours of light and 12 hours of uninterrupted darkness per day. The uninterrupted dark period is critical, even a brief light leak during the dark phase can disrupt flowering, cause herming (hermaphroditism), or create light stress that will show up in your final cannabinoid profile. Seal your grow space properly before flipping. Check for leaks with the lights off and your eyes adjusted to darkness. Any visible light is too much.
Outdoor growers don't flip a switch, your plants begin flowering naturally as day length shortens toward the autumn equinox. In most northern hemisphere temperate climates, this means outdoor plants begin flowering in late July through August and reach harvest between late September and late October depending on the strain's flowering time. The same principles of environmental management apply; you simply have less control over some variables.
Light intensity during flower: finding the productive range
Light intensity during flower directly influences cannabinoid accumulation in many cultivars, but there's a ceiling. Controlled studies have shown that cannabinoid yield increases with PPFD up to around 1000 µmol/m²/s and some research reports proportional yield gains up to approximately 1300 µmol/m²/s, though responses are cultivar-dependent and energy costs rise sharply. The study 'Effect of Light Intensity and Two Different Nutrient Solutions on the Yield of Flowers and Cannabinoids in Cannabis sativa L. Grown in Controlled Environment' reported maximum flower yield and cannabinoid concentration at very high PPFD (~1300 µmol·m−2·s−1, DLI ≈56 mol·m−2·d−1), but cautioned about cultivar variability and energy/cost tradeoffs. For home growers, targeting 800 to 1000 µmol/m²/s at the canopy during peak flowering is a practical sweet spot that balances THCa production with energy consumption and heat management. Going higher without excellent cooling and CO2 supplementation often creates more heat stress problems than it solves.
Heat is the enemy of THCa. Canopy temperatures above 28 to 30°C accelerate terpene loss and can begin to promote THCa degradation over time, even in the living plant. Keep your canopy temperature at 22 to 26°C during lights-on and night temperatures no lower than 18°C (a small temperature drop at night of 5 to 8°C is fine and can encourage resin development, but big swings stress the plant and invite powdery mildew). Modern LED fixtures run much cooler than HPS at the same PPFD level and are worth the investment for THCa-focused indoor grows, especially in warm climates.
VPD and humidity through the bloom phase
Managing vapor pressure deficit (VPD), the difference between the amount of moisture in the air and how much it could hold at saturation, is more precise than chasing a single RH number, because VPD accounts for temperature. Research on hemp and cannabis demonstrates clearly that high RH (low VPD) conditions during flowering suppress cannabinoid accumulation and delay flowering, while also creating serious mold risk. Target VPD of 0.8 to 1.2 kPa in early flower (weeks 1 to 4) and 1.2 to 1.6 kPa in mid to late flower (weeks 4 through harvest). At a typical canopy temperature of 25°C, this corresponds roughly to 55 to 65% RH in early flower and 45 to 55% RH in mid to late flower.
| Flowering Stage | Weeks | Target VPD (kPa) | Approx. RH at 25°C | Temperature (Canopy) |
|---|---|---|---|---|
| Early flower | 1 to 3 | 0.8 to 1.2 | 55 to 65% | 22 to 26°C |
| Mid flower | 4 to 6 | 1.2 to 1.6 | 45 to 55% | 22 to 26°C |
| Late flower / ripening | 7 to harvest | 1.2 to 1.6 | 40 to 50% | 20 to 24°C |
| Dark period (all stages) | Lights off | Reduce slightly | 50 to 60% | 18 to 22°C |
Nutrient management in flower to support THCa accumulation
The relationship between macronutrient inputs and THCa concentration is less dramatic than many nutrient company marketing materials suggest. Controlled response-surface studies in soilless and hydroponic systems show that within typical fertilizer ranges, NPK manipulation alone has limited effect on THCa percentage in THC-dominant cultivars. That said, extremes hurt: excess nitrogen late in flower can suppress cannabinoid accumulation, and severe deficiencies in any macronutrient will reduce biomass and therefore total cannabinoid yield. The practical guidance is to follow a proven bloom-phase nutrient schedule, reduce nitrogen inputs significantly at the flip to 12/12, and focus more effort on environmental control than on chasing complex nutrient formulations.
For soilless and hydroponic growers, a bloom-phase EC of 1.4 to 2.0 mS/cm with a nitrogen-reduced, phosphorus and potassium-forward nutrient profile is a reliable starting range. Monitor runoff EC and pH closely, pH drift in coco or DWC (below 5.5 or above 6.5) can lock out calcium, magnesium, and iron at exactly the wrong time in flower. In soil, a slightly wider pH range of 6.0 to 7.0 is acceptable, but keep it toward the lower end of that range (6.0 to 6.5) for optimal availability of most micronutrients.
Flush timing and late-flower decisions
Whether to flush before harvest (running plain water through the medium for the final 1 to 2 weeks) is genuinely debated in the cultivation community, and the peer-reviewed evidence doesn't strongly support flushing as a factor in cannabinoid concentration. What matters far more for THCa preservation is controlling temperature and harvesting at the right trichome window. That said, flushing is low-risk and many experienced growers maintain it as part of their protocol. If you do flush, keep water temperature at room temperature and continue your usual environmental controls, don't let humidity creep up during the flush window.
Harvest timing: reading trichomes to lock in peak THCa
Harvest timing is arguably the most impactful single decision for THCa preservation. Harvest too early and trichomes haven't fully loaded with cannabinoids. Harvest too late and THCa begins degrading to CBN (cannabinol), especially if temperatures have been warm. The window for peak THCa is when the majority of trichome heads have turned from translucent/clear to milky white (cloudy), with at most 10 to 20% amber. Once amber trichomes dominate, THCa is already converting.
To inspect trichomes accurately, you need at minimum a 60x jeweler's loupe, and ideally a digital microscope or a jeweler's scope with 100x capability. Inspect the trichomes on the buds themselves, not just the sugar leaves (which ripen earlier). Also watch the pistils, at peak ripeness, 70 to 90% of pistils will have turned from white to orange or red, but use this as a secondary indicator, not your primary one. Trichome color is your reliable guide.
Drying and curing: where most THCa losses happen
I've seen growers nail every step from genetics through flowering and then lose measurable THCa in a hot, fast dry. Drying slowly at cool temperatures is non-negotiable for THCa preservation. Hang whole branches (or individual buds on a rack) in a dark room at 15 to 18°C and 50 to 55% RH with gentle airflow, not a fan blowing directly on the buds, but enough circulation to prevent mold. At these conditions, a proper dry takes 10 to 14 days, sometimes longer for dense buds. The slow dry preserves terpenes and minimizes thermal and oxidative stress on your THCa.
Once the smaller stems snap rather than bend and the outside of buds feels dry to the touch, transfer to airtight glass jars at roughly 60 to 65% RH (use Boveda or Integra Boost humidity control packets to maintain this). Burp jars daily for the first 1 to 2 weeks, open them for 10 to 15 minutes to exchange gases, then reduce to weekly burping. A minimum cure of 2 to 4 weeks significantly improves quality; 6 to 8 weeks is even better for premium flower. Keep jars in a cool, dark location. Consistent temperatures around 15 to 18°C and darkness are the two most important storage conditions for protecting THCa during the cure.
Long-term storage to protect your THCa
After curing, the same enemies remain: heat, light, oxygen, and moisture. All four degrade THCa over time, through decarboxylation and oxidation. For long-term storage (beyond a month), sealed glass jars in a cool, dark cabinet or refrigerator at 4 to 8°C and 55 to 60% RH is optimal. Avoid freezing unless you're planning to make extracts, as freeze-thaw cycles can rupture trichome heads. Vacuum sealing removes oxygen and dramatically slows degradation, worth doing for any significant quantity you're not planning to use quickly.
Testing your THCa levels at home and through labs
The most reliable way to know your actual THCa content is through a third-party ISO/IEC 17025-accredited laboratory using validated HPLC-based methods, specifically AOAC Official Method 2018.11 (LC-DAD or LC-MS), which is the widely adopted reference method for potency testing in regulated cannabis programs across North America. Many jurisdictions that allow home growing also have licensed testing labs that accept samples from private individuals, though availability varies by location. The AOAC 2018.11 method has reported detection limits (LOD) on the order of 0.004% and quantification limits (LOQ) around 0.012% by dry weight for major cannabinoids in dried flower, which is more than sensitive enough for typical home-grown flower. A COA from an accredited lab is the most defensible and accurate result you can get.
Consumer-grade colorimetric test kits are available but they are not accurate for quantification, they can confirm the presence of cannabinoids but cannot tell you whether your flower tests at 22% or 28% THCa. For home growers who just want directional feedback, kits like the ones from Cannachem or similar suppliers are a starting point, but treat the results as indicative only. If you're growing high-THCa cultivars seriously, budgeting for a lab test once or twice per grow is worth it for the feedback.
Pest and disease management without compromising THCa
Pest and pathogen pressure during flowering is a double threat: the direct damage to plant tissue and trichomes, and the temptation to apply chemical interventions that may themselves degrade cannabinoid content or leave residue. The best pest management strategy is integrated pest management (IPM) centered on prevention.
- Spider mites: maintain VPD in the correct range (mites thrive in hot, dry, low-VPD conditions above 1.8 kPa); introduce predatory mites (Phytoseiulus persimilis or Neoseiulus californicus) as a biological control; neem oil sprays are effective in veg but avoid spraying in flower — the oil can coat trichomes
- Powdery mildew: the most common fungal issue, especially at high RH; maintain late-flower RH below 50% and ensure good airflow within the canopy; potassium bicarbonate or diluted hydrogen peroxide sprays (applied carefully, not to drench buds) can control early outbreaks in veg
- Fungus gnats: allow the top 2 to 3 cm of soil to dry completely between waterings; yellow sticky traps for monitoring; beneficial nematodes (Steinernema feltiae) applied to the growing medium are highly effective at targeting larvae
- Botrytis (bud rot): the most devastating late-flower pathogen; prevent by maintaining RH below 50% in late flower, removing dead leaves, and ensuring airflow reaches the interior of large colas; remove any affected material immediately with sterile tools and quarantine
- Broad/russet mites: nearly invisible to the naked eye; monitor for stunted new growth and leaf curling in veg; spinosad-based sprays (OMRI-listed) or predatory mites (Neoseiulus californicus) are effective control options; avoid all sprays within 2 to 3 weeks of harvest
As a general rule: nothing should be sprayed on flowering buds within 2 to 3 weeks of harvest if you care about clean, contaminant-free THCa. Prevention through environmental control is always preferable to remediation once problems appear.
Troubleshooting common THCa production problems
| Symptom | Likely Cause | Fix |
|---|---|---|
| Lower-than-expected THCa on lab test | Wrong genetics, harvest too late, or post-harvest heat exposure | Verify strain COAs upfront; harvest at mostly cloudy trichomes; dry at under 18°C |
| Trichomes turning amber too quickly | Temperature too high in flower or during dry; UV overexposure | Lower canopy temp to 22 to 24°C; shade or reduce UV intensity in final weeks |
| Powdery mildew on buds in late flower | RH too high (above 55% in week 5+), poor airflow | Reduce RH, improve canopy airflow, remove affected material immediately |
| Buds feel airy or loose despite good genetics | Insufficient light (low PPFD), low VPD suppressing terpene and resin gland development | Increase PPFD to 800 to 1000 µmol/m²/s; correct VPD to target range |
| Yellowing leaves before week 6 of flower | Nitrogen deficiency (normal after week 5) or pH lockout | If early, check pH and adjust; if week 6+, some yellowing is normal senescence |
| Plants hermaphrodite in flower | Light leak during dark period, or temperature stress (above 30°C) | Seal all light leaks; lower canopy temperature; check for heat sources near the canopy |
Hydroponic-specific notes for high-THCa cultivation
Hydroponic systems (DWC, NFT, coco coir, ebb and flow) can produce exceptional THCa yields when dialed in, largely because of the precise nutrient control and oxygen delivery to roots. The same environmental targets apply, but a few details matter more in hydro. pH stability is critical: DWC and NFT in particular are sensitive to pH drift, and keeping the reservoir between 5.8 and 6.2 throughout flower prevents the lockout issues that will tank your cannabinoid accumulation. Reservoir temperature should stay between 18 and 22°C to prevent root rot (Pythium spp.), which can devastate a DWC crop seemingly overnight. Dissolved oxygen in the reservoir, maintained with adequate airstones or recirculation, is what allows roots to uptake nutrients aggressively, don't undersize your air pump. In coco, water more frequently (often daily or twice daily in peak flower) and keep EC and pH consistent across every fertigation. Inconsistent feeding in coco creates nutrient swings that show up as stress and reduced cannabinoid production.
If you're growing CBG alongside THCa-dominant cultivars in the same space, note that CBG-dominant cultivars typically need to be harvested earlier than THCa-dominant ones (CBGA doesn't fully convert in CBG strains, and the harvest window is narrower). For detailed, step-by-step cultivation advice specific to CBG-dominant plants, see the how to grow CBG guide (b8902300-c38a-4fd0-8b88-cf4cefa128d5). Managing two chemotypes in the same room is doable with careful planning but adds complexity, the CBG growing guide covers that in detail.
Outdoor growing for THCa: maximizing what nature provides
Outdoor cannabis can absolutely produce high-THCa flower, and some of the best results I've seen came from well-managed outdoor grows in the right climate. The key advantages are free sunlight at natural DLI levels that are difficult to replicate affordably indoors, and the full-spectrum light quality that comes from the sun. The key challenges are less control over temperature swings, humidity, and the risk of early-season rain coinciding with late flowering. Choose strains with a flowering time that suits your climate's frost-free window. In a northern hemisphere temperate climate, a 9-week flowering strain that finishes by mid to late October is a safer bet for preserving THCa than a 12-week strain that's still flowering when cold, wet conditions arrive and degrade your resin. Maximize your training in the vegetative outdoor season to open up the canopy, and add a temporary greenhouse cover or roof during the final weeks of flowering if rain is forecast, botrytis is the number one outdoor late-flower threat, and wet buds invite it immediately.
FAQ
What is THCa and why focus on preserving it instead of converting it to THC?
THCa (tetrahydrocannabinolic acid) is the acidic biosynthetic product of THCA synthase acting on CBGA in the living plant. It is non‑psychoactive until heat or prolonged aging decarboxylates it to THC. For growers aiming to maximize and preserve THCa, practices should minimize heat, light and oxidation postharvest and favor plant chemotypes with strong THCA synthase expression. (See: PubMed review on THCA synthase structure: https://pubmed.ncbi.nlm.nih.gov/22766313/).
How do I choose cultivars/chemotypes that reliably produce high THCa?
Choose verified high‑THCa chemotypes from reputable breeders or COAs (lab Certificates of Analysis). Commercial examples often cited include Bruce Banner and Gorilla Glue hybrids, but potency varies by phenotype and grow conditions. Verify cultivar COAs and, if possible, grow multiple phenotypes and select top performers. (Phylos variety pages and published COAs are useful references).
What are the indoor lighting targets to maximize THCa production?
Higher PPFD/DLI often increases flower biomass and cannabinoid yield in many cultivars. Home growers can target canopy PPFDs of 600–1000 µmol·m−2·s−1 for flower under full‑spectrum LED or HPS, with attention to heat management and cultivar tolerance. Very high intensities can increase yield but responses are cultivar‑dependent and carry energy/cost and stress risks (see controlled trials: https://www.ncbi.nlm.nih.gov/pmc/articles/PMC9551646/ and https://www.mdpi.com/2073-4395/14/12/2960).
What environmental parameters (temperature, RH, VPD) best support THCa accumulation?
Manage temperature and vapor pressure deficit (VPD) rather than RH alone. Common target VPD ranges: propagation 0.4–0.8 kPa, late veg/early flower 0.8–1.2 kPa, mid/late flower 1.2–1.6 kPa. Higher VPD in flowering tends to reduce disease and can favor resin/trichome production; sustained low VPD (high RH) can suppress cannabinoid accumulation (see VPD guidance and studies).
How should I manage nutrients to support high THCa?
Use cultivar‑appropriate balanced nutrient programs. Controlled studies show typical NPK within recommended ranges supports cannabinoid synthesis; extreme excess nitrogen or obvious deficiencies can reduce cannabinoid concentration. Follow flowering‑stage formulations, adjust EC/PPM per medium, and monitor plant response. Response is cultivar‑dependent; run smaller trials before applying extremes (see optimisation studies).
Indoor vs outdoor vs hydroponic — which system yields the highest THCa?
All systems can produce high THCa if genetics and cultural practices are optimized. Hydroponics/soilless systems allow tighter control of nutrition and pH and are commonly used for high‑potency production. Indoor controlled environments allow higher and more consistent light, VPD and pest control. Outdoor can produce large biomass with strong sun‑driven DLI but outcomes depend on climate and pest exposure. Choose the system you can control best and scale trials to your setup and cultivar. Studies show soilless systems can be optimized for cannabinoids but cultivar and environment interactions are key. (See nutrient and light studies cited above).},{
Next Article
How to Grow 1 Pound Per Plant: Yield Guide for Beginners
Step-by-step plan to grow ~1 lb per plant using strain choice, light, training, feeding, and troubleshooting for beginne