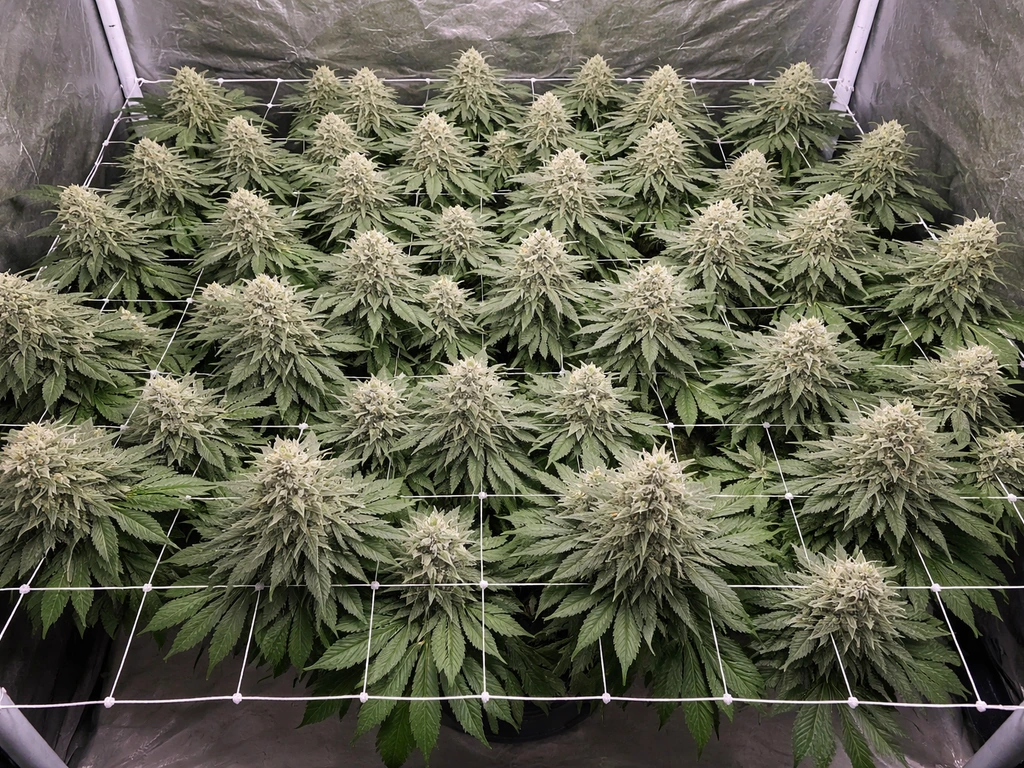
You can absolutely grow 'Reggie weed' at home, and doing it well is mostly about understanding what you're actually working with. 'Reggie' is slang for regular or low-tier cannabis, not a specific strain, so the first practical step is figuring out what genetics you have in hand. Once you know that, the grow process is the same as any home cannabis project: germinate, veg, flower, harvest, cure. This guide walks you through each stage, covers indoor and outdoor differences, and gives you honest troubleshooting for the problems that trip up most beginners. Once you have your seeds and legal basics covered, the rest of the steps follow the same straightforward timeline for how to grow cannabis from start to finish how to grow reefer.
How Do You Grow Reggie Weed at Home Step by Step

Marcus Holbrook
8 Jul 2026
A quick note on legality before you start
Home cannabis cultivation is legal in a growing number of places, but the rules vary enormously depending on where you live. Some U.S. states allow adults to grow up to six plants per person. Others allow more, some allow fewer, and some still prohibit home growing entirely even where recreational use is permitted. Outside the U.S., laws differ by country, region, and sometimes municipality. Before you spend money on seeds, lights, or soil, spend 15 minutes checking your local regulations. Look up your state, province, or country's specific plant-count limits, whether plants must be kept out of public view, and any licensing requirements. Growing outside your legal limits creates real risks that no harvest is worth. Everything in this guide assumes you're operating within whatever legal framework applies to you.
What 'Reggie weed' actually means, and why it matters for your grow
The word 'Reggie' is basically internet slang for mediocre or regular-grade cannabis. On Reddit’s r/trees, commenters also use “Reggie” to mean lower-quality cannabis, like “ditch weed” or “Reggie.” blank" rel="noopener noreferrer">Reggie is basically internet slang for mediocre or regular-grade cannabis.. blank" rel="noopener noreferrer">It likely evolved from the word 'regular' and is used informally to describe weed that's low in THC, weak in smell, and unremarkable in appearance. You'll see it used on forums to describe everything from commercial brick weed to homegrown plants that underperformed. The important thing is that Reggie is not a strain name. There's no seed bank selling 'Reggie Auto' or 'Reggie Feminized.' It's a quality label, not a genetic category.
In practice, if someone gives you seeds pulled from average commercial weed, those are Reggie seeds. They're often unknown genetics, possibly un-stabilized, and frequently regular (non-feminized) seeds, meaning about half will turn out male. That changes your strategy. You'll need to sex plants and pull males early, or accept the gamble. If you can get named feminized or autoflowering seeds from a reputable seed bank instead, even budget strains, your grow will be more predictable and likely more rewarding. Strains marketed as beginner-friendly, like Northern Lights, Blue Dream, or similar easy-growers, are essentially the legal equivalent of what people call Reggie in terms of accessibility, but with known genetics and better consistency.
So the decision point here is: do you grow with the random seeds you have, or do you source something known? Either path works, but if you're going the unknown-seed route, budget extra time for plant sexing and expect some variation in the final product. If you're sourcing seeds, autoflowering varieties are the easiest starting point for beginners since they flower on their own schedule regardless of light cycle.
Choosing your grow setup
Your setup choice, indoor, outdoor, or hydroponic, should match your real-world constraints, not an ideal scenario. Ask yourself: Do I have space indoors where I can control the environment? Do I have a private outdoor area in a legal jurisdiction that permits outdoor growing? Hydro is an option too, but it's more complex and honestly not the best starting point for a first grow with unknown genetics. Pick the method that fits your life, and commit to it.
Germinating seeds and getting seedlings started
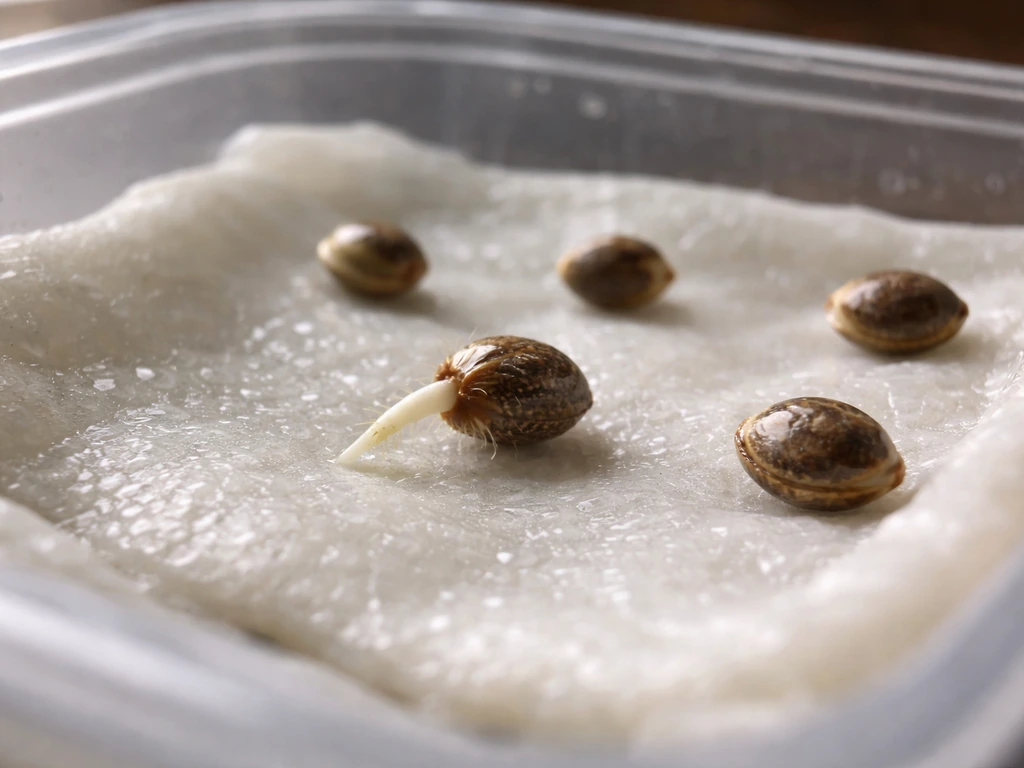
Germination is straightforward, but it's easy to overthink or over-handle the seeds. The paper towel method works reliably for most beginners. Place your seeds between two damp (not soaked) paper towels, put them on a plate, and cover with another plate or plastic wrap to hold moisture. Keep them somewhere warm, around 70 to 80 degrees Fahrenheit (21 to 27 degrees Celsius). Check every 12 hours. Most seeds crack and show a taproot within 24 to 72 hours. If a seed hasn't sprouted after five days, it's likely not viable.
Once the taproot is about a quarter to half an inch long, it's time to transplant into a starter medium. A small 3-inch pot filled with lightly pre-moistened seedling mix or a 50/50 blend of coco coir and perlite works well. Make a small hole about half an inch deep, place the seedling taproot-down, and cover gently. Don't pack the soil. Water lightly around the seedling, not on top of it, with plain pH-balanced water (6.0 to 6.5 for soil, 5.8 to 6.0 for coco or hydro).
For the first week or two, your seedling needs high humidity (65 to 70 percent relative humidity works well), moderate warmth (around 72 to 78 degrees Fahrenheit), and gentle light. If you're indoors, a T5 fluorescent or a low-power LED on an 18/6 light schedule (18 hours on, 6 off) is perfect. Don't blast a seedling with a 600-watt HPS right out of the gate. If you're starting outdoors, wait until nighttime temperatures are consistently above 50 degrees Fahrenheit before putting seedlings outside.
If you're working from a clone rather than seed, the process is simpler. Place the clone in a humidity dome with a rooting medium (rockwool cubes or rapid rooters work great), keep humidity at 70 to 80 percent, and wait for roots to show through the medium, usually 7 to 14 days. Once roots appear, it's ready to pot up and treat like a young seedling.
Planning your grow space: indoor vs outdoor
This is where a lot of beginners make commitments they later regret, so let's be specific about what each path actually requires.
| Factor | Indoor | Outdoor |
|---|---|---|
| Space needed | 2x2 ft minimum per plant (4x4 tent common for 2 to 4 plants) | 3 to 6 ft diameter per plant at maturity |
| Light source | LED, HPS, or CMH grow lights | Natural sunlight (free, but location-dependent) |
| Light control | Full control via timer | Dependent on season and latitude |
| Ventilation | Inline fan, carbon filter, ducting required | Natural airflow; still benefits from air movement |
| Climate control | Heater/AC may be needed; more precise control | Subject to weather; harder to manage extremes |
| Privacy/security | Contained; easier to keep discreet | Must screen from public view in most jurisdictions |
| Cost to start | Moderate to high (lights, tent, fans) | Low (seeds/soil; land already available) |
| Yield potential | Consistent year-round; depends on light wattage | Large yields possible in full sun with long season |
| Pest/mold risk | Lower if environment is controlled | Higher; more exposure to insects, rain, humidity |
Indoor grow essentials
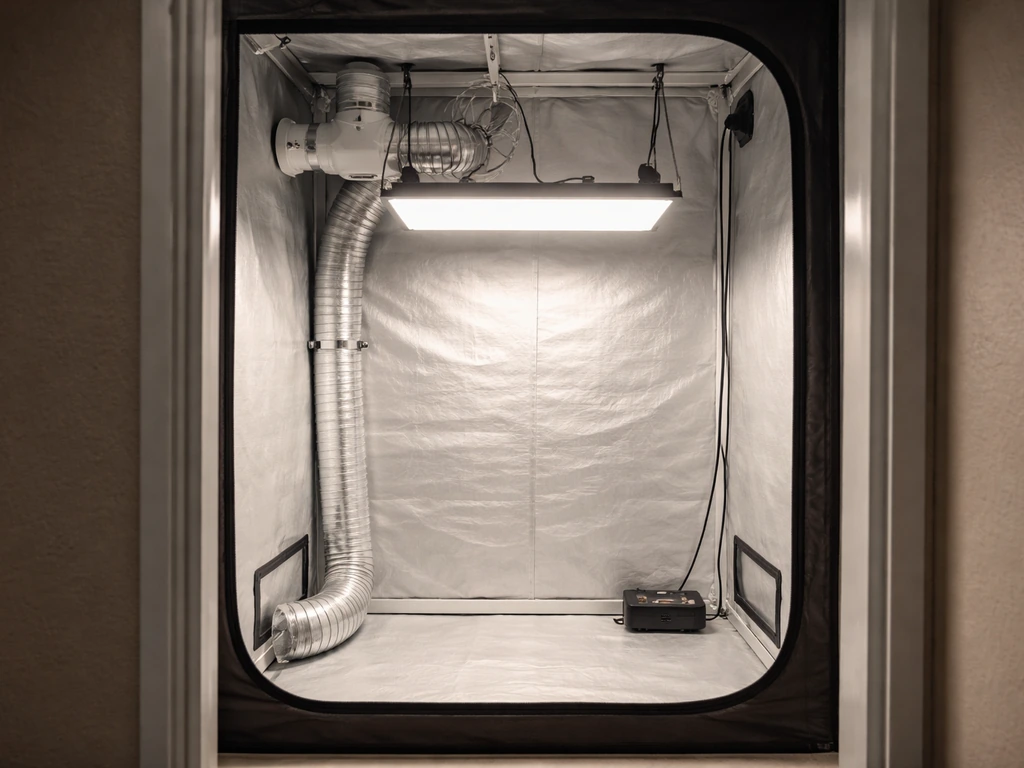
For indoor growing, a 4x4 grow tent is the most practical starting point for 2 to 4 plants. You'll need a quality LED or HPS light (a 400 to 600-watt HPS or a 200 to 300-watt actual draw LED covers a 4x4 effectively), an inline fan with a carbon filter to manage odor and airflow, a thermometer/hygrometer combo, and a pH meter. These are non-negotiables. I've tried cutting corners on airflow and pH monitoring and paid for it with stunted plants both times. Temperature should stay between 70 and 85 degrees Fahrenheit during the light period, and humidity should be around 50 to 70 percent in veg, dropping to 40 to 50 percent in flower to reduce mold risk.
Outdoor grow essentials
Outdoor growing is the most forgiving on the wallet. You need a spot that gets at least 6 to 8 hours of direct sun per day (south-facing in the Northern Hemisphere), privacy screening or fencing, good-quality outdoor cannabis soil or a large container (25 to 30-gallon smart pots work well for big outdoor plants), and a basic watering and feeding schedule. Cannabis planted outdoors in the Northern Hemisphere typically vegs through spring and summer, then flowers naturally as days shorten in August and September, with harvest usually falling between late September and early November depending on your latitude and strain.
Vegetative growth: training, feeding, and hitting your targets
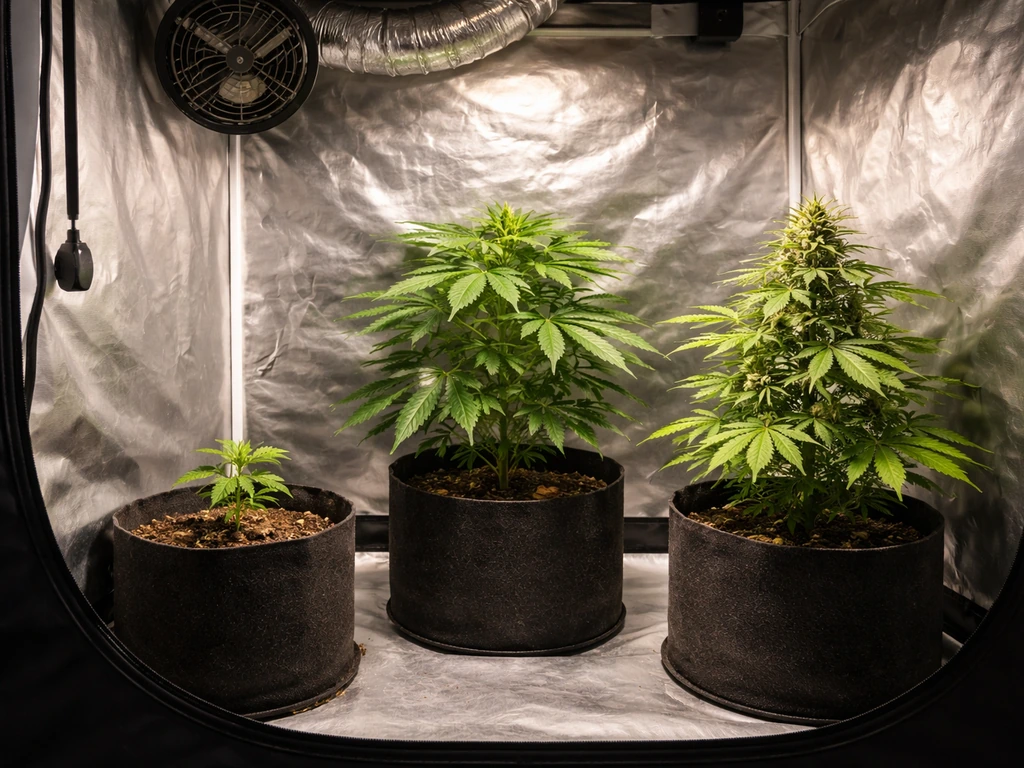
The vegetative stage is where the plant builds the structure that determines your eventual yield. For photoperiod plants (not autoflowers), you control veg length by keeping lights at 18 hours on, 6 off indoors, or by starting plants late enough outdoors that they have a full season of long days ahead. Most plants need 4 to 8 weeks of veg to develop enough branching for a good harvest. Autoflowers skip this calculation and begin flowering on their own around weeks 3 to 5 regardless of light cycle.
Training your plants
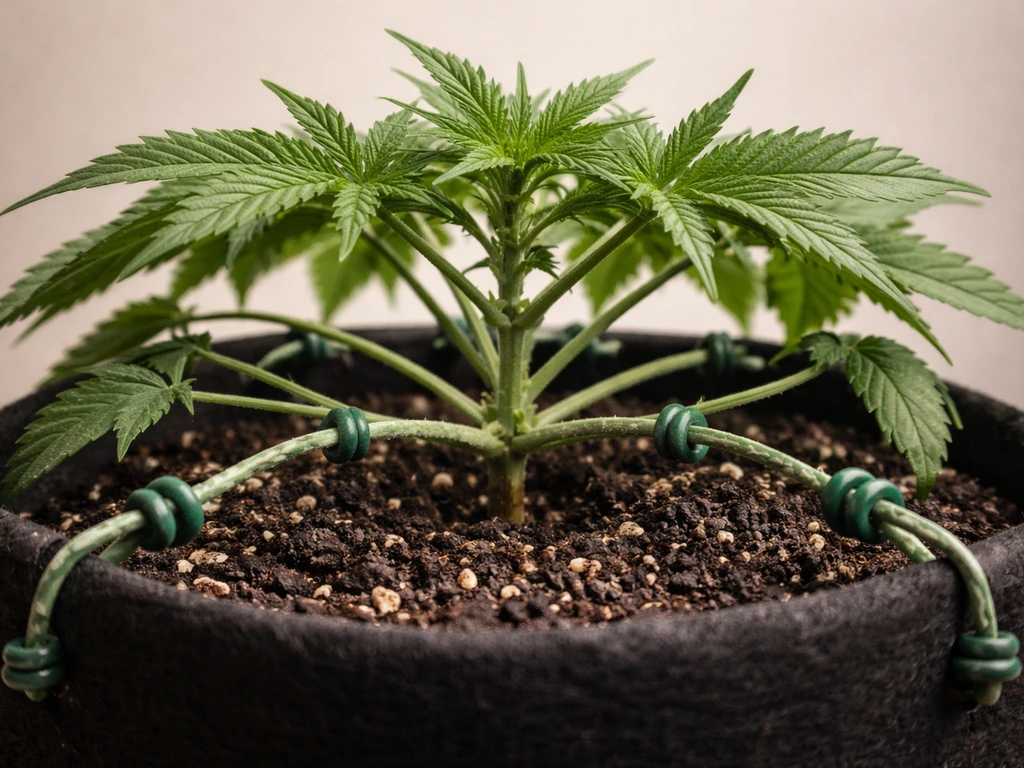
Training is optional but it genuinely increases yield without extra cost. Low-stress training (LST) is the easiest method: bend the main stem sideways and tie it down to the pot rim with soft wire or plant ties. This creates an even canopy and encourages multiple top colas instead of one. Start LST when the plant has 4 to 6 nodes. For unknown genetics (your Reggie seeds), I'd stick to LST rather than topping or FIMing right away, since you don't know how the plant will respond until you've seen it grow for a few weeks.
Feeding during veg
During veg, cannabis wants higher nitrogen relative to phosphorus and potassium. An NPK ratio around 3-1-2 is a common starting point. If you're using a pre-amended organic soil, you may not need to add nutrients for the first 3 to 4 weeks at all. When feeding, always mix nutrients into water, check the pH of the solution (6.0 to 6.5 for soil, 5.8 to 6.2 for coco/hydro), then water. Feed at roughly half the manufacturer's recommended dose when starting out. Overfeeding is one of the most common beginner mistakes, and it's much easier to fix underfeeding than a nutrient burn. Water only when the top inch of soil feels dry, and always water to about 10 to 20 percent runoff to prevent salt buildup.
- Veg temperature target: 70 to 85 degrees Fahrenheit (lights on), 60 to 70 degrees Fahrenheit (lights off)
- Relative humidity during veg: 50 to 70 percent
- pH for soil grows: 6.0 to 6.5; for coco/hydro: 5.8 to 6.2
- Watering frequency: every 2 to 3 days in soil (adjust based on pot size and plant size)
- Light schedule (photoperiod plants): 18 hours on, 6 hours off
- Nitrogen-forward nutrient ratio during veg: look for 3-1-2 NPK or similar
Flowering: the light flip, sexing plants, and knowing when to harvest
For photoperiod plants indoors, you trigger flowering by switching your light timer to 12 hours on and 12 hours off. If you’re growing delta 8 flower, keep in mind that the same general flowering and timing rules apply, but choose genetics and inputs aimed at the specific cannabinoid profile you want how to grow delta 8 flower. Do this when your plants are roughly half the height you want at harvest, since most strains will stretch an additional 50 to 100 percent during the first 2 to 3 weeks of flower. Outdoors, flowering begins naturally when day length drops below about 14 hours, usually in late July or August in most Northern Hemisphere climates.
Identifying and removing males
This step is critical if you're growing from unknown or regular (non-feminized) Reggie seeds. Within 1 to 2 weeks of the light flip (or pre-flowering outdoors), plants will show their sex at the nodes where branches meet the main stem. Female plants develop two white hair-like pistils emerging from a small teardrop-shaped calyx. Male plants develop small round pollen sacs that look like tiny balls on a stem. Pull all males immediately and dispose of them away from your grow space. A single male that pops open can pollinate your entire crop, filling buds with seeds and dropping THC content significantly.
Feeding and environment during flower
Switch to a phosphorus and potassium-forward nutrient formula once flowering begins, something like a 1-3-2 NPK ratio. Reduce nitrogen progressively as flower matures. Drop relative humidity to 40 to 50 percent to protect developing buds from mold. Temperature can stay in the 65 to 80 degree Fahrenheit range. Many growers drop temps slightly during the dark cycle (by 5 to 10 degrees) to encourage terpene development and sometimes color changes in the buds.
Knowing when to harvest
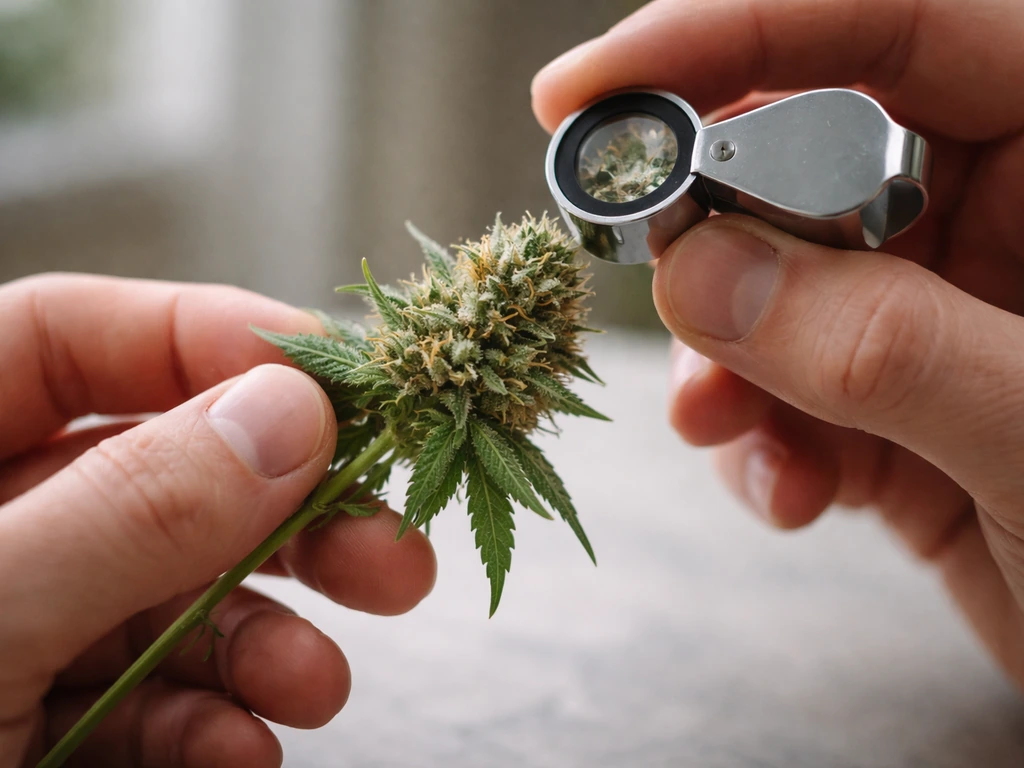
Most strains flower for 8 to 12 weeks depending on genetics. The most reliable harvest indicator is trichome color, which requires a jeweler's loupe (30x to 60x) or a digital microscope. Clear trichomes mean the plant isn't ready. Milky white (cloudy) trichomes signal peak THC development. Amber trichomes indicate THC is degrading into CBN, producing a more sedating effect. Most growers harvest when trichomes are a mix of mostly cloudy with 10 to 30 percent amber, depending on the effect they want. Also watch the pistils: when 70 to 90 percent have turned from white to orange/red, you're in the harvest window. A few days before harvest, stop all nutrients and water with plain pH-adjusted water only. This is called flushing and it helps clear residual salts from the plant.
Troubleshooting problems, and curing your harvest properly
Mold and botrytis
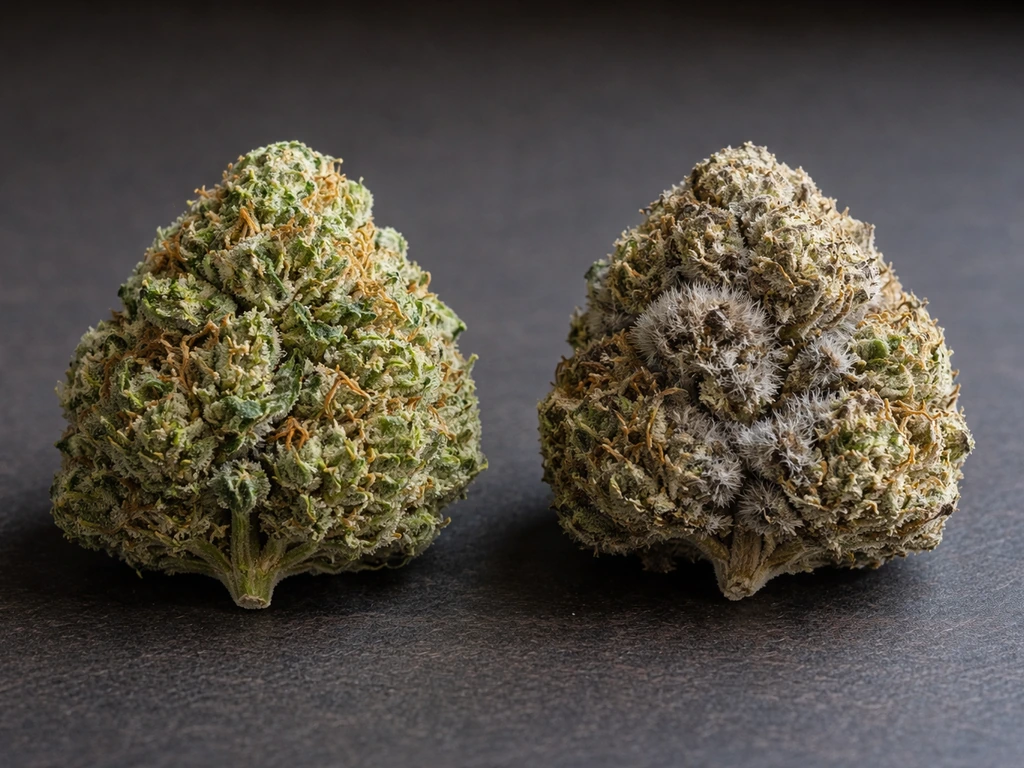
Bud rot (botrytis) is the most devastating late-flower problem, especially in humid climates or if your airflow is poor. It shows up as gray or brown fuzzy patches inside dense buds, often spreading invisibly before you notice. Prevention is everything: keep humidity below 50 percent in flower, run oscillating fans so air moves through the canopy, and defoliate lightly to open up airflow around bud sites. If you find bud rot, cut the affected bud and the surrounding area out immediately, sterilize your scissors, and keep a close eye on neighboring plants. Don't try to save infected material.
Pests
Spider mites, fungus gnats, and aphids are the most common culprits. Spider mites leave tiny yellow stippling on leaves and fine webbing under them; they thrive in hot, dry conditions. Fungus gnats look like tiny fruit flies and their larvae damage roots by feeding on organic matter in wet soil. Aphids cluster on new growth and stems. For any of these, start with the least invasive option: neem oil spray (1 tablespoon neem oil, 1 teaspoon dish soap, per quart of water) applied every 3 days for two weeks works well in veg. In flower, switch to spinosad-based sprays or insecticidal soap to avoid residues on buds. For fungus gnats, let the top of your soil dry out more between waterings and use yellow sticky traps to monitor populations.
Nutrient deficiencies and toxicity
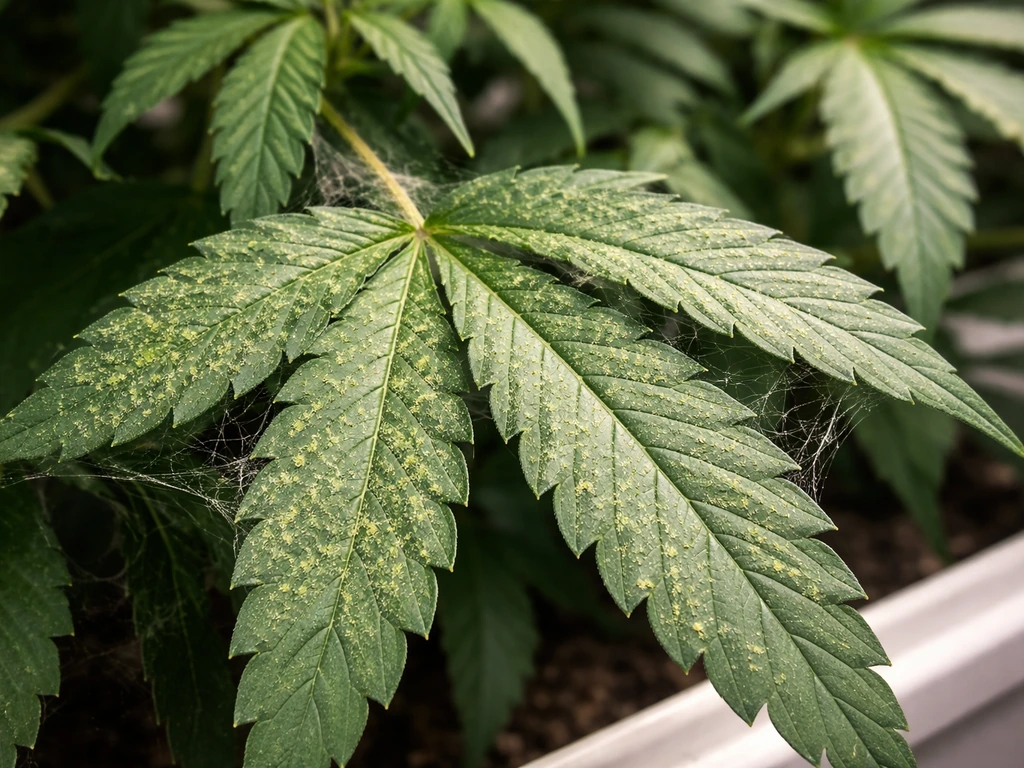
Yellowing leaves are the most common symptom beginners panic about, but not all yellow leaves are a problem. Lower fan leaves yellowing in late flower is completely normal. If newer upper leaves are yellowing, that's a flag. Nitrogen deficiency shows as yellowing that starts at the bottom and moves up. Calcium deficiency appears as small brown spots with yellow halos, usually mid-canopy. Phosphorus deficiency can cause dark green or purplish leaves with brown edges. If you want a similar outcome to Grand Daddy Purp, learn its specific growth requirements and flowering timeline so you can fine-tune your feeding and environment how to grow Grand Daddy Purp. In most cases, check pH first before adding anything, because pH being off by even half a point can lock out nutrients that are already present in the soil. Fix the pH, water normally for a day or two, and often the deficiency resolves on its own. Nutrient toxicity (overfeeding) shows as brown, crispy leaf tips and edges. Flush with plain pH-adjusted water and hold off feeding for 4 to 7 days.
Harvesting and basic curing
When you're ready to harvest, cut branches and hang them upside down in a dark space with good airflow. Temperature should be around 60 to 70 degrees Fahrenheit and humidity around 50 to 60 percent. Whole branches can hang dry for 7 to 14 days. The buds are ready for the next step when the smaller stems snap rather than bend. If they're still bendy, keep drying.
After drying, trim your buds (you can do a rough wet trim at harvest or a more detailed dry trim now) and place them in clean glass mason jars, filling each jar about 70 to 75 percent full. Seal the jars and store them in a cool, dark place. For the first two weeks, open each jar for 10 to 15 minutes once or twice daily to let moisture escape. This is called burping. If you smell ammonia when you open a jar, the buds are too wet and at risk of mold. Spread them out on a clean surface for a few hours to dry further before re-jarring. After two weeks of daily burping, you can reduce to opening jars every few days. Most cannabis reaches its best flavor and smoothness after 4 to 8 weeks of curing, though it's smokable after 2 to 3 weeks.
Growing what people call Reggie weed is really just growing cannabis with unknown or modest genetics, and the process is identical to growing any other plant. The more attention you pay to the basics (pH, airflow, humidity, and feeding) the further you'll push whatever genetics you're working with. If you want to take things further from here, exploring specific strain types like autoflowers for simplicity or diving into training techniques like topping and ScrOG are natural next steps as you get comfortable with the fundamentals.
FAQ
Is “Reggie weed” a specific strain I can buy seeds for?
No, “Reggie” is a slang quality label, not a strain name. If you are getting seeds from average or low-tier cannabis, you are usually dealing with unknown genetics and they may be regular (non-feminized), so plan for sexing and more variability in yield and potency.
How can I tell if my seeds are likely regular (and male) before I grow them?
You often cannot know with certainty until plants show sex. If the source is unknown or harvested from random flowers, assume a mix of male and female. A practical approach is to germinate extra seeds so you can discard males without risking a short crop.
What should I do if my seedlings look healthy but growth stalls in week 2 or 3?
First check pH and watering pattern. Stalled growth commonly comes from nutrient or pH lockout (especially in coco/hydro) or consistently wet medium that limits root oxygen. Let the medium partially dry between waterings, verify pH in your feeding solution, and avoid increasing fertilizer while roots are stressed.
Can I grow Reggie weed outdoors even in a cooler climate?
Yes, but you need a realistic season length. Choose a location with consistent sun and make sure daytime temperatures stay reliably warm until plants are established. If nights drop hard early, consider starting in containers indoors, then moving outside once temperatures are stable to avoid slow starts.
How many plants should I start if my seeds are unknown?
Start more than your “final” target. With regular seeds, you may lose a portion to males. Even among females, unknown genetics can produce smaller plants, so having extra plants lets you keep the best performers without compromising your end result.
Do I have to top or FIM unknown-seed plants for better yield?
No. With unknown genetics, low-stress training is usually the safer first move because it is less dependent on the plant responding predictably to cuts. Topping can work, but if a particular seed line has slower recovery, you can lose time and yield in the first grow.
How do I know whether to use soil or coco for an “unknown genetics” first grow?
Soil is more forgiving when pH swings or when you are learning watering. Coco can grow great plants, but it demands tighter pH control and more consistent feeding. If you want fewer variables, start with quality soil and only switch to coco once you are confident about pH and drainage.
What’s a good way to prevent bud rot when humidity is unpredictable?
Treat airflow as your main control. Use an oscillating fan aimed to move air through the canopy, avoid over-dense foliage early in flower, and do not let humidity sit above your target range. If you are in a humid area, also inspect inside buds frequently, because rot can begin before external signs appear.
My buds smell “off” early in flower, is that always a problem?
Not always, but a rapid shift to sour, musty, or “wet hay” aromas can indicate excessive moisture or early mold risk. If that happens, check humidity and airflow immediately, reduce watering stress, and inspect bud interiors. Do not ignore odor changes during dense flowering.
How do I avoid nutrient burn when I’m feeding an unknown Reggie seed line?
Use a conservative start and increase slowly. Feed at about half dose initially, confirm your pH, and watch the newest growth. Overfeeding often shows as brown, crispy tips, while underfeeding is more reversible. If you suspect burn, flush with plain pH-adjusted water and pause nutrients for several days.
What’s the best way to confirm harvest timing if pistils are still changing color?
Use a combination of trichomes and pistils. Trichomes give the strongest indicator, harvest when you have mostly cloudy heads with some amber if you want more sedating effects. Pistils can keep changing after peak readiness, so do not rely on pistils alone.
Do I really need to flush before harvest?
Flushing is optional depending on how you feed and your medium. If you do flush, do it briefly and consistently (stop nutrients a few days before harvest and water with pH-adjusted water). The main practical benefit is reducing residual salts, which can help prevent harshness if your feeding schedule was aggressive.
Why do my jars smell like ammonia during curing?
Ammonia odor usually indicates buds are still too wet internally or curing is too aggressive. Fix it by spreading buds out for a short period to reduce moisture, then re-pack after they are drier. Also keep burping schedules consistent (do not skip the early daily burps).
How do I store “Reggie weed” so it stays potent and flavorful?
Use clean glass jars, keep them sealed and out of direct light, and monitor humidity during curing so it does not get too wet or overdry. If you are going to store longer-term, aim for a stable cool, dark environment, and avoid repeatedly opening jars for long periods.
Next Article
How to Grow 1 Pound Per Plant: Yield Guide for Beginners
Step-by-step plan to grow ~1 lb per plant using strain choice, light, training, feeding, and troubleshooting for beginne