You can successfully grow cannabis outdoors from seed by starting seeds indoors 4 to 6 weeks before your last frost date, hardening off your seedlings, transplanting once night temps stay reliably above 50°F (10°C), and managing water, nutrients, pests, and training through a full outdoor season that ends at harvest in late summer to fall. If you want truly top-shelf results outdoors, focus on premium soil, maximum direct sun, and consistent pest and moisture control throughout the full flowering window grow cannabis outdoors. If you want truly top-shelf results outdoors, focus on premium soil, maximum direct sun, and consistent pest and moisture control throughout the full flowering window how to grow outdoor weed step by step. The whole process from seed to harvest takes roughly 4 to 6 months for photoperiod strains, or as little as 10 to 14 weeks for autoflowers. What follows is a practical, stage-by-stage breakdown of exactly how to get there.
How to Grow Weed Outdoors From Seed: Step by Step Guide

Before anything else: check your local laws. Cannabis cultivation rules vary enormously by country, state, and even municipality. Some places allow several plants per household for personal use; others prohibit cultivation entirely. Whatever you do, stay within your legal limits and grow responsibly. This guide assumes you are growing legally where you live.
Choosing the Right Strain and Planning Your Grow Window
Strain choice and timing are the two decisions that shape everything else. Get them right and the rest of the grow becomes a lot more forgiving. Get them wrong and you can end up with plants that flower too late, get hit by early frost, or just don't suit your climate.
Autoflower vs. Photoperiod: Which Makes More Sense for You?
Photoperiod strains flower based on daylength. Outdoors, they stay in vegetative growth through summer's long days, then shift into flowering once days shorten past a natural trigger point (typically around the summer solstice or shortly after, depending on genetics and latitude). That makes them ideal for growers who want maximum plant size and yield, but they need the full season. Expect 3 to 5 months from seed to harvest. Autoflowering strains work on an internal clock regardless of light schedule. An auto started indoors in late March can be transplanted outside in late April and finish by late June in a cooler northern climate, which is earlier than most photoperiods have even started flowering. Autos run their full cycle in roughly 10 to 14 weeks from seed. If you're in a short-season climate, have a warm microclimate with a narrow window, or just want a faster result, autoflowers are the practical choice. For people who want the biggest plants and highest yields and have a full season to work with, photoperiods are worth the extra time. The guide on how to grow photoperiod outdoors covers that lifecycle in more depth if you're going that route.
Map Your Frost Dates First
Your grow window is defined by two dates: your average last spring frost and your average first fall frost. Look these up for your specific ZIP code or region using a tool like the Old Farmer's Almanac frost date calculator. Your last spring frost tells you the earliest safe transplant zone. Your first fall frost tells you when outdoor plants must be done. A late-season photoperiod strain that needs 10 weeks of flowering started too late will get hit by frost before it finishes. Plan backward from your first fall frost to make sure you have enough season. In most of the continental US, the outdoor window runs roughly May through October, but this shifts significantly depending on where you are. Growers in southern states like Florida have a completely different window, conditions there favor earlier starts and present different challenges altogether. If you are growing outdoors in Florida, the same basics apply but you will need to plan around Florida’s climate and pests how to grow weed outdoors in Florida.
Picking a Strain for Your Climate
Short-season climates (northern states, Canada, higher elevations) need fast-finishing strains, autos or early-finishing photoperiod hybrids that wrap up in 7 to 8 weeks of flowering. Long-season, warm climates can handle slower, higher-yielding sativas or larger indicas with 9 to 10-week flower times. If you're in a humid climate, prioritize strains with documented resistance to mold and powdery mildew. Open bud structure reduces the risk of bud rot late in flowering when rain and dew can be relentless. Ask your seed bank specifically about humidity and mold tolerance before buying.
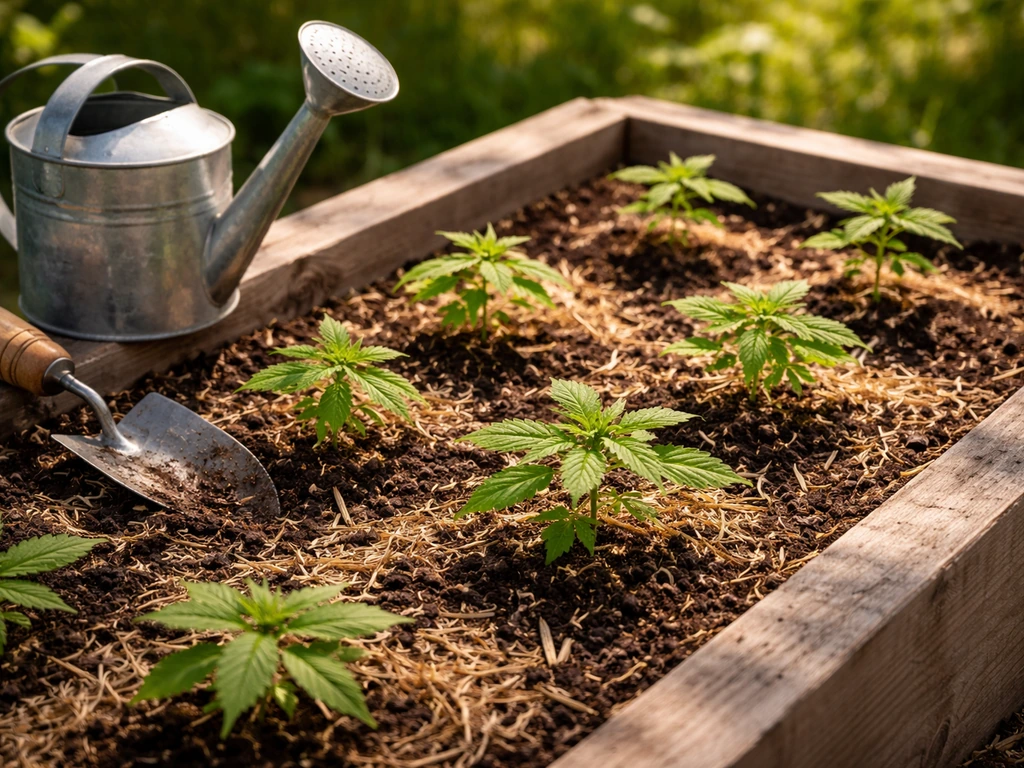
Seed Starting and Germination for Outdoor Cultivation
Germinating seeds sounds simple, and it is when conditions are right. The most common mistake is rushing seeds into cold, wet soil too early or using suboptimal conditions that stall the process.
The Paper Towel Method (Reliable and Easy to Monitor)

- Dampen two paper towels — moist but not dripping.
- Place seeds between the towels on a plate.
- Cover with another plate or a loose plastic bag to hold moisture.
- Keep in a warm spot: target 75 to 80°F (24 to 27°C) with humidity around 70 to 90%.
- Check every 12 to 24 hours. Most viable seeds crack and show a taproot within 24 to 72 hours.
- Once the taproot is 0.5 to 1 cm long, plant carefully, taproot pointing down.
If a seed cracks but doesn't show taproot progress after 48 hours, don't give up immediately. Keep it at 24 to 25°C (75 to 77°F) for another 48 hours before writing it off as non-viable. Cool temperatures are a very common culprit for slow or stalled germination. If your ambient temps are below 70°F (21°C), find a warmer spot, top of a refrigerator, a seedling heat mat, or inside a cabinet near a heat source.
Direct Sowing vs. Starting Indoors
You can direct-sow cannabis seeds outdoors once conditions are reliably warm, which avoids the transplant shock risk entirely. Plant seeds about 1/4 to 1/2 inch (6 to 12 mm) deep, cover lightly, and keep the area consistently moist until germination. The trade-off is that you have less control over temperature and moisture in outdoor soil during early spring, and germination rates tend to be lower with direct sowing in variable conditions. Starting indoors 4 to 6 weeks before your planned outdoor transplant date gives you more control over the critical early phase and a stronger, more resilient plant by transplant time. For most beginners, indoor starts lead to better results.
Early Seedling Care Indoors
Once sprouted, seedlings need light, a lot of it. A simple LED grow light or T5 fluorescent positioned a few inches above the canopy for 18 hours per day is fine for this stage. Keep temps around 70 to 80°F (21 to 27°C) and humidity around 60 to 70%. Start in small containers (solo cups or 4-inch pots) using a light seedling mix. Avoid heavy nutrient feeding at this stage; seedlings have delicate roots and can burn easily. Water lightly and only when the top inch of medium is dry.
Outdoor Site Selection and Setup
Your site is one of the biggest yield factors in an outdoor grow. Cannabis is demanding when it comes to light, and an average spot is not good enough if you want genuinely good results.
Sunlight Requirements
Cannabis wants at least 6 hours of direct sunlight per day at an absolute minimum, and 8 to 10+ hours is where yields really improve. South-facing spots in the Northern Hemisphere get the most direct light throughout the day. Watch your site at different times, morning, midday, and afternoon, to understand where shadows fall and how long the space stays in full sun. Trees, fences, and buildings can block crucial hours you won't notice until it's too late.
Soil Quality and pH
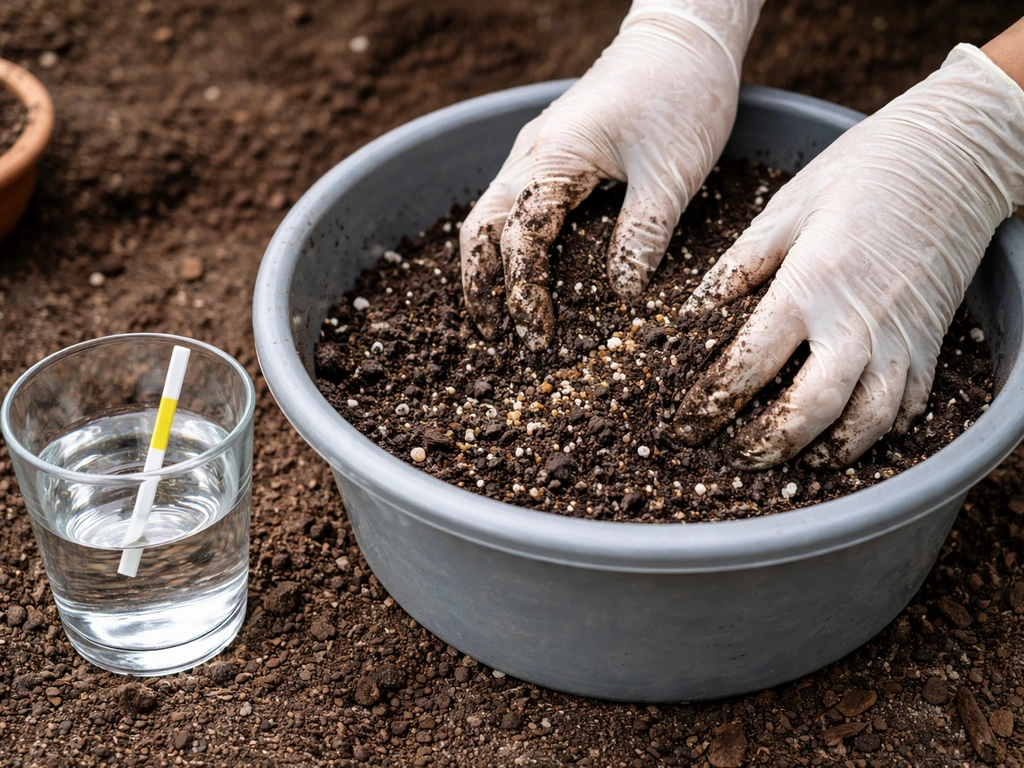
Cannabis performs best in well-draining, slightly acidic soil with a pH of 6.0 to 6.5. Outside of that range, nutrients become less available to the plant even when they're present in the soil, a frustrating problem that looks like a deficiency but is actually a pH lock-out. Test your soil before planting using an inexpensive pH meter or test kit. If you're amending native soil, mix in 10 to 20% compost to improve structure, water retention, and biological activity. Avoid compacted clay soils that hold standing water; cannabis roots need oxygen as much as moisture.
Containers vs. In-Ground
Growing in containers gives you control over your soil quality from the start, lets you move plants to optimize sun exposure or protect them from sudden weather, and makes it easier to dial in pH and drainage. The downside is that containers dry out faster, especially in heat, requiring more frequent watering. Large fabric pots (15 to 30 gallons for big photoperiod plants) work extremely well outdoors. In-ground planting allows larger root systems, potentially bigger plants, and more natural nutrient cycling, but you're working with whatever your native soil offers and can't move the plants. For beginners, containers offer more forgiveness and flexibility.
Drainage, Wind, and Privacy
Make sure your site drains well. If water pools after rain, plants will sit in saturated soil, which kills roots and invites root rot. Raised beds and containers solve this easily. Wind is a double-edged factor: gentle airflow reduces humidity around foliage and helps prevent mold, but sustained strong wind can stress, break branches, and cause windburn. A site that has some natural windbreak (a fence, a hedge) while still getting air movement is ideal. And yes, privacy matters for most growers for both security and legal reasons. Tall fences, companion planting, or natural screening plants are common solutions.
Transplanting Seedlings and Early Veg Care Outdoors
Transplanting too early is one of the most common beginner mistakes. Cold soil and cold nights stress young plants badly, sometimes stalling growth for weeks. Wait until your last frost date has passed, night temperatures are consistently above 50°F (10°C), and you have a stable weather forecast with no cold snaps on the horizon. Soil temperature should be reliably warm enough for active root growth, at least 60°F (15°C) at root depth.
Hardening Off: Don't Skip This Step
Indoor seedlings are not prepared for direct outdoor conditions, full sun, wind, temperature swings. Hardening off is the process of gradually introducing them to outdoor conditions over 7 to 14 days. Start by setting them outside in a sheltered, partially shaded spot for just 1 to 2 hours per day, then bring them back inside. Increase outdoor exposure by an hour or two each day, gradually moving them into more direct sun. By the end of two weeks, they can handle full outdoor conditions without shock. Skipping this step and putting pale indoor seedlings straight into full summer sun can result in severe bleaching, curled leaves, and setback growth.
How to Transplant Without Stressing the Plant
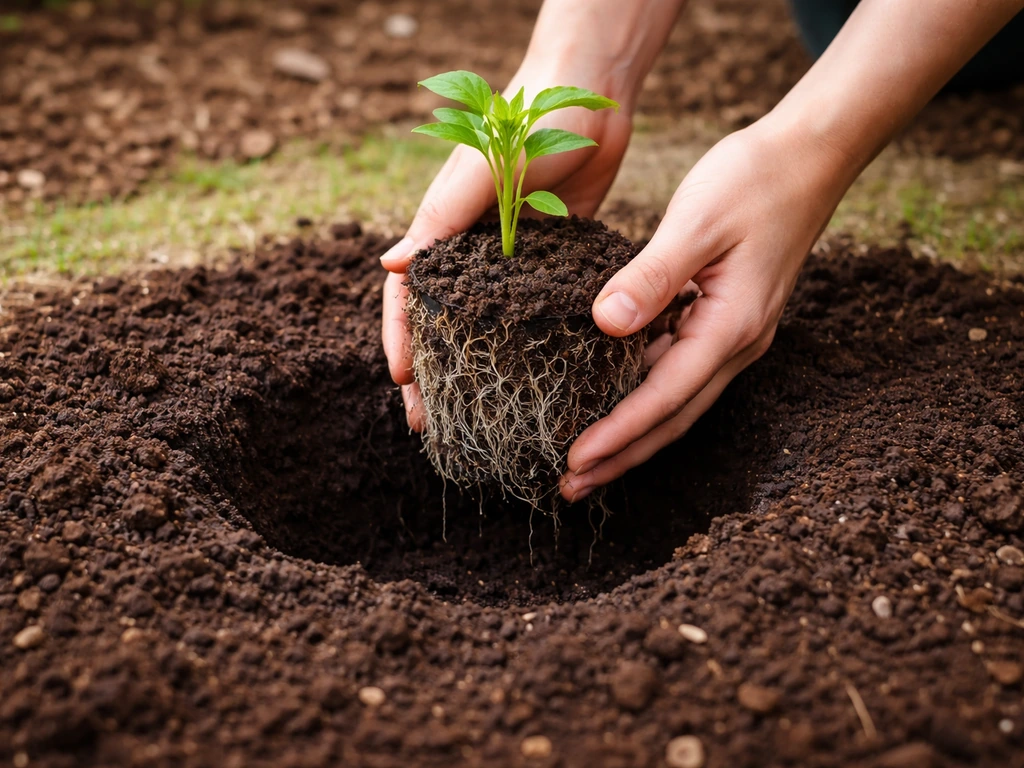
- Water the seedling well about an hour before transplanting so the root ball holds together.
- Prepare the new container or hole with pre-moistened, amended soil.
- Gently tip the seedling out of its current container — don't pull by the stem.
- Place in the new container at the same soil depth (slightly deeper is fine if the stem is leggy).
- Backfill gently, water lightly, and shade the plant for the first day or two.
- Avoid heavy nutrient feeding for the first week while roots settle into new soil.
During early veg outdoors, focus on root development and letting the plant establish. You'll see rapid growth once it settles in. Keep an eye on overnight temperatures, if a late cold snap is coming, bring containers inside or cover in-ground plants with frost cloth.
Watering, Feeding, and Soil Amendments Through Growth
Outdoor plants have natural advantages, rainfall, soil biology, living organisms cycling nutrients, but they still need consistent management, especially in containers.
Watering Rhythms
The simplest watering guideline: water when the top inch or two of soil is dry. Stick your finger into the soil; if it feels dry at the first knuckle, it's time to water. Water deeply until you see runoff from the bottom of containers, then wait. Outdoor containers in hot weather may need watering every day or two; in-ground plants in naturally moist soil may go 5 to 7 days. Overwatering is far more common than underwatering and causes more problems. Yellowing lower leaves, drooping that doesn't recover after morning, and a constantly heavy, wet pot are signs you're watering too much.
Nutrients: What Plants Need and When
Cannabis has three major nutrient needs: nitrogen (N) for vegetative growth, phosphorus (P) for root development and flowering, and potassium (K) for overall plant health and bud development. During veg, plants want relatively high nitrogen. As they enter and move through flowering, they need less nitrogen and more P and K. If you start with a high-quality amended soil (with compost, worm castings, and slow-release amendments), you may not need to add much during early veg at all. For later stages, a dedicated cannabis bloom fertilizer or a well-balanced organic line works well. Avoid over-feeding, nutrient burn (bright yellow or crispy leaf tips) is more common than deficiency in beginner grows.
pH Management and Soil Amendments
Always pH your water and liquid nutrients before applying. Target 6.0 to 6.5 for soil grows, and you can go slightly higher, up to 6.8, during flowering without issue. If your soil is too alkaline, sulfur amendments or pH-down solutions bring it in line. Too acidic, and garden lime raises it. For soil amendments before planting, a mix of compost (10 to 20% of your total mix), perlite for drainage (15 to 20%), and a balanced slow-release dry amendment or worm castings gives you a strong base. Avoid cheap fertilizers that are entirely fast-release nitrogen, they can spike and burn roots. Look for products where the nitrogen fraction includes a meaningful portion of slow-release or organic forms.
Dealing with Outdoor Weather Challenges
Heat over 95°F (35°C) causes heat stress, leaves curl upward like tacos, growth slows, and terpene production can be affected. If you're in containers, you can move plants to afternoon shade during a heat wave. Mulching around the base of in-ground plants helps keep root zones cooler and retains moisture. Extended cold snaps, even short of frost, slow growth significantly and can cause purple discoloration in some strains. Wind can physically damage plants and also desiccate them rapidly. Staking stems and using a windbreak prevents mechanical damage during storms.
Training, Pest Control, and Mold Prevention
Training shapes your plant to maximize light exposure and airflow, which directly impacts both yield and disease prevention. Pest and mold management outdoors requires consistent monitoring because the outdoor environment brings threats you simply don't encounter indoors.
Low-Stress Training (LST)
LST is the beginner-friendliest training method. You gently bend and tie down main stems to encourage a more horizontal canopy with multiple bud sites at similar heights rather than one dominant central cola. Start LST around the 5th node, typically 3 to 4 weeks after germination, when stems are still flexible enough to bend without snapping. Use soft plant ties, garden wire with rubber coating, or even pipe cleaners to anchor bent stems to the pot rim or a stake. As new growth rises, continue training it horizontally. LST works on both autos and photoperiods, though with autos you need to start early given their shorter timeline.
Topping and Pruning
Topping (cutting off the main growing tip) creates two main colas from one and dramatically changes the plant's structure. For photoperiod plants outdoors, topping in early summer during vigorous veg growth gives plenty of recovery time before flowering. Avoid topping after the plant has begun flowering, the stress at that stage costs more than it gains. For autoflowers, topping is more controversial. If you do it, time it precisely: the plant needs to have enough nodes developed and enough time to recover before its automatic flower trigger kicks in. A late top on an auto can permanently stunt the plant. If you're unsure with autos, skip topping and stick with LST. Lollipopping (removing lower growth that gets no light) improves airflow in the lower canopy and redirects energy upward, do this selectively during early to mid veg.
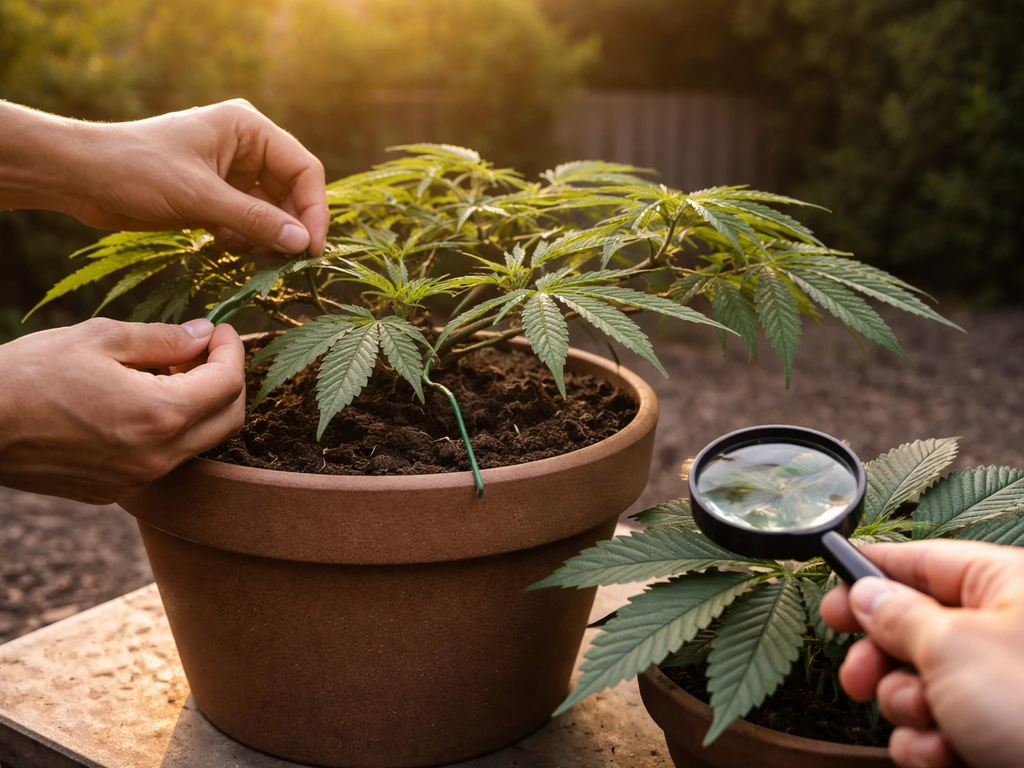
Pest Management
The most common outdoor cannabis pests are spider mites, aphids, caterpillars (especially from budworms), fungus gnats, and thrips. Check the undersides of leaves weekly, that's where most pests hide and lay eggs. Integrated Pest Management (IPM) approaches combine cultural controls (good airflow, healthy soil, not overwatering) with targeted interventions. Neem oil is a broadly effective organic option that works against aphids, spider mites, and many soft-bodied insects. Apply it as a foliar spray in the evening to avoid sun-related leaf burn, and avoid spraying it during flowering (it can affect flavor and burn delicate buds). Insecticidal soap is another gentle option. Predatory insects, including predatory mites released near your plants, can control spider mite populations very effectively as a biological approach. Stop all foliar sprays as you approach harvest.
Powdery Mildew and Bud Rot Prevention
Powdery mildew shows up as white powdery patches on leaves and stems. It thrives in humid, low-airflow conditions and spreads rapidly. Prevention is far easier than treatment: maintain airflow, thin dense foliage in the middle of the canopy (like removing crowded inner leaves), and avoid overhead watering that keeps leaves wet overnight. If you spot early signs, potassium bicarbonate or diluted hydrogen peroxide sprays can help control spread. Bud rot (Botrytis) is the most devastating late-season outdoor threat. It starts inside dense buds and works outward, often invisible until a bud literally falls apart. Late flowering, particularly during extended wet or cool, humid weather near harvest, is the highest-risk period. Good airflow, choosing open-structure or mold-resistant strains, and avoiding anything that traps moisture around buds (including dense screen-of-green setups in humid climates) are your best defenses. If you see a single infected bud, remove it immediately and thoroughly with clean scissors, then sterilize your tools before touching any other plant.
Trellising for Outdoor Plants
Large outdoor photoperiod plants can get enormous, 5 to 10 feet tall or more, with heavy branches that bend or snap under the weight of developing buds. A simple trellis made from bamboo stakes and garden netting, or a tomato cage around a container plant, provides structural support and also lets you train the canopy as it develops. Install your support early in the season so you're not scrambling to support a 7-foot plant during late flowering when it's most vulnerable to branch breakage.
Flowering Timeline, Harvest Readiness, and What to Do After
The final stretch is where patience pays off. Harvesting even a week early or late makes a real difference in potency, flavor, and effect.
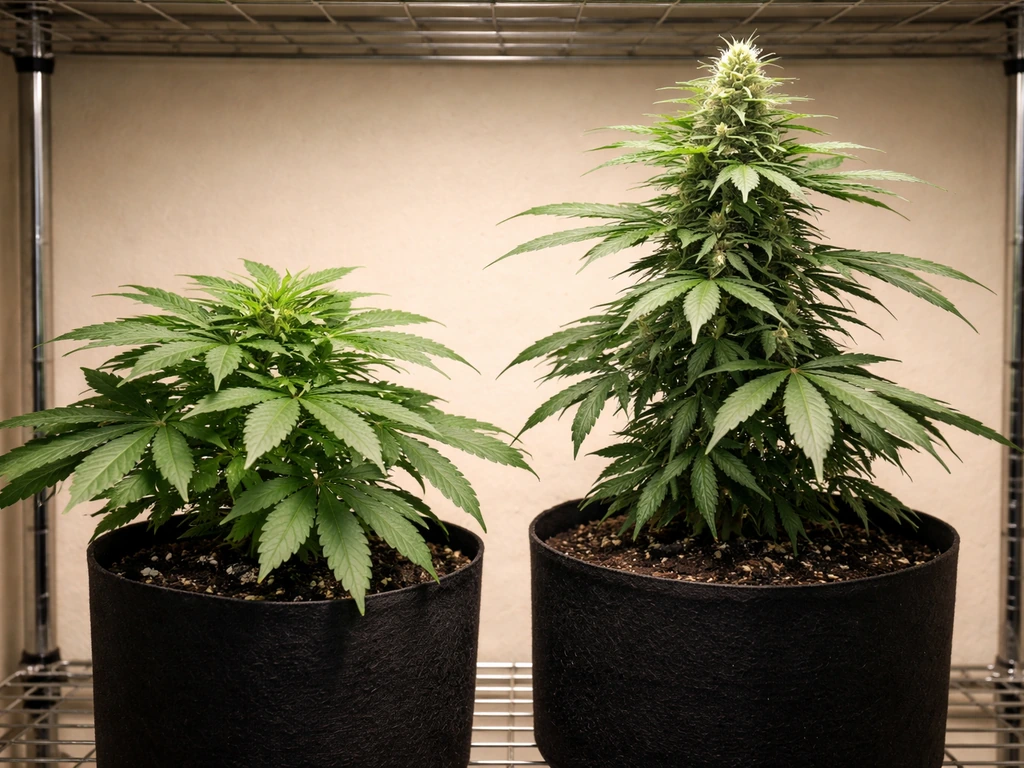
When Flowering Starts Outdoors
For photoperiod plants, flowering starts naturally as days shorten after the summer solstice (around June 21 in the Northern Hemisphere). Depending on your latitude and the strain, plants typically begin showing flowering signs in late July to mid-August, then spend 7 to 10+ weeks in flower before harvest. Autoflowers bypass all of this, they begin flowering on their own timeline, usually 3 to 5 weeks from seed, regardless of light schedule.
How to Know When to Harvest
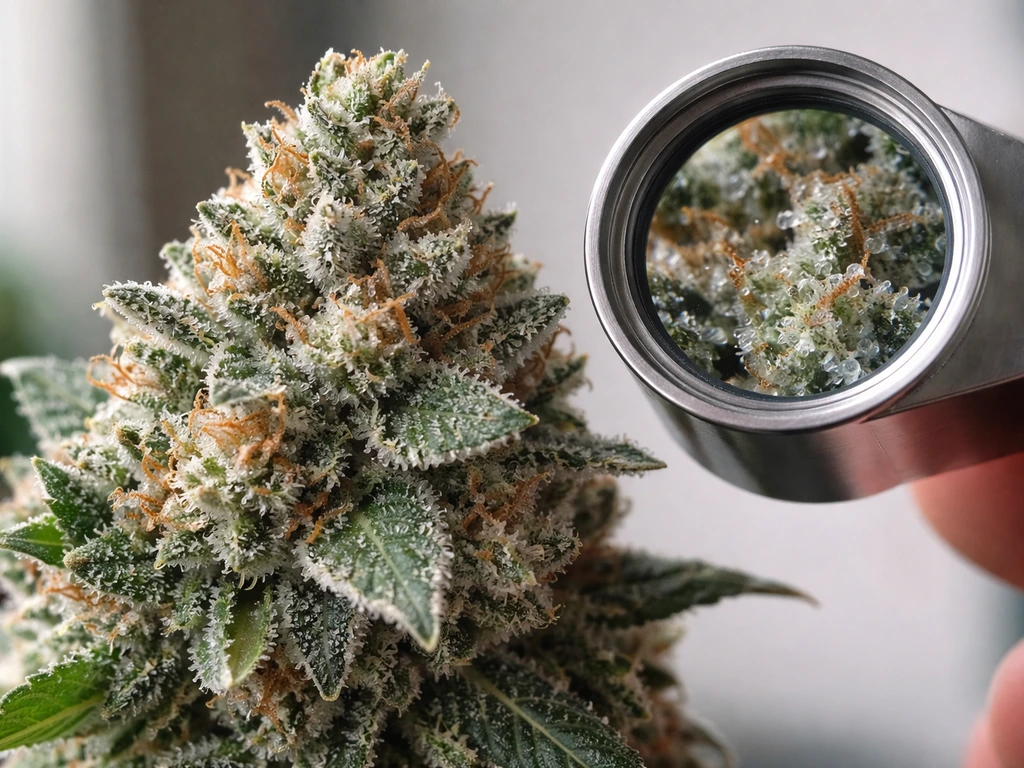
The most reliable harvest indicator is trichome color, viewed with a jeweler's loupe (30x to 60x) or a USB microscope. Trichomes are the tiny crystal-like resin glands covering buds and surrounding leaves. Their progression tells you exactly where the plant is in ripeness.
| Trichome Appearance | What It Means | Harvest Timing |
|---|---|---|
| Clear / translucent | Still developing, not ready | Too early — wait |
| Cloudy / milky white | Peak THC, energetic/cerebral effect | Harvest now for more uplifting results |
| Amber (some) | THC degrading to CBN, more body/sedating | Harvest now for heavier, more relaxing effect |
| Mostly amber | Overripe, significant THC loss | Harvested late — potency reduced |
Most growers aim for a mix of mostly cloudy with 10 to 30% amber, which gives a balanced effect. Watch the trichomes on the buds themselves, not the sugar leaves, leaf trichomes amber faster. Secondary cues include: pistils (the hair-like structures on buds) shifting from white to orange/red (70 to 90% color change is a rough indicator), swelling calyxes, and fading fan leaves as the plant redirects energy into final ripening.
Harvesting, Drying, and Curing
Harvest in the morning after a dry night, when terpene content is highest. Cut branches and trim away large fan leaves immediately. Hang branches upside down in a dark, well-ventilated space at around 60 to 70°F (15 to 21°C) with 45 to 55% relative humidity. Drying too fast (hot, dry room) evaporates terpenes before they can lock in and leaves the outside dry while the inside remains wet. Drying too slow in high humidity invites mold. Buds are ready to jar when small stems snap rather than bend and the outside of the buds feels dry but not crumbly, typically 7 to 14 days.
Curing is what separates average results from genuinely good ones. Place dried buds loosely in glass mason jars, filling them about 75% full. For the first week to two weeks, open the jars for 15 to 30 minutes once or twice a day (this is called 'burping') to release trapped moisture and gases. After the first two weeks, burp less frequently. A minimum cure of 2 to 4 weeks dramatically improves flavor, smoothness, and potency compared to smoking freshly dried buds. Six to eight weeks of curing is even better. Use a small hygrometer in the jar to monitor humidity, keep it between 58 and 62% for ideal storage and curing conditions.
Common End-Stage Problems and Quick Fixes
- Bud rot discovered at harvest: Cut out all infected material aggressively. Salvage what you can, dry it quickly and carefully, and do not jar any material with visible mold.
- Buds not bulking up near expected harvest: Check that your photoperiod plant is actually getting dark, uninterrupted nights. Street lights, porch lights, or security lights can interrupt the dark cycle and delay or disrupt flowering.
- Leaves yellowing heavily in late flower: Some yellowing of fan leaves in the final 2 weeks is normal as the plant pulls mobile nutrients. Aggressive early yellowing in flower can indicate nitrogen or magnesium deficiency — check pH before adding anything.
- Airy, larfy buds (loose, underdeveloped): Usually caused by insufficient light during flowering. Next season, optimize your site for more direct sunlight or choose a smaller, faster-finishing strain that produces denser buds in your conditions.
- Slow or failed germination: Check temperature first (target 75 to 80°F), and make sure seeds are not submerged or soaking in standing water. Old or improperly stored seeds have lower viability.
Growing cannabis outdoors from seed is genuinely one of the most rewarding things you can do as a home cultivator. The sun does a lot of the work for you. Your job is to pick the right strain for your season, start on time, give the plant a good home with healthy soil and excellent light, stay on top of pests and moisture, and be patient through drying and curing. Following the best way to grow pot outdoors also means planning your timing around frost dates so plants have enough weeks to finish pick the right strain for your season. If you do those things, you'll harvest quality cannabis that you grew yourself, and that's hard to beat.
FAQ
Can I direct sow outdoors instead of starting seeds indoors?
Yes, but only if it matches your local season. If your spring is warm enough, direct sowing can work, yet you should still start seeds indoors when temperatures are likely to dip below warm germination ranges or when rainfall is unreliable early. A practical approach is to direct-sow only after the forecast shows several consecutive warm days, and have a backup plan to start indoors if germination stalls.
When is it too late to train, top, or defoliate outdoor plants? (photoperiod vs autoflower)
If pistils have started and days are shortening, avoid major stress. For photoperiod plants, topping or heavy defoliation late in veg can still be viable, but after flowering begins it usually delays development and can reduce yield. For autos, any high-stress training (especially late topping) can permanently stunt growth because the plant cannot “wait” for recovery before its internal clock triggers flowering.
How do I avoid overwatering when the weather keeps changing?
Use a simple rule before watering decisions: check soil moisture, then adjust for weather. In ground, watering too frequently often creates soggy roots, while containers dry faster, especially with wind and heat. Instead of watering on a schedule, water when the top inch or two is dry, then reduce frequency during cooler, overcast weeks and increase during hot afternoons.
My plant is yellowing outdoors, how can I tell if it is overwatering or a nutrient deficiency?
First, confirm drainage. A yellowing plant in wet soil often indicates root oxygen problems, not a lack of fertilizer. Check whether water is pooling, verify the pot has functioning drainage, and let the medium dry back before any nutrient changes. If you suspect nutrient issues, use diluted fertilizer rather than increasing immediately, because nutrient burn is common when people correct too aggressively.
Do I really need nutrients if I amend the soil with compost? How much should I add?
Yes, and it can matter even in outdoor grows. If you start with compost and a balanced slow-release base, you might only supplement later, but you still need to pH your liquid inputs. Also, very “fast” fertilizers can spike nitrogen and cause tip burn, so if you choose amendments or teas, prioritize slow-release or organic forms and apply small amounts gradually.
What should I do during a heat wave or a sudden cool snap? (containers vs in-ground)
Treat this as a heat and root-depth problem. If it is hot during the day, moving containers to afternoon shade lowers stress, and adding mulch around in-ground bases can keep the root zone cooler. If night temperatures drop sharply after a warm period, expect slower growth and consider frost protection if you are near your frost threshold.
Can I use neem oil or insecticidal soap during flowering, and how do I avoid harming buds?
If you use foliar treatments like neem oil or soap, the timing matters. Apply in the evening and avoid spraying during peak flowering because it can affect bud quality and increase the risk of burning delicate flowers. Also, do not mix different sprays the same day unless the products clearly indicate compatibility, because combined ingredients can cause additional plant stress.
What are practical ways to protect outdoor plants from late frost without causing mold?
Yes. If frost risk is real but your plants are still immature, you can use frost cloth, cloches, or temporary covers. The best results come from protecting during the coldest nights while still allowing daytime airflow and sun exposure, because trapping too much moisture under coverings can worsen mold.
How do I decide whether to harvest early or wait, especially when rain is coming?
Not necessarily. Harvesting early can reduce final weight and potency, but letting it go too long can invite bud rot or degrade flavor if weather turns wet. A useful decision aid is to prioritize the risk window: if nights are cooling and rain is increasing, you may need to harvest sooner even if some trichomes are not fully amber.
Can I use the same drying and curing plan if my fall is humid?
You can, but you need to plan the rest of the schedule. Seedlings should be protected until they are hardened off, and harvesting and drying targets should still be met before high-humidity periods. If your climate has a humid late season, an open bud structure and earlier harvesting become more important than maximizing how long you wait to reach a specific trichome mix.
How to Grow Weed Outdoors: Step-by-Step Beginner Guide
Beginner outdoor cannabis grow guide: choose strains, set up site, seed to harvest, nutrients, pests, and curing.
