You can grow cannabis hydroponically from seed by germinating in a starter cube, moving the sprout into a DWC or similar hydro system, keeping pH between 5. If you want the most complete walkthrough, review these hydro-specific steps for how to grow weed hydro from seed to harvest. 5 and 6.5, feeding a diluted nutrient solution from the seedling stage onward, and dialing in your light, temperature, and humidity for each growth phase. The whole process from seed to harvest typically runs 10 to 16 weeks depending on your strain, and once you get the fundamentals locked in, hydro almost always outpaces soil in speed and yield. This guide walks you through every step.
How to Grow Hydro Weed From Seed: Beginner Guide

Marcus Holbrook
17 Jun 2026
Before you start: legality, setup, and what hydro weed actually means
"Hydro weed" just means cannabis grown hydroponically, meaning the roots grow in a nutrient-rich water solution rather than soil. If you want the full step-by-step, this is where the hydroponic setup, reservoir targets, and grow-cycle details come together into a practical plan for growing hydroponic marijuanas cannabis grown hydroponically. No dirt, no guesswork about what's in your medium. You control everything the plant eats. That control is what makes hydro so appealing, and also what makes it unforgiving when something goes wrong.
Before you buy a single seed or a single piece of equipment, check your local laws. Home cannabis cultivation is legal for adults in many US states, Canada, and several other countries, but the rules vary enormously. Some states cap you at two to six plants, others ban home grows entirely even where possession is legal. New York, for example, has specific eligibility and plant-count rules for adult-use home cultivation. Washington State's LCB has published research noting the patchwork of state-level rules across the country. The Marijuana Policy Project tracks state-by-state home cultivation laws if you want to look up your specific jurisdiction. Grow legally and responsibly. This guide assumes you're operating within whatever limits apply to you.
For your physical setup, you'll need a dedicated grow space (a tent works great for beginners), a hydroponic system, grow lights, a pH meter, an EC/TDS meter, a thermometer/hygrometer, fans, an air pump, and your nutrients. It sounds like a lot, but you can put together a functional beginner DWC grow for a few hundred dollars. We'll cover each piece as we go.
Choosing the right seeds and making a solid germination plan
Start with seeds from a reputable breeder. For a first hydro grow, I'd recommend an autoflowering or a stable feminized photoperiod strain with a reputation for being forgiving, something labeled beginner-friendly or resilient. Autoflowers are especially practical for hydro beginners because they move quickly (seed to harvest in as little as 8 to 10 weeks) and don't require a light schedule change to trigger flowering.
Before germinating, you can do a quick viability check by dropping seeds in a glass of plain water. Seeds that sink after 1 to 2 hours are generally viable; floaters may still germinate but are less reliable. This isn't foolproof, but it's a useful first filter before you invest time in your system.
Best germination method for hydro grows
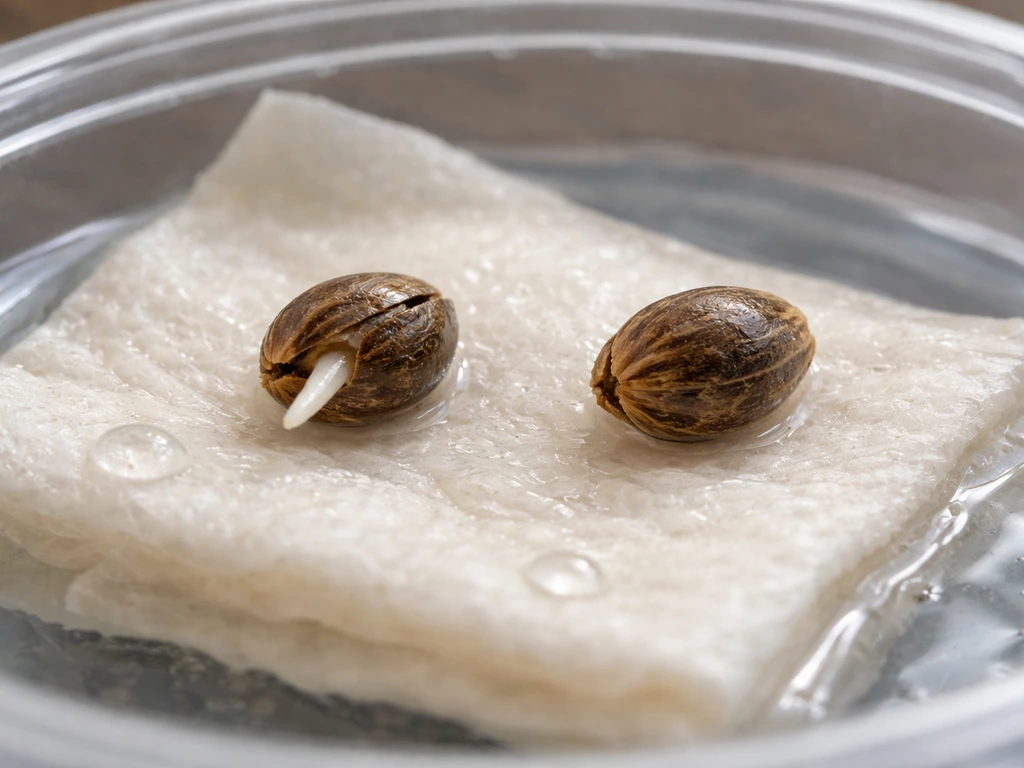
For hydro specifically, the paper towel method or a direct soak followed by planting into a starter cube is the cleanest approach. Here's the sequence I use:
- Soak seeds in plain pH-adjusted water (6.0) for 12 to 24 hours until you see a tiny taproot tip or the seed has noticeably swelled.
- Wet a paper towel until damp but not dripping, place seeds inside, fold it over, and set it on a plate. Cover with another plate or a humidity dome.
- Keep the environment at 70 to 80°F (21 to 27°C). Check every 12 hours and keep the towel moist.
- Once the taproot is 0.25 to 0.5 inches long (usually 24 to 72 hours), carefully transfer to a pre-soaked starter cube, taproot pointing down.
- Set the cube under a low-intensity light or in a warm spot and mist lightly. You should see a sprout in 2 to 5 days.
Rockwool cubes and Oasis horticubes are the most commonly used starter media for hydroponic seedlings, and both work well. Soak rockwool in pH 5.5 water for a few hours before use to buffer its naturally high pH. Keep the cube moist but not waterlogged, because soggy cubes are the number one cause of damping off, which is the seedling-killing fungal condition we'll cover in troubleshooting.
Picking your hydro system and getting seedlings established
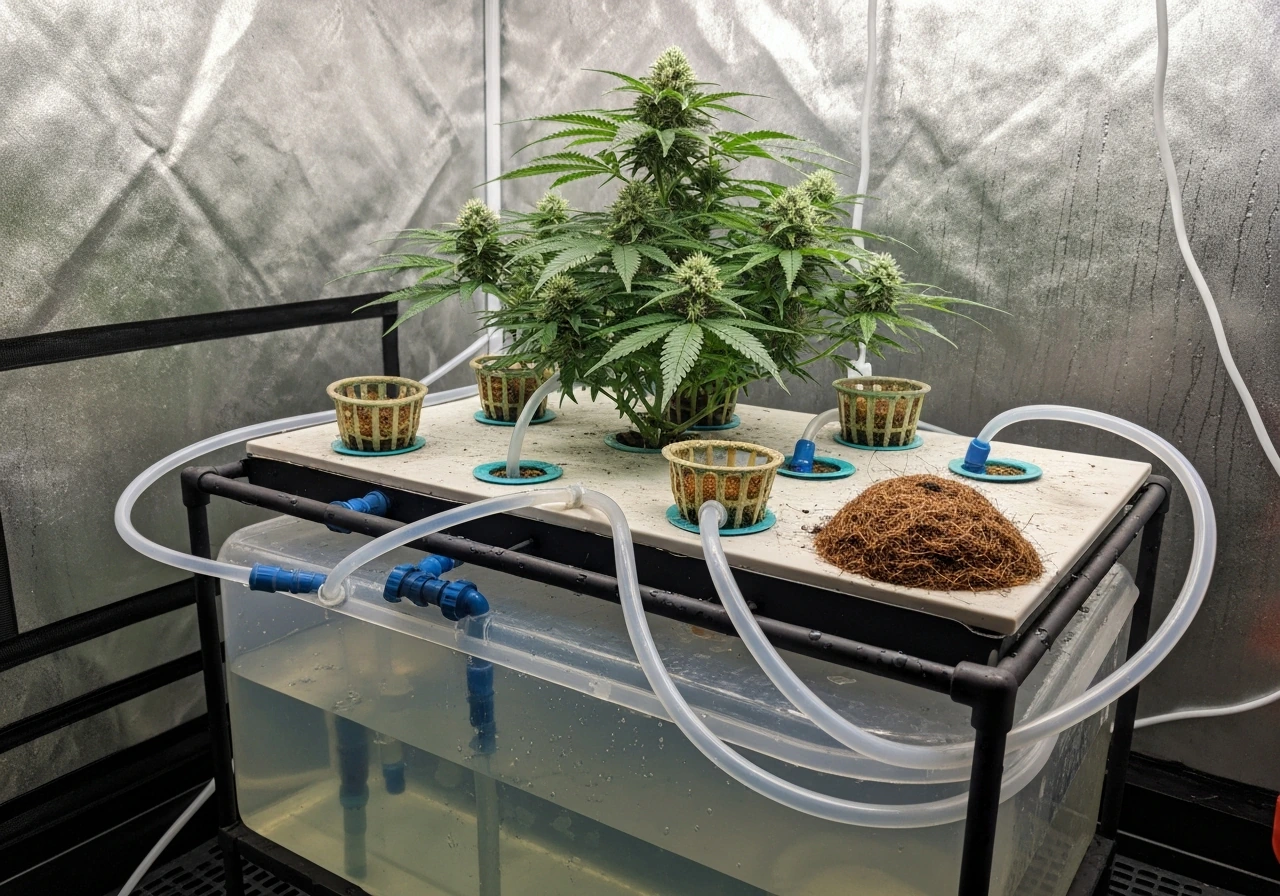
There are four main hydroponic system types you'll encounter as a home grower: DWC (deep water culture), RDWC (recirculating DWC), NFT (nutrient film technique), drip systems, and ebb-and-flow. For beginners, DWC is my top recommendation and honestly the recommendation of most experienced hydro growers I know. If you also want a step-by-step plan for hydro from seed through harvest, use this guide on how to grow hydro chronic. It's simple, cheap, and the results speak for themselves.
| System | How it works | Beginner friendliness | Main risk |
|---|---|---|---|
| DWC | Roots hang in oxygenated nutrient solution in a bucket/reservoir | High | Root rot if air pump fails or temps rise |
| RDWC | Multiple DWC buckets connected to a central reservoir | Medium | More plumbing, more failure points |
| Drip | Nutrient solution dripped onto growing medium via timer | Medium | Clogged drippers, medium dryout |
| NFT | Thin film of nutrient solution flows over roots in channels | Low-Medium | Roots dry quickly if pump fails |
| Ebb-and-Flow | Tray floods and drains on a timer | Medium | Pump/timer failure causes drought stress |
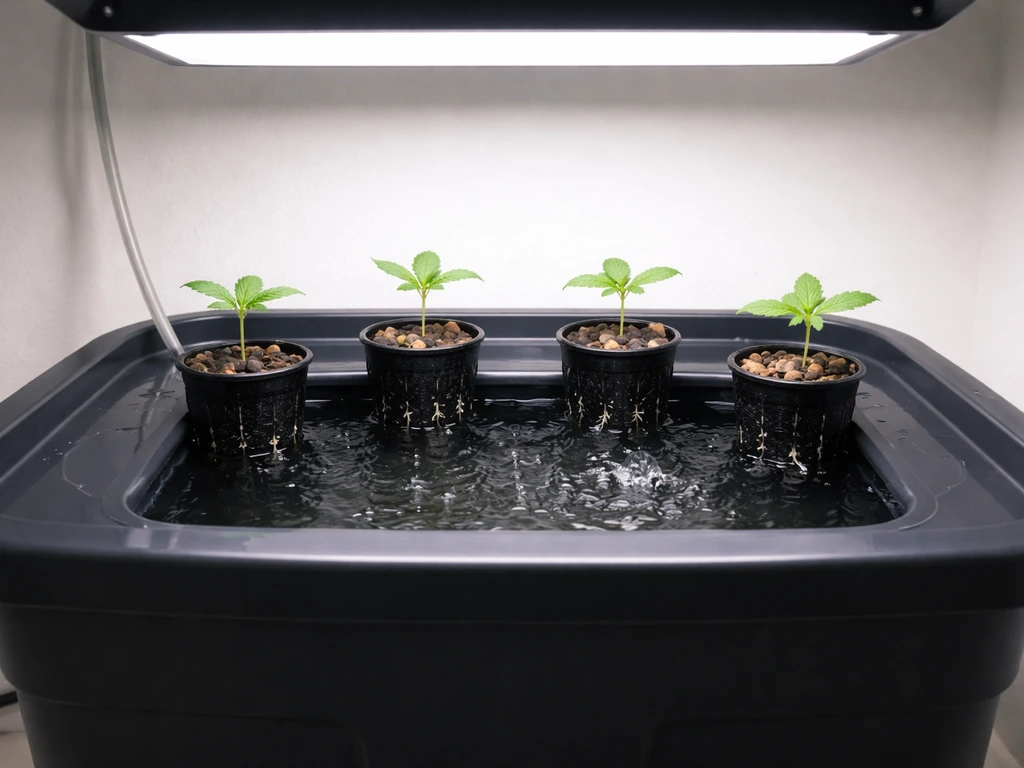
For a first grow, get a 5-gallon DWC bucket kit, an air pump with an airstone, net pots, and a bag of hydroton (clay pebbles) or a similar inert medium to fill around your starter cube. Each plant gets its own bucket. The air pump keeps the water oxygenated so roots don't drown, which is the whole trick of DWC.
Moving your seedling from cube to system
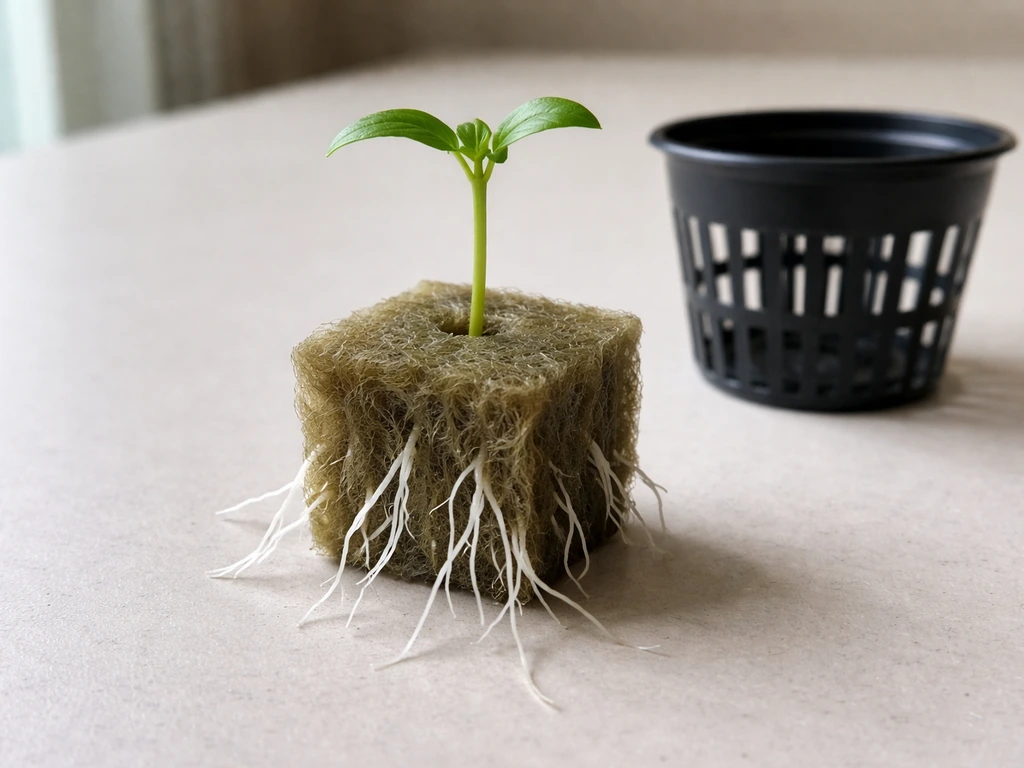
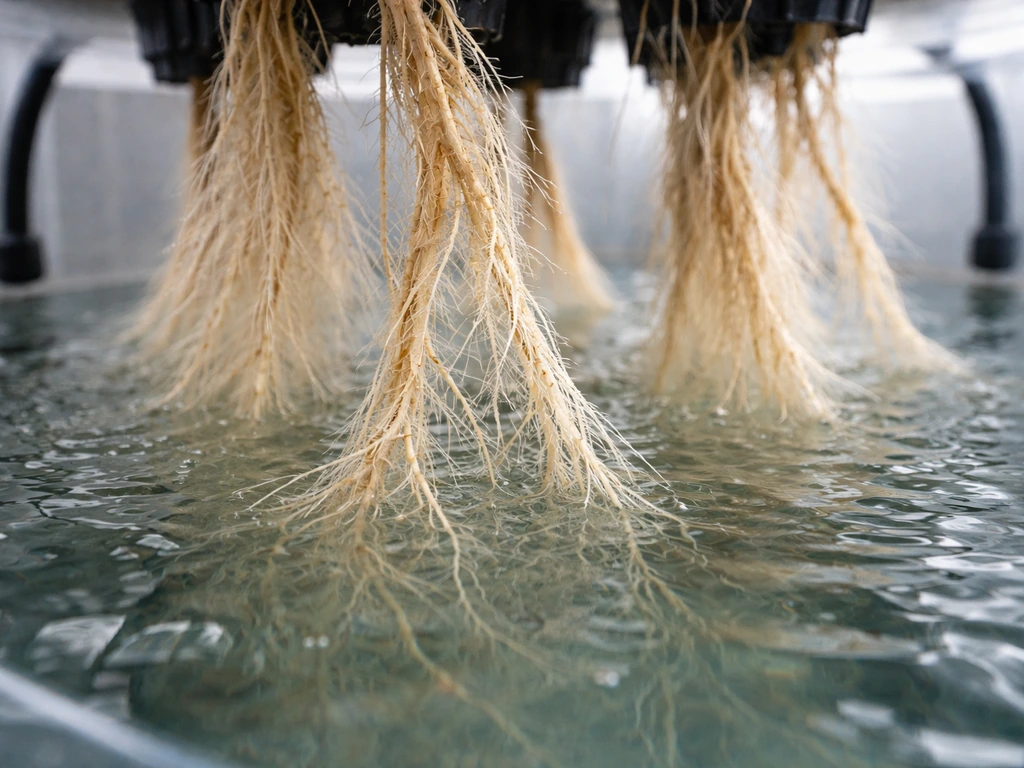
Once your seedling has visible roots emerging from the bottom or sides of the starter cube (usually 7 to 14 days after sprouting), it's ready to move into the DWC system. Place the cube inside the net pot and pack hydroton loosely around it. The bottom of the net pot should sit just above the waterline, or barely touching it, so roots can drink without the stem sitting in solution. As the roots grow down into the reservoir over the next few days, raise the water level slightly if needed, then back it off as roots extend. Eventually the roots will hang freely in the solution and the water level can be 1 to 2 inches below the net pot.
Add a beneficial bacteria product like Hydroguard (which contains Bacillus amyloliquefaciens) to your reservoir from day one. Root rot is the most common catastrophic problem in DWC, and good bacteria out-compete the pathogens that cause it. This is one of those things I wish I had done from the start on my first grow.
Dialing in light, temperature, humidity, and airflow
Environment is everything in an indoor hydro grow. Get this wrong and no amount of good nutrients will save you. The good news is that the targets are straightforward once you understand them.
Lighting by stage
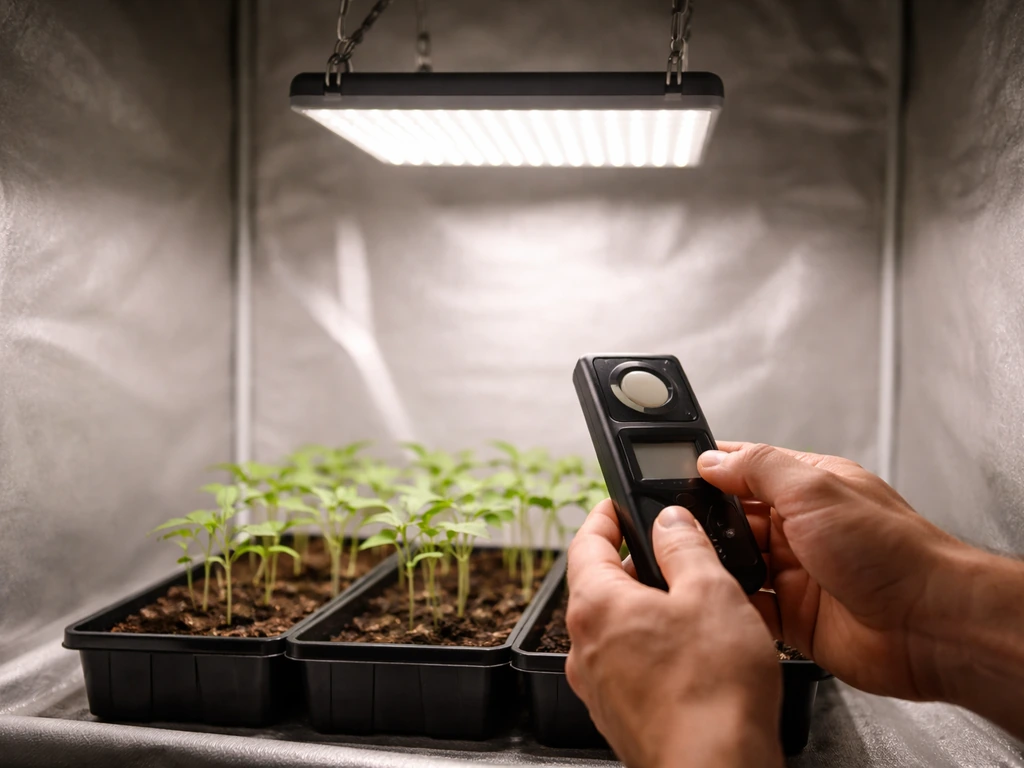
For seedlings, you want low-intensity light, around 200 to 400 PPFD (micromoles per square meter per second). An LED panel at full power hung close will bleach or stress young seedlings. Raise the light or dim it. Run an 18/6 light schedule (18 hours on, 6 hours off) for photoperiod strains in veg, or 20/4 for autoflowers. As plants move into the vegetative stage, bump intensity to 400 to 600 PPFD. In flower, push it to 600 to 900 PPFD or higher if your plants can handle it. Modern LED grow lights with Samsung LM301 diodes or similar are the standard for home grows now because of their efficiency and full spectrum.
Temperature and humidity targets
The goal isn't just hitting a temperature or humidity number in isolation. Vapor pressure deficit (VPD) is the more useful metric because it accounts for both together and tells you how hard the plant is working to transpire. That said, here are the practical targets by stage:
| Stage | Temperature (°F) | Relative Humidity (%) | Target VPD (kPa) |
|---|---|---|---|
| Germination / seedling | 75–80°F | 65–75% | 0.4–0.8 |
| Early veg | 72–80°F | 55–70% | 0.8–1.0 |
| Late veg | 70–78°F | 50–65% | 1.0–1.2 |
| Early flower | 68–78°F | 45–55% | 1.0–1.3 |
| Late flower | 65–75°F | 40–50% | 1.3–1.6 |
Reservoir temperature matters too. Keep your nutrient solution between 65 and 72°F (18 to 22°C). Warm water holds less dissolved oxygen and creates ideal conditions for root rot pathogens. If your reservoir runs warm, a small aquarium chiller or frozen water bottles can help.
Airflow
You need two things: circulation and exchange. An oscillating clip fan inside the tent keeps air moving around the canopy, which strengthens stems and prevents hot/stagnant spots. An inline exhaust fan connected to a carbon filter pulls air out of the tent (important for odor control and temperature management). A general rule is to exchange the total air volume of your tent every 1 to 3 minutes. So for a 4x4x7 tent (roughly 112 cubic feet), you'd want an exhaust fan rated at least 100 to 200 CFM.
Feeding your hydro plants from seed: a practical nutrient schedule
This is where hydro diverges most sharply from soil. In soil, the medium holds buffered nutrients and organic life does a lot of work for you. In hydro, you are the medium. Everything the plant gets comes directly from your reservoir, so you need to be intentional and accurate.
pH: the most important number in your reservoir
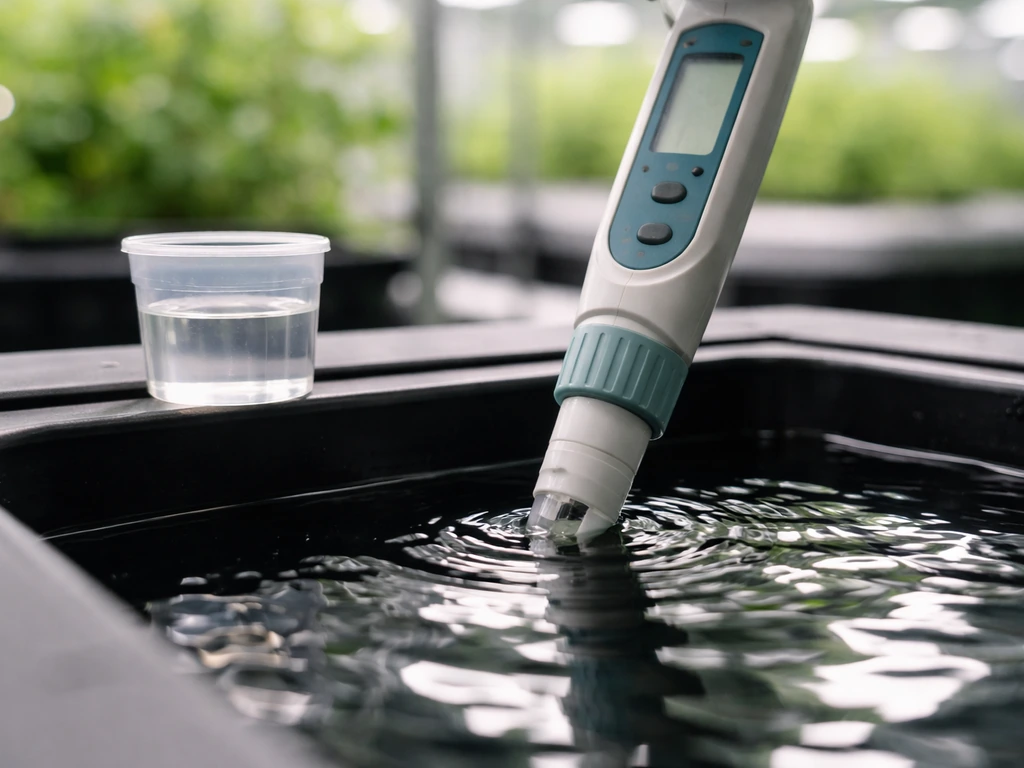
Keep your reservoir pH between 5.5 and 6.5. This is the range where all major nutrients stay available to cannabis roots in hydro. Outside this window, certain nutrients lock out regardless of how much you've added, which shows up as deficiencies even when your reservoir is fully loaded. I recommend targeting 5.8 to 6.2 as your sweet spot and letting it drift slightly rather than chasing a single number. Check pH daily, especially early on. A decent digital pH meter is non-negotiable. Cheap strips aren't accurate enough.
EC and what to feed when
EC (electrical conductivity) measures how much dissolved nutrient is in your solution. For seedlings, you want very low EC, around 0.4 to 0.8 mS/cm. Young roots are delicate and high nutrient concentration will burn them. As plants mature through veg, raise EC gradually to 1.2 to 1.8 mS/cm. In flower, 1.8 to 2.4 mS/cm is typical for most strains. Always add nutrients to water, not the other way around, and if you're using a 3-part system like General Hydroponics Flora Series, add in this order: Micro first, then Grow, then Bloom. This prevents nutrient precipitation (clumping) in your reservoir.
A basic nutrient schedule for a DWC grow with a 3-part Flora-style system looks roughly like this:
| Stage | Weeks (approx.) | Flora Micro / Grow / Bloom ratio emphasis | EC target (mS/cm) | Notes |
|---|---|---|---|---|
| Seedling | 1–2 | Micro-heavy, very diluted (quarter strength) | 0.4–0.8 | Add Cal-Mag if using RO water |
| Early veg | 3–4 | Balanced Micro + Grow, light Bloom | 1.0–1.4 | Ramp up gradually |
| Late veg | 5–6 | Grow-heavy | 1.4–1.8 | Watch for deficiency signs |
| Early flower | 7–9 | Shift to Bloom-heavy | 1.8–2.2 | Reduce Grow, increase Bloom |
| Late flower | 10–11 | Bloom-dominant, minimal Grow | 2.0–2.4 | Monitor closely |
| Flush week | 12+ | Plain water only | Under 0.4 | See harvest/flushing section |
If your tap water is high in minerals, its baseline EC might already be 0.3 to 0.5 before you add anything. Factor that in. Reverse osmosis water starts cleaner (EC near 0) and gives you more precise control, but then you'll need to add Cal-Mag since RO strips out calcium and magnesium that plants need. Tools like the Grow Weed Easy nutrient schedule calculator can help you dial in specific quantities based on your chosen product line.
Training, transplanting, and moving through veg into flower
In DWC, there's no transplanting between containers the way soil growers do it. You place your rooted cube in the net pot once and that's the plant's home for its entire life. What you do manage actively is training and the veg-to-flower transition.
Low-stress training (LST) in hydro
Low-stress training (LST) is highly compatible with DWC grows and I'd call it essential for maximizing your light footprint. Starting when the plant has 4 to 6 nodes, gently bend the main stem sideways and secure it with soft plant ties or pipe cleaners hooked to the rim of your net pot bucket. As new growth reaches up, bend and tie those branches outward too. The goal is a flat, wide canopy that catches light across all bud sites rather than one tall cola shading everything below it. LST adds almost no stress when done correctly and can substantially increase your final yield.
For photoperiod strains, you control when flowering starts by switching your light timer from 18/6 to 12/12. Veg for 4 to 8 weeks depending on how large you want your plant before flipping. Autoflowers handle this themselves, so no light schedule change needed. If you specifically want to grow a hybrid weed plant, the same hydroponic setup works, but you’ll want to tune your light schedule, training, and feeding to the strain’s balance of veg length and flowering speed Autoflowers handle this themselves. Expect a "stretch" of rapid vertical growth in the first 2 to 3 weeks of flower for most strains. If you're doing LST, keep gently training during this period.
Reservoir maintenance through the grow
Top off your reservoir with pH-adjusted plain water between full reservoir changes. As plants drink, they consume water faster than nutrients, so the EC will naturally creep up if you just add more nutrient solution. Top off with plain water to keep EC stable, and do a full reservoir change every 7 to 14 days to prevent salt buildup and keep the solution fresh. Keep the reservoir dark (light-proof) to prevent algae growth.
Troubleshooting common problems from seedling to late flower
I've made most of these mistakes myself. Here's how to spot and fix the most common issues in a hydro grow from seed.
Germination failure
Seeds that don't sprout within 5 to 7 days are usually victims of wrong temperature (too cold), a dry paper towel or cube, or old/low-quality seeds. Recheck your temperature (aim for 75 to 80°F), keep the towel consistently damp (not soaking), and make sure you're using fresh seeds from a reputable source. Don't give up until day 7 to 10 for older seeds.
Damping off
Damping off is a fungal condition that collapses seedling stems at the base. It looks like the stem pinches and the seedling keels over, seemingly overnight. The cause is almost always overwatered or oversaturated starter cubes combined with poor airflow. Prevention is everything here: sanitize all equipment before use, don't oversoak your cubes, ensure good air circulation around seedlings, and avoid letting water sit stagnant. Once damping off hits a seedling, it's usually fatal. Start fresh and dry out your practices.
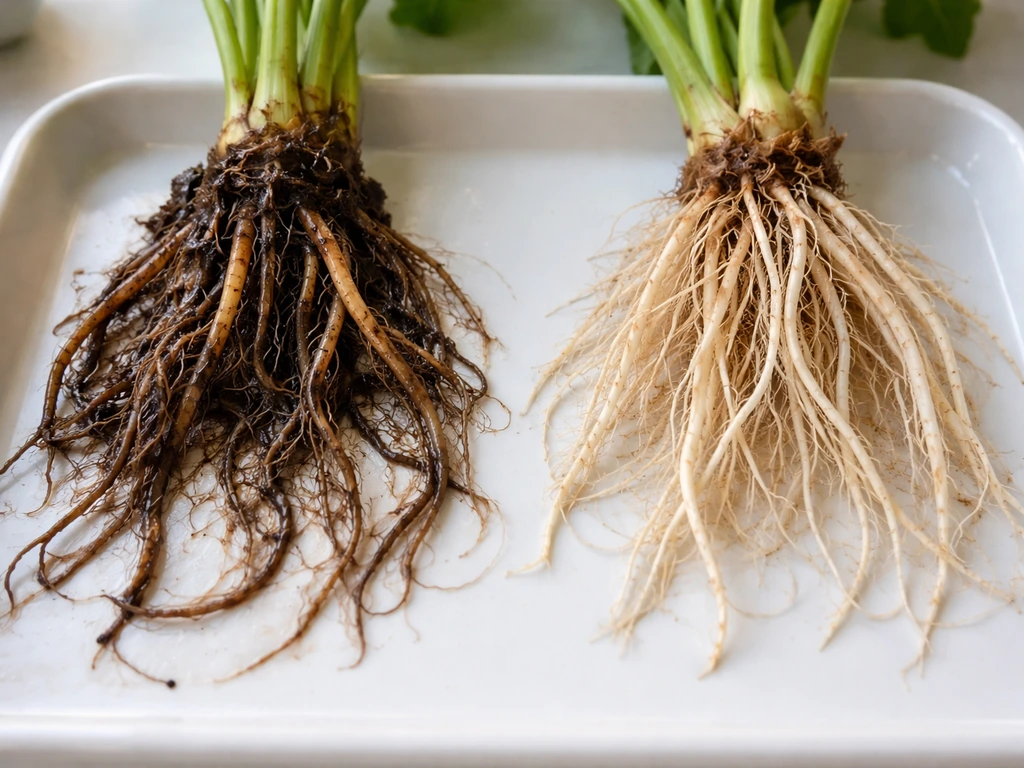
Root rot
Root rot shows up as brown, slimy roots with a foul smell (healthy roots should be white and firm). It's caused by warm reservoir temps, insufficient dissolved oxygen, or pathogen overgrowth. Fix it by: dropping your reservoir temperature to below 72°F, confirming your air pump and airstone are working, adding Hydroguard or a similar beneficial bacteria product, and doing a full reservoir flush with clean solution. Catching it early is critical. Check your roots every few days.
pH and nutrient problems
Yellowing leaves, purple stems, brown leaf tips, or patchy discoloration are almost always traced back to pH being out of range. Check pH first before assuming you have a nutrient deficiency. If pH is 5.5 to 6.5 and you're still seeing symptoms, check your EC. Burned tips with curling leaves suggest nutrient excess (lower your EC). Pale yellowing with stunted growth often means nutrient deficiency (raise EC slightly or check Cal-Mag levels). Magnesium deficiency (yellowing between leaf veins starting on older leaves) is extremely common in hydro, especially with RO water. Add 1 to 2 mL/gallon of Cal-Mag as a baseline.
Stalled or stunted growth
If your plant looks frozen in time for more than a week, the culprits are usually: pH out of range (locking out nutrients), too-low or too-high temperature, light too close or too dim, or roots not yet reaching the solution in early DWC setup. Work through each variable systematically. Adjust one thing at a time, then observe for 48 hours before changing something else.
Harvest timing, flushing, and the basics of curing
Knowing when to harvest is a skill, but it's learnable. The two most reliable indicators are trichome color and pistil color. Trichomes are the tiny crystal-like structures on buds. Under a jeweler's loupe or digital microscope, they look like mushrooms. Clear trichomes mean the plant isn't ready. Milky/cloudy trichomes indicate peak THC. Amber trichomes signal THC is degrading into CBN, which creates a more sedating effect. Most growers harvest when trichomes are mostly cloudy with 10 to 30% amber depending on the effect they want. Pistils (the tiny hairs on buds) turning from white to orange/brown is another signal, with 70 to 90% color change typically coinciding with harvest readiness.
Flushing before harvest
Flushing means running plain, pH-adjusted water through your system for the final 1 to 2 weeks before harvest instead of nutrient solution. The idea is to clear residual salts from plant tissue and theoretically improve the taste and smoothness of the final product. It's worth noting that the science on flushing is genuinely debated, and some research suggests the drying and curing process has more impact on final quality than pre-harvest flushing. That said, a 7 to 14 day plain water flush is low-risk and common practice in hydro. If you've been using beneficial bacteria in your reservoir (like Hydroguard), you can continue that through the flush since it doesn't add nutrients.
Drying and curing
After harvest, hang trimmed branches upside down in a cool, dark room with airflow. Target around 60 to 70°F and 55 to 65% humidity. Too fast a dry (low humidity, high temp, strong airflow) destroys terpenes and creates harsh smoke. Too slow (high humidity) risks mold.
Drying typically takes 7 to 14 days. When the smaller stems snap rather than bend, you're ready to cure. Place buds in glass mason jars, filling them about 75% full, and store in a cool dark place. Open the jars for 15 minutes once or twice daily for the first two weeks ("burping") to release moisture and fresh air.
After two weeks, burp every few days. A proper cure of 4 to 8 weeks dramatically improves aroma, flavor, and smoothness. Don't skip it.
Growing hydro from seed takes some upfront learning, but once you've done it once you'll have a repeatable process you can refine every cycle. The other guides in this series cover related ground if you want to go deeper, including general hydroponic growing methods, how long different hydro grows take from seed to harvest, and growing specific strain types hydroponically. If you’re wondering how long to grow hydro weed, the exact timeline varies by strain type, conditions, and whether you’re running autoflower or photoperiod how long different hydro grows take from seed to harvest. Start simple, document everything, and trust the process.
FAQ
How do I prevent the starter cube from keeping the stem too wet in my DWC net pot?
Before you germinate, verify your starter cube size versus your net pot so the cube fits with room for hydroton to hold it stable. If the cube is too tall or sits too deep, it can keep the stem submerged, which increases the risk of rot early on.
What should I do if my roots are slow to reach the nutrient water after moving to DWC?
If your seedlings are 7 to 14 days in and still not showing roots into the reservoir, reduce the distance between cube and waterline. The goal is for the bottom of the net pot to be barely above the surface (roots can reach quickly), then raise the level slightly only if you see roots drying out rather than soaking.
My reservoir water is getting algae, what’s the best fix?
Algae is usually caused by light hitting the reservoir or warm surfaces that stay wet. Keep the reservoir light-proof, cover any exposed tubing, and avoid opening the tent more than necessary during early establishment, since added light and airflow swings can encourage algae.
Why is my EC rising even when I top off with pH-adjusted water?
If your EC keeps climbing even though you are topping off with plain water, check whether you are topping with unbuffered or high-mineral water, and confirm your EC meter is calibrated. Also watch for temperature swings, because warmer water can slightly change readings.
What are common reasons plants do not stretch after I flip to 12/12 in hydro?
If you switch to flowering and growth slows instead of stretching, confirm you are using the correct photoperiod timing (no light leaks, no timer drift) and that PPFD is appropriate for the early transition. Also check pH daily during the first week, because even small drift can trigger lockout during this stage.
How can I tell if my problem is nutrient burn versus a pH lockout?
For DWC, oversupplying nutrients early looks similar to pH issues, burned tips, and weak growth. Start at the low EC range, and when symptoms appear check pH first, then EC, then review how much nutrient you added per gallon (measuring mistakes are common).
Can I use sanitizers like peroxide in DWC if I’m already running beneficial bacteria?
If you are using a beneficial bacteria product, keep your system hygiene consistent. Don’t add hydrogen peroxide or heavy sanitizers on top of live bacteria unless the product instructions explicitly allow it, because those treatments can wipe out your microbial population.
What signs indicate my oxygenation is failing in DWC?
Airstone output matters. If you see fizzing but the water still feels warm or roots turn slimy, inspect the airline for kinks, verify the pump diaphragm is working, and consider moving to a higher airflow airstone. Root rot risk rises fast if oxygenation drops.
How should I adjust nutrients if I’m growing with RO water?
When using RO, Cal-Mag is not just a general add-on, it is often necessary to prevent magnesium-related yellowing. Use a baseline Cal-Mag dose (as you would in the article), then adjust based on new leaf color and pH behavior, since RO can make pH drift harder to predict.
What should I check first if one plant is failing while the others look healthy?
If only one plant is struggling in an otherwise stable DWC setup, isolate variables like cube age, root development timing, and whether the plants are receiving the same light intensity and airflow. Also compare EC and pH between buckets, because mixing errors can happen even when the rest of the room is dialed in.
Does flushing in hydro actually improve taste, and how should I do it if I choose to?
In hydro, “flush” is optional and low-risk, but the bigger quality drivers are consistent feed quality earlier and careful drying and curing. If you do flush, keep it pH-adjusted and use the same water quality you have been feeding, so you are not swapping minerals and stressing plants.
What’s the safest approach if my seeds stall and still haven’t sprouted by day 7?
If seeds are not sprouting by day 7 to 10, try a controlled warm re-try rather than repeatedly drying them out. Keep the environment around 75 to 80°F, use fresh pH 5.5 to 6.0 water for any soak, and start a new cube batch if the first ones have been kept too wet.
Next Article
How to Grow Weed Hydroponically: Step-by-Step Indoors
Step-by-step indoor hydroponic weed guide: set up, pH EC feeding, veg to flower, harvest timing, and troubleshooting.