Growing cannabis hydroponically indoors is faster, more controllable, and often higher-yielding than soil, but it rewards preparation over improvisation. The core process works like this: set up your system (deep water culture, drip, or coco coir are the most beginner-friendly), germinate seeds or root clones in rockwool plugs at pH 5.8–6.2, move seedlings into your system, run an 18/6 light cycle through veg while keeping your nutrient solution pH between 5.5–6.5 and EC climbing from around 0.8 up to 2.0, flip to 12/12 to trigger flowering, manage nutrients week by week through bloom, then harvest once trichomes are mostly cloudy with some amber. Every step is repeatable once you understand the logic behind it.
How to Grow Weed Hydroponically: Step-by-Step Indoors

Marcus Holbrook
24 Apr 2026
Before anything else: check the cannabis cultivation laws where you live. Home growing is legal in some states and countries, heavily restricted in others, and illegal in many jurisdictions. This guide is written for growers operating legally in places where home cultivation is permitted. Know your local plant count limits, licensing requirements, and any other applicable rules before you start.
Understanding hydroponic cannabis basics
Hydroponics simply means growing plants without traditional soil. Instead of soil microbes and organic matter slowly breaking down nutrients for roots to absorb, you deliver dissolved mineral nutrients directly to the root zone in water. That direct delivery is why hydro grows tend to be 20–30% faster than soil, roots spend less energy searching for food and more energy building plant mass.
The trade-off is that you become the soil. In a soil grow, the medium buffers pH swings and holds nutrients in reserve. In hydro, if your pH drifts or your reservoir runs low on a key element, the plant feels it within hours, not days. That sounds scary, but it just means you need a pH meter, an EC (electrical conductivity) meter, and the habit of checking both every day or two.
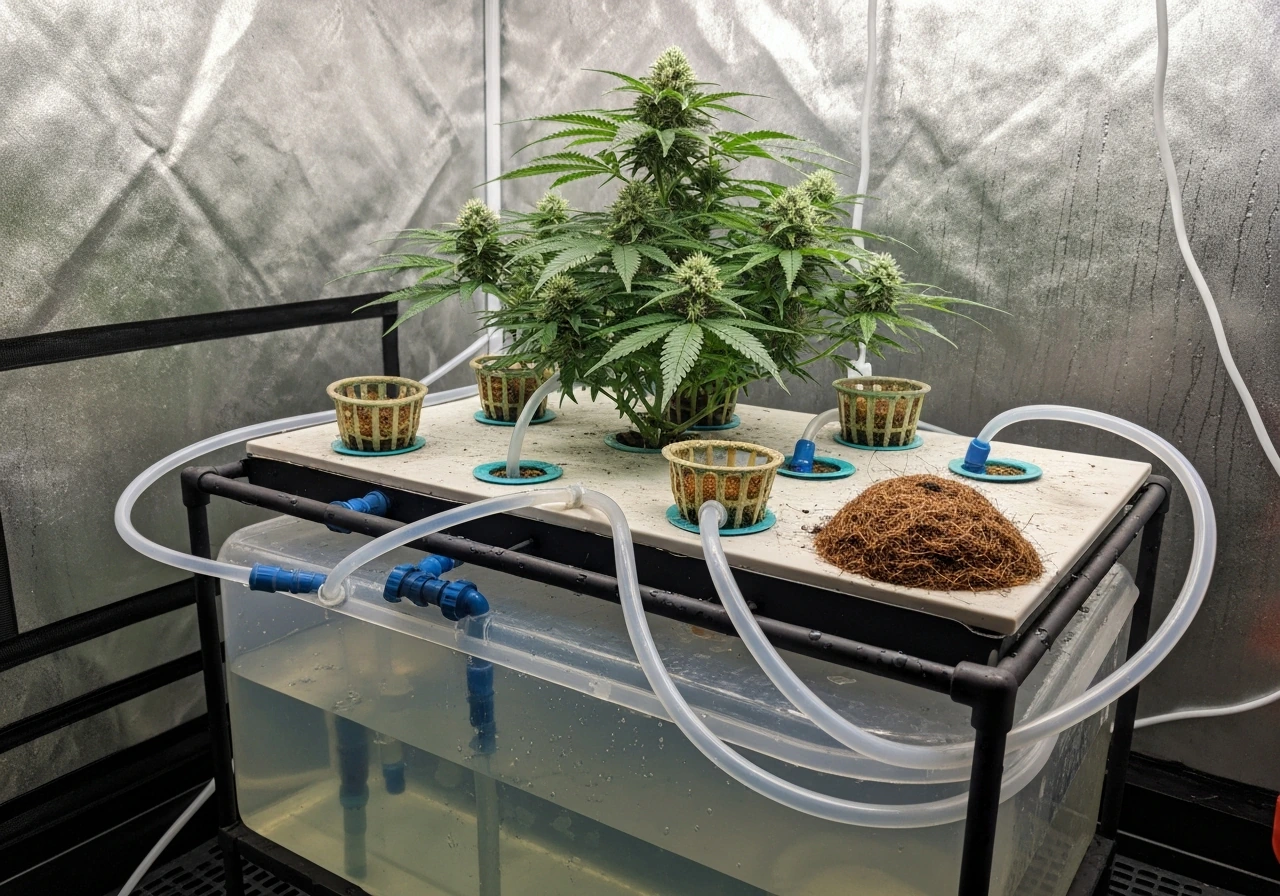
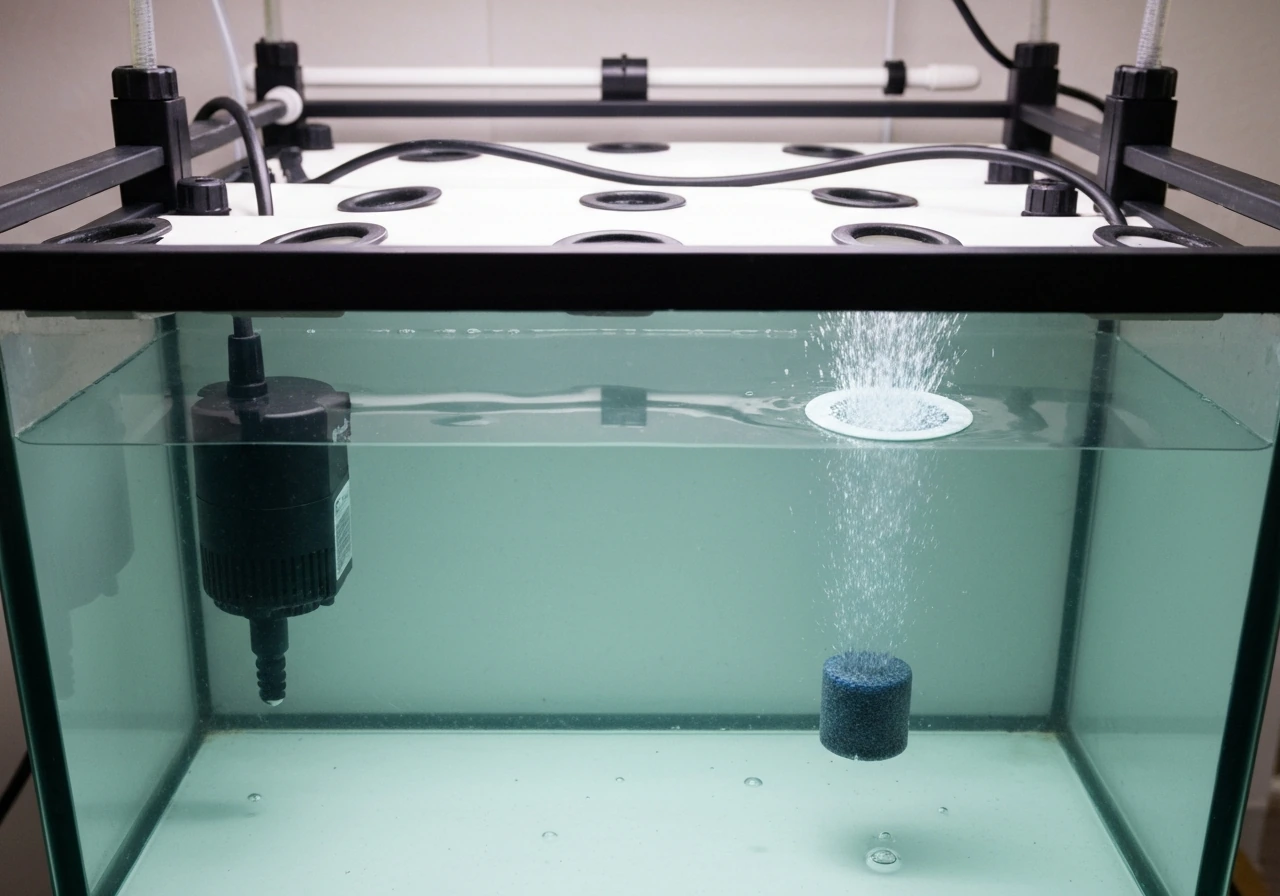
The most popular hydroponic systems for home cannabis growers are deep water culture (DWC), where roots hang directly in an oxygenated nutrient reservoir; coco coir, a soilless fiber medium fed with nutrient solution (it acts like hydro even though it looks like potting mix); and drip systems, where nutrient solution drips onto the medium and drains away or recirculates. For most beginners, coco coir or a small DWC bucket is the easiest entry point. Coco is more forgiving because it has some buffering capacity; DWC gives the fastest growth but less margin for error.
Choosing strains and planning an indoor hydroponic setup
Not every strain thrives equally in hydroponics. Fast-finishing, compact indica-dominant strains and modern autoflowering varieties tend to work very well in DWC or coco because they stay manageable in height and respond well to the consistent feeding that hydro provides. Tall, lanky sativa-dominant strains can still be grown hydroponically, but they need more vertical space and more aggressive training. If this is your first hydro run, pick something labeled as beginner-friendly or medium-difficulty with a 8–10 week flower time.
For your physical setup, here is what you actually need before you plant anything:
- Grow tent or dedicated grow space (common beginner sizes: 2x2 ft for 1–2 plants, 4x4 ft for 4–6 plants)
- Hydroponic system: DWC bucket kit, coco coir with fabric pots, or a drip system
- LED grow light sized for your space (aim for 200–400W true draw for a 4x4 tent)
- Inline fan with carbon filter for odor control and air exchange
- Clip-on or oscillating circulation fan inside the tent
- Digital pH meter and EC/TDS meter (calibrate these before every use)
- pH Up and pH Down solutions
- Three-part nutrient system (General Hydroponics Flora Series is a reliable, widely available starting point)
- Thermometer and hygrometer (combined units are fine)
- Rockwool starter plugs or rapid rooters for germination
- Submersible pump and air stones with an air pump if running DWC
Plan your grow space before you buy equipment. A 4x4 tent with a quality LED and a 5-gallon DWC bucket or coco setup is a very practical beginner system that can yield 2–5 oz per plant with good technique. Measure your ceiling height and account for the light hanging above the canopy, most lights need 12–24 inches of clearance above plant tops.
Seed-to-seedling hydroponic workflow
You have two starting points: seeds or clones. Clones (rooted cuttings from a mother plant) skip the germination step and put you straight into the seedling stage, which saves 1–2 weeks. Seeds give you a wider strain selection and avoid importing any pests or pathogens from a clone donor. Either works well in hydro.
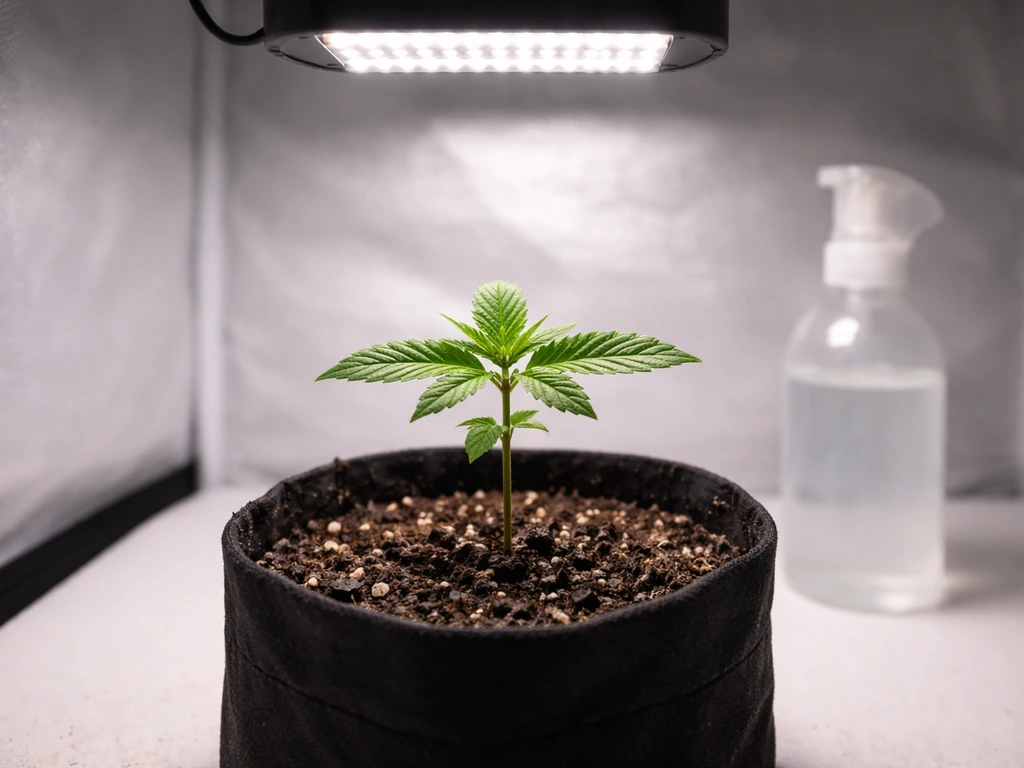
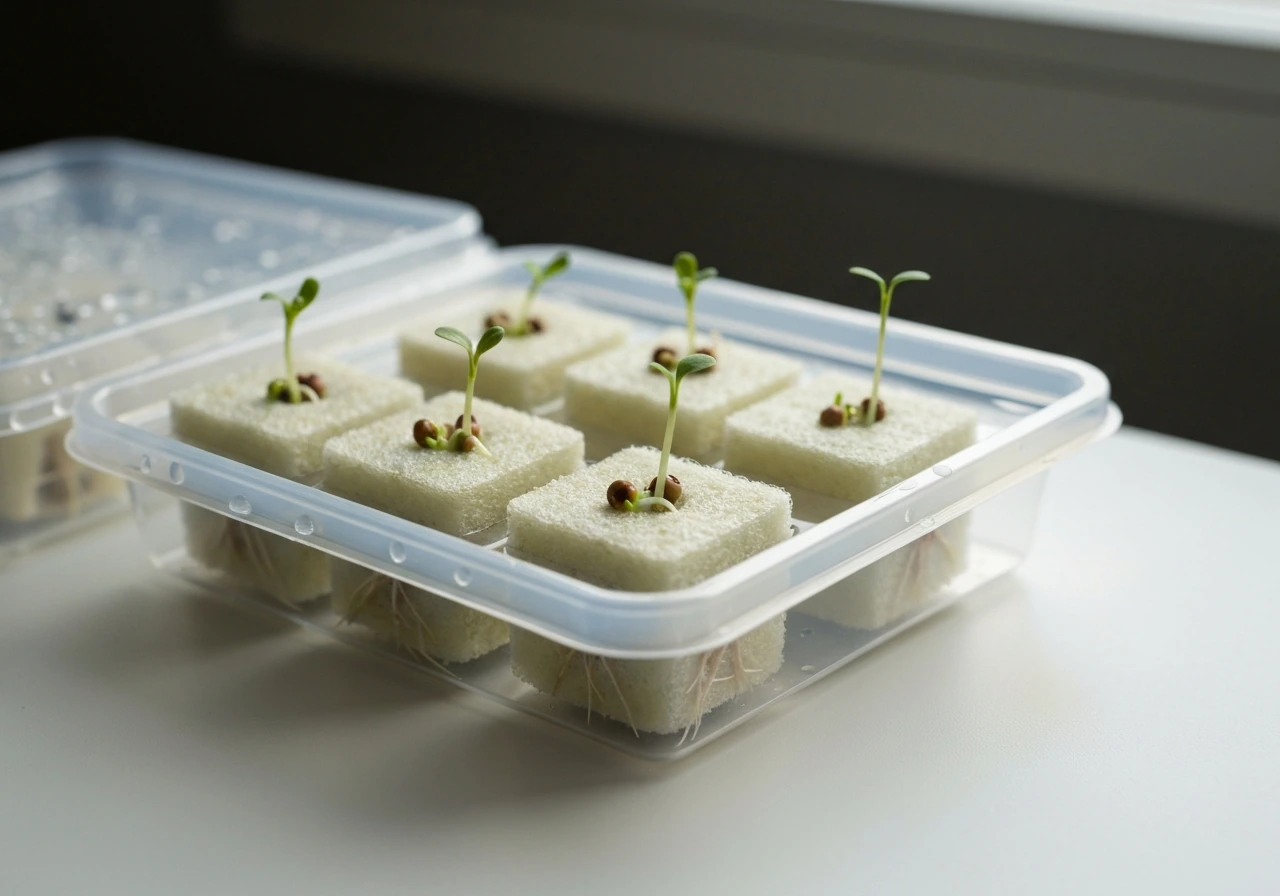
Germinating seeds in rockwool plugs
- Pre-soak rockwool plugs in pH-adjusted water at 5.8–6.2 for about 30 minutes, then squeeze out the excess moisture gently. Rockwool is naturally alkaline, so skipping the pH soak causes germination problems.
- Place one seed per plug, pointed end down, about 0.5 cm deep. Cover the hole loosely.
- Keep plugs in a warm, humid environment — a seedling tray with a humidity dome works perfectly. Aim for 70–80% relative humidity and 72–77°F (22–25°C).
- Do not flood the plugs or add nutrients yet. Keep them moist but not waterlogged. If you do add nutrients, use no more than 25% of the recommended seedling dose (EC around 0.4–0.6).
- Seeds typically crack and show a taproot within 24–72 hours. Once the taproot is visible and the seedling has popped through the plug surface, it is ready to move under a light.
Rooting clones
Take cuttings from a healthy mother plant, dip the stem in cloning gel or powder, and place in rockwool plugs or rapid rooters in the same warm, humid conditions as above. Clones do not need strong light while rooting, a low-intensity LED or T5 fluorescent at 18–24 inches is plenty. Roots typically appear in 7–14 days. Once you see white root tips emerging from the plug, the clone is ready for your main hydro system.
Vegetative and training stages in hydroponics
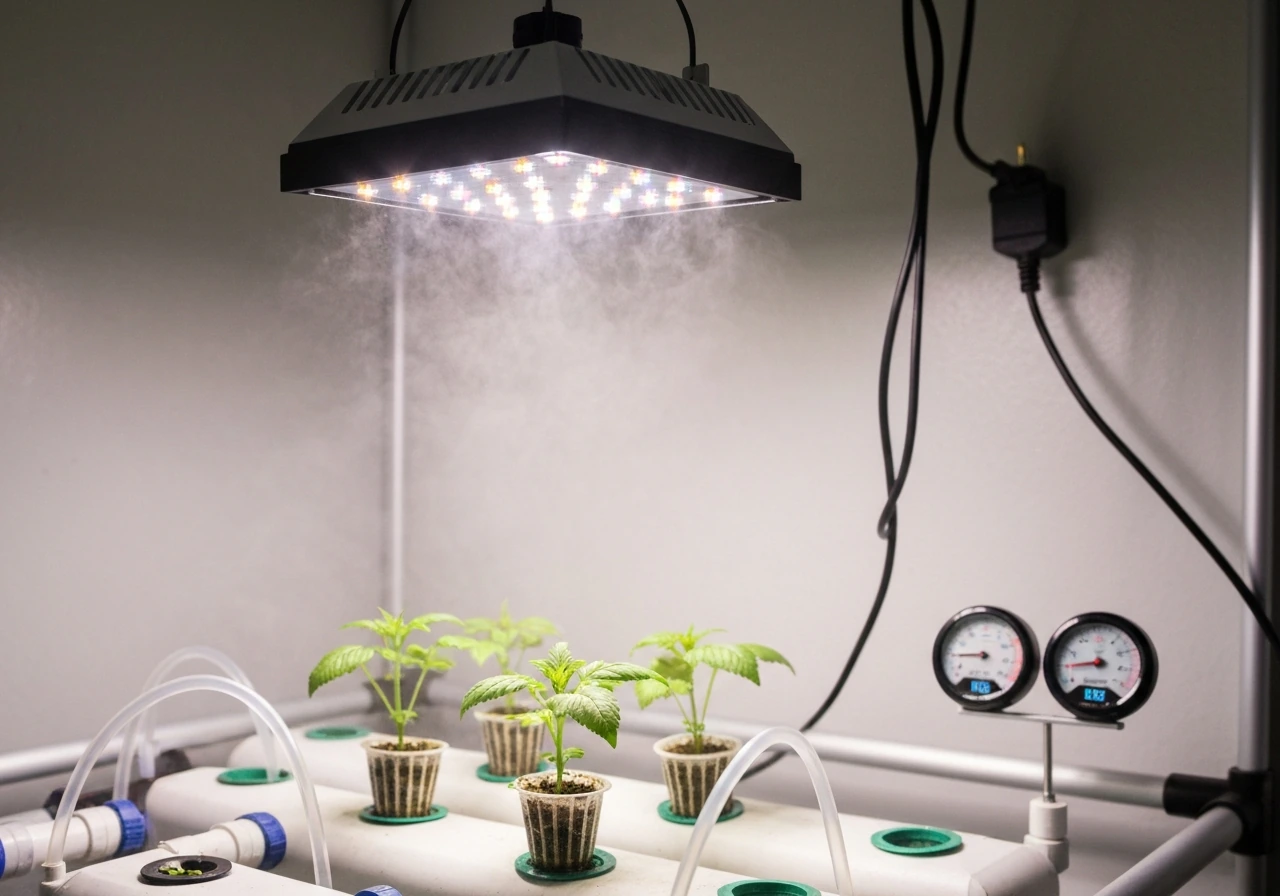
Lighting and environment during veg
Run an 18-hours-on, 6-hours-off light cycle during vegetative growth for photoperiod strains. Autoflowering varieties can run 18/6 or even 20/4 throughout their entire life, they flower based on age, not light cycle. For photoperiod plants, the 18/6 schedule tells the plant it is still summer and keeps it in vegetative mode indefinitely until you flip to 12/12.
For LED lights in veg, target a Daily Light Integral (DLI) of roughly 25–40 mol/m2/day. DLI is the product of your light intensity (PPFD) and the number of hours the light runs. At 18 hours, a PPFD of around 400–600 µmol/m2/s at canopy level hits that range comfortably. Most modern LEDs have a manufacturer PPFD map, use it.
Temperature and humidity matter a lot in hydro, especially because your reservoir temperature is also in play. Aim for these ranges during veg:
| Parameter | Seedling | Vegetative |
|---|---|---|
| Air temperature (lights on) | 72–77°F (22–25°C) | 70–82°F (21–28°C) |
| Relative humidity | 65–80% | 50–70% |
| VPD target | 0.4–0.8 kPa | 0.8–1.2 kPa |
| Reservoir temperature | 65–72°F (18–22°C) | 65–72°F (18–22°C) |
Keep your reservoir temperature below 72°F. Warm water holds less dissolved oxygen and creates the perfect breeding ground for root pathogens like Pythium. A reservoir chiller is a worthwhile investment if your grow room gets warm in summer.
Training your plants during veg
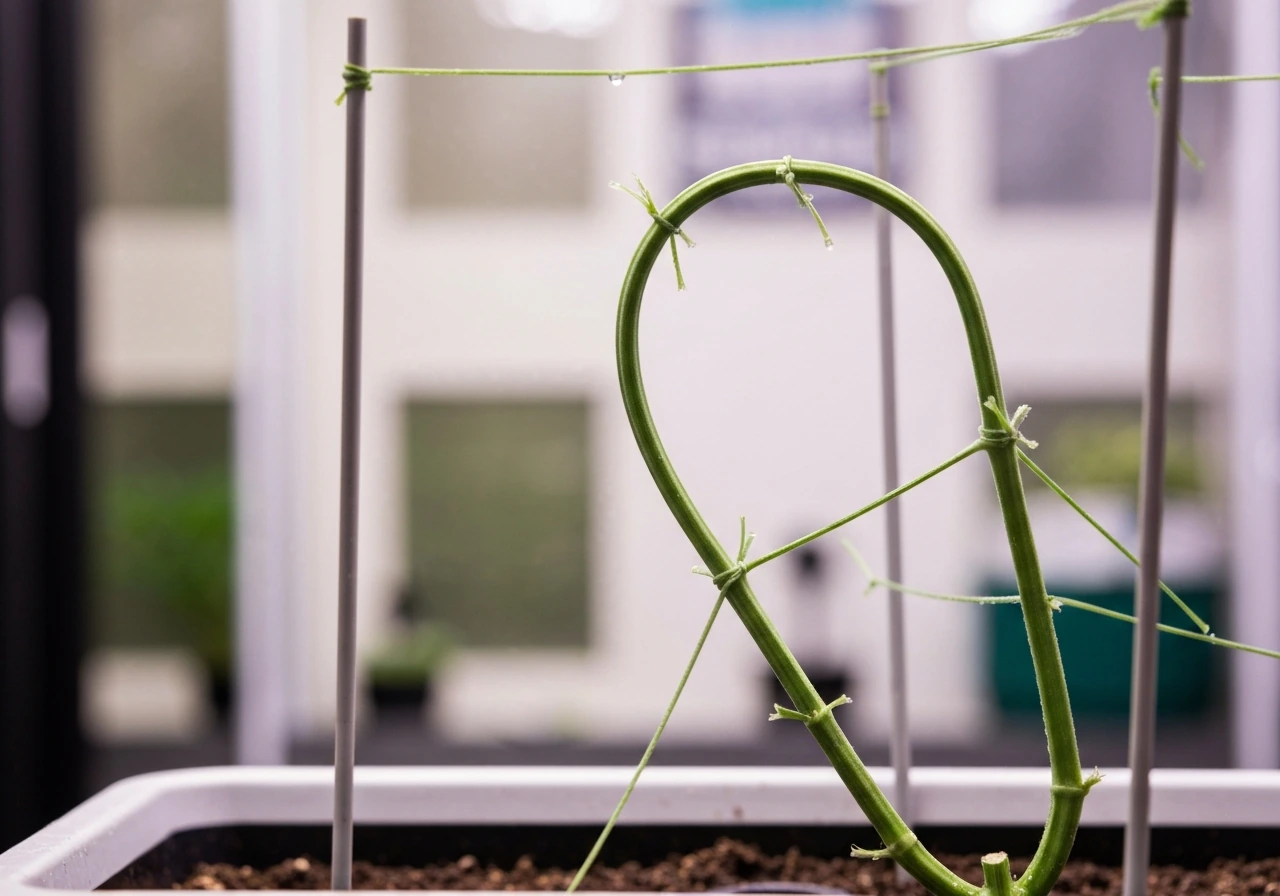
Training in veg is where you shape your yield. Cannabis grows naturally as a Christmas tree, one dominant top with smaller side branches below. Left untrained, you get one big cola and a lot of popcorn. Training flattens the canopy so every bud site receives direct light.
Low-stress training (LST) is the easiest approach: gently bend the main stem outward and tie it down with soft wire or plant ties, encouraging lower branches to grow upward and fill the space. No cutting required. A screen of green (SCROG) takes this further by weaving branches through a horizontal mesh screen to create an even, flat canopy. Topping (cutting the main growing tip) creates two main colas from one and is a common technique for increasing side branch development, though it does add a few days of recovery time.
Most growers in hydro veg their plants for 4–8 weeks depending on the final size they want. Because hydro plants grow faster than soil, you often need slightly less veg time than you expect. A plant that fills about 50–60% of your intended canopy space at the flip is a good rule of thumb, it will continue stretching for 2–3 weeks after the flip to 12/12.
Flowering and harvest in hydroponics
Flipping to flower and managing the stretch
For photoperiod strains, switch to a 12-hours-on, 12-hours-off light schedule to trigger flowering. The plant will stretch significantly, often doubling in height, over the first 2–3 weeks. Adjust your light height as needed and continue any remaining training during this stretch period. Once the pre-flowers harden into recognizable bud sites (usually by week 3–4 of flower), training largely stops.
Adjust your environment for flower. Lower humidity to 40–50% to reduce mold risk on dense buds, and aim for a VPD of 1.0–1.5 kPa. Temperature can drop slightly from veg, 68–78°F (20–26°C) lights-on is a comfortable flowering range. Note that switching from 18/6 to 12/12 reduces the total light hours your plants receive each day, which reduces DLI. To compensate, you can increase your light intensity modestly during flowering.
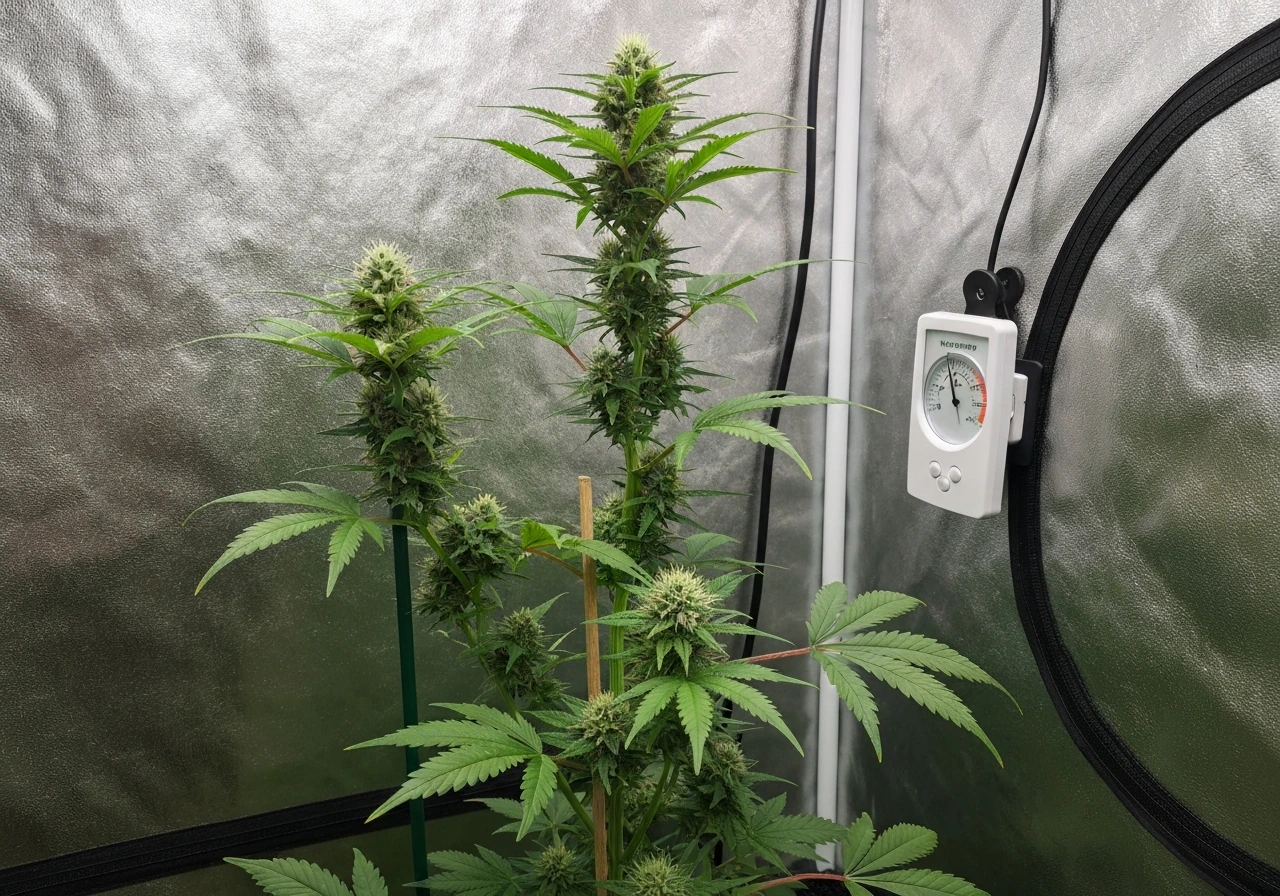
When to harvest: reading trichomes
Pistil color (the orange/brown hairs on buds) gives you a rough idea of maturity, but it is not reliable enough to use alone. Trichomes are the real harvest indicator. Use a jeweler's loupe (30–60x) or a digital microscope to examine the trichome heads on your buds (not the sugar leaves, those mature faster).
- Clear trichomes: too early, harvest would be immature and weak
- Mostly cloudy/milky trichomes (50–70%): peak THC, energetic and cerebral effect, good harvest window
- Mix of cloudy and amber (20–30% amber): more sedative, relaxing effect, slightly past peak THC
- Mostly amber: overripe for most purposes, THC degrading to CBN
Most photoperiod strains finish flowering in 8–12 weeks. Autoflowers typically finish their entire life cycle from seed in 10–14 weeks. Treat the breeder's listed flower time as an estimate, not a guarantee, always verify with trichomes.
Flushing before harvest
The flushing debate is active in cannabis growing communities, but in hydroponics the practice is straightforward: during the last 5–7 days before harvest, many growers replace their nutrient solution with plain pH-adjusted water (or a dedicated flush solution like FloraKleen at manufacturer-recommended dose for one week). The goal is to run out the residual mineral salts in the plant tissue before harvest. Whether this meaningfully affects the final smoke is debated, but it costs almost nothing to do and is standard practice in many hydro nutrient schedules. At minimum, stop feeding heavy bloom nutrients in the final week.
Yield expectations
Hydroponic cannabis yields vary widely based on genetics, light intensity, canopy management, and grower experience. A realistic first-time DWC or coco grow in a 4x4 tent with a 400W LED might yield 2–4 oz per plant. Experienced growers running optimized setups can pull significantly more. Do not chase yield numbers on your first run, focus on learning the system and keeping plants healthy. Yield follows from mastering the basics.
Nutrient schedules and water management for hydroponic weed
This is the area where most hydro beginners either overthink things or under-invest attention. Getting your pH and EC right is genuinely the most important skill in hydroponic cannabis growing.
pH targets
Keep your nutrient solution pH between 5.5 and 6.5, with a sweet spot of 5.8–6.2 for most of the grow. Different nutrients are absorbed most efficiently at slightly different pH levels, so allowing your pH to naturally drift within that range (rather than locking it at exactly one number) actually helps plants access a full spectrum of elements. Check pH daily. Adjust with pH Up (potassium hydroxide-based) or pH Down (phosphoric acid-based) after mixing your nutrients, not before.
EC targets by growth stage
EC (electrical conductivity) measures the total dissolved mineral concentration in your nutrient solution. Too low and plants are underfed; too high and you risk nutrient burn or salt lockout. Target EC climbs progressively from seedling through late bloom, then drops during the flush phase.
| Growth Stage | Target EC Range | Notes |
|---|---|---|
| Seedling | 0.4–0.8 | Very light feeding; roots are fragile |
| Early vegetative | 0.8–1.4 | Increase as plants establish |
| Late vegetative | 1.4–2.0 | Full feeding, plants are vigorous |
| Early flower (weeks 1–3) | 2.0–2.4 | Increase P and K, reduce N |
| Mid/late flower (weeks 4–7) | 1.8–2.2 | Monitor carefully for lockout signs |
| Ripening/flush | 0.0–0.5 | Plain water or flush solution |
These are starting targets, not laws. Your specific strain, system, and local water source all affect the real numbers. If your plant looks burned (crispy, curling leaf tips) and EC is at the high end of the range, back off. If it looks pale and stretched thin, bump it up. Always adjust based on what the plant tells you, not just the chart.
Mixing nutrients correctly
Always add nutrients to water, not water to nutrients. Mix each component separately into your reservoir water before adding the next. For a three-part system like General Hydroponics Flora Series, a common order is: fill reservoir with water, add Micro first, stir, then add Grow, stir, then add Bloom, stir. Check pH last and adjust to your target range. Never mix nutrients in concentrated form, always dilute into water.
Reservoir management and water changes
In a recirculating DWC system, do a full reservoir change every 7–14 days. Between changes, top off with plain pH-adjusted water as the level drops (plants drink more water than nutrients, so the EC in the reservoir will naturally creep up between changes, topping off with plain water keeps it in range). Keep the reservoir opaque and dark to prevent algae growth. Never let light hit your nutrient solution.
In coco coir, water and feed every day or every other day, letting 10–20% of the solution drain out as runoff. Check the runoff EC and pH to confirm your medium is not accumulating salt buildup. If runoff EC is significantly higher than your input EC, flush the coco with plain water until it equalizes, then resume normal feeding.
CO2 supplementation
CO2 supplementation can boost yields meaningfully, some growers report 20–25% improvements, but only when the rest of your environment is dialed in first. Ambient CO2 is around 400 ppm. An intermediate supplementation level of 800–1200 ppm is where most home growers see a practical benefit. The commonly cited peak for dense flowering is 1200–1500 ppm. Do not bother with CO2 if your temperature, humidity, VPD, and light intensity are not already dialed in, it will not compensate for those deficiencies. CO2 also carries real safety risks in enclosed spaces; always use a monitor and never exceed safe levels.
Troubleshooting common problems
pH and EC drift
pH drift is the most common hydro problem and the cause of most nutrient deficiency symptoms. If your pH drifts below 5.5 or above 6.5, certain nutrients become unavailable even if they are present in the solution, this is called nutrient lockout. Symptoms look like deficiencies: yellowing, purple stems, spotted leaves. Before diagnosing a deficiency, always check pH first. Correct the pH, then wait 24–48 hours to see if the plant responds before adding more nutrients. Adding more nutrients to a pH-locked plant just makes the problem worse.
Root problems and root rot
Healthy hydro roots are white and smell fresh. Brown, slimy roots with a foul smell are root rot, typically caused by Pythium or similar water-borne pathogens. Root rot spreads fast in recirculating systems because the shared reservoir carries it to every plant. Prevention is far easier than treatment: keep reservoir temperature below 72°F, keep the reservoir completely dark, ensure strong aeration (air stones should run 24/7 in DWC), and maintain good reservoir hygiene. If you catch root rot early, beneficial bacteria products (like Hydroguard/Botanicare) can help suppress it. Severe cases often mean losing the affected plant and doing a full system sterilization before the next run.
Nutrient deficiencies and toxicities
The most common deficiency symptoms and their likely causes in hydro:
| Symptom | Likely cause | Fix |
|---|---|---|
| Overall yellowing from bottom up | Nitrogen deficiency (or pH lockout) | Check pH first, then increase N in nutrient mix |
| Purple stems, slow growth | Phosphorus deficiency or pH too low | Raise pH to 6.0–6.2, adjust P levels |
| Brown leaf edges, curling tips | Nutrient burn (EC too high) | Lower EC, flush system, top off with plain water |
| Yellowing between leaf veins (green veins stay) | Iron or magnesium deficiency | Check pH; iron available 5.5–6.5, Mg available 6.0+ |
| Spots, blotches, leaf curling | Calcium deficiency or environmental stress | Add Cal-Mag supplement, verify pH and airflow |
Pests in a hydroponic grow
Indoor hydroponic grows are generally less pest-prone than outdoor grows, but fungus gnats are a common nuisance. Adults are harmless but larvae feed on organic matter near roots and can stress plants. Use yellow sticky traps to monitor adult populations, if you are catching a lot, act fast. Let the top of your medium dry out between waterings (harder to do in coco, but possible), use a layer of diatomaceous earth on the surface, or apply beneficial nematodes to the medium. Spider mites, aphids, and thrips can also appear, inspect plants regularly and quarantine any new clones for a week before introducing them to your grow space.
Algae and biofilm in the reservoir
Green algae in the reservoir means light is getting in somewhere. Algae competes with your plants for oxygen and nutrients and creates biofilm that can clog lines and harbor pathogens. Fully cover your reservoir with opaque material, no light leaks. Between grows, clean and sterilize the entire system with hydrogen peroxide or a dedicated hydro cleaning product. A clean system at the start of each run prevents most of these problems.
Getting started: a beginner checklist and where to learn more
If you are just getting started, here is a practical run-of-show checklist to work through before your first plant goes in:
- Confirm home cultivation is legal in your jurisdiction and that you are within your legal plant count
- Set up and test your grow tent, light, fans, and ventilation before any plants are involved
- Calibrate your pH and EC meters with calibration solution — do not skip this
- Pre-soak rockwool plugs at pH 5.8–6.2 and germinate seeds or root clones
- Move seedlings into your system once roots are visible and the plug surface is moist but not waterlogged
- Start with a low EC (0.4–0.6) and increase gradually as seedlings establish
- Check pH and EC of your reservoir or runoff every 1–2 days and log the numbers
- Begin LST training once the plant has 4–5 nodes and is growing vigorously
- Flip photoperiod plants to 12/12 when they have filled about 50–60% of your canopy space
- Switch to a bloom nutrient profile at the flip and continue adjusting EC week by week
- Monitor trichomes starting around week 6 of flower and harvest when you see the trichome mix you want
- Flush or run plain water for the final 5–7 days, then harvest, dry, and cure
Using videos and other resources to learn
Video guides are genuinely useful for hydroponic growing because seeing reservoir setup, root health, trichome inspection, and training techniques in motion is faster than reading about them. The best approach is to search specifically for your system type: look for 'DWC cannabis grow from seed to harvest' or 'coco coir cannabis grow guide' on YouTube rather than generic hydro videos. Channels that document full grows week by week are more useful than highlight reels, because you see how experienced growers respond to problems in real time. Prioritize channels where the grower shows their actual meters, reservoir temps, and nutrient mixing process, that specificity is what teaches transferable technique.
For written resources, nutrient manufacturer feedcharts (General Hydroponics, Canna, Advanced Nutrients all publish free multi-week schedules) are worth downloading and printing out before your first grow. Sites like Coco For Cannabis publish detailed, science-backed grow guides with specific pH and EC targets for every week of the cycle. Cannabis cultivation education programs, including formal institutions like Oaksterdam, also offer structured course material if you want to go deeper than forum advice.
If you want to go further into specific aspects of the grow cycle, it is worth exploring detailed guides on growing hydroponic cannabis from seed, the full hydroponic marijuana growing process, and how long a hydro weed grow actually takes from seed to harvest, each of those digs into a specific part of the workflow covered here. For a more specific timeline, see how long to grow hydro weed from seed to harvest and what affects the total weeks how long a hydro weed grow actually takes. Hybrid strain selection for hydro is also worth researching if you want to match genetics to your specific system and environment. Hybrid genetics can also change how vigorous the plant is and how it responds in hydro, so plan for that when you set your light, nutrients, and training Hybrid strain selection for hydro.
The most important thing I can tell you is this: your first hydro grow will not be perfect, and that is fine. The goal is to finish it, learn from what went wrong, and apply that to the next run. Hydroponic cannabis growing has a real learning curve, but the feedback loop is tight, problems show up fast, corrections work fast, and you get results in a matter of weeks rather than months. If you want a deeper look at plant timing, growth phases, and how long a complete run can take, use this guide on how to grow hydro chronic as a related next step. Start simple, keep notes, and trust the numbers your meters give you over any instinct to guess.
FAQ
Do I need to run my hydro system with recirculation, or can I do non-recirculating?
You can do either, but non-recirculating usually involves more nutrient waste and less risk of spreading problems between plants. Recirculating is efficient, yet any pH drift or root issue can affect everything in the shared reservoir, so you must be stricter about sanitation and reservoir checks (often full reservoir changes on a tighter schedule).
How often should I top off the reservoir with water, and how do I avoid EC creeping too high?
Top off when the level drops, using plain pH-adjusted water, not more concentrate. Topping off helps because plants remove more water than nutrients, so the reservoir EC naturally rises as volume decreases. Still, recheck EC after top-offs, if it keeps climbing faster than expected, do a partial or full reservoir refresh sooner than your usual 7 to 14 day window.
What water source should I use for hydro, and how does it change my pH/EC targets?
If your tap water is high in dissolved minerals, it can raise starting EC and make pH adjustment harder. Test your water first and start with a lower nutrient dose, then dial in to your EC and pH ranges after mixing. If possible, use RO or filtered water when your baseline EC is consistently high, to reduce nutrient imbalances and scale buildup.
Should I keep the reservoir constantly aerated in DWC?
Yes, DWC typically needs continuous aeration because roots rely on dissolved oxygen. If your air pump or air stone stops even briefly, stress can show up quickly. Use an air stone sized for strong bubbles and consider an emergency backup (like a spare pump) because oxygen loss is one of the fastest ways to lose plants.
Why do plants show deficiency symptoms but my pH and EC look “in range”?
Most of the time this is either transient pH swings between checks, a mixing error (like forgetting to stir between parts), or nutrient lockout from temperature-related changes in uptake. Check pH right after mixing, then again a few hours later, and look at the whole pattern (new growth vs old growth). If pH is stable and symptoms persist, verify you mixed the correct nutrient components and that you are not overshooting a single element.
Is it better to follow a manufacturer feed chart exactly, or adjust daily in hydro?
Use the chart as a baseline, then adjust based on plant response and your meter readings. A common mistake is treating chart EC numbers as universal, but strain, light intensity, and water chemistry change the real uptake. If your plants look burned at the top of the chart range, back down immediately, then let the next 24 to 48 hours confirm recovery before changing again.
What’s the safest way to correct pH when it’s off, should I add pH Up/Down to the reservoir directly?
Add pH adjuster slowly while stirring, then recheck once the solution is fully mixed (not right after a quick pour). Make small incremental corrections, overshooting is a common error. Also remember to adjust after mixing nutrients, not before, because nutrients can shift pH substantially.
How do I know if my coco coir is getting salt buildup?
The practical test is runoff monitoring. If your runoff EC is consistently higher than your input EC (for example, rising above it by a meaningful margin day after day), salts are accumulating and you likely need a deeper flush. Also confirm pH and look for repeating deficiency patterns, coco buildup often mimics nutrient problems even when you are feeding “on schedule.”
Should I flush in hydro, and what if my system relies on nutrient recirculation?
Many growers flush only in the final days by replacing nutrients with plain pH-adjusted water, but in recirculating systems you should be deliberate to avoid shocking roots. Remove nutrient sources cleanly, then run a properly aerated plain-water phase and keep pH stable. If you are prone to pH drift, do a shorter flush and stop heavy feeding earlier rather than extending a risky long water-only period.
What are early signs of root rot, and when should I act versus wait?
Watch for root smell (foul), slimy or brown roots, and a sudden slowdown in growth even though light and feed have not changed. If you see roots degrading, act immediately, root issues can spread quickly in shared reservoirs. Do not wait a full week, increase oxygenation, correct reservoir temperature, and isolate or remove the worst-affected plant if possible.
How do I prevent algae, besides keeping the reservoir covered?
Covering the reservoir is the core step, also check for light leaks from lids, cable holes, and tubing. Use opaque lines where possible and keep the grow space light-tight during the dark cycle. If algae appears, clean the system and address where light is reaching, algae is often a symptom of a leak rather than a “random” growth issue.
When should I start training, and what should I avoid during the flip?
Start LST or SCROG while plants are still flexible, typically after seedlings establish and the plant has enough stem strength (often before it fully fills the intended canopy). During the first 2 to 3 weeks after switching to 12/12, be gentle, the plant stretches and can break if bent hard late. Avoid topping or major cuts right at the flip unless you have a buffer for recovery and slower growth.
How do I choose LED intensity if I don’t know my PPFD?
If you lack a PPFD meter, start by using manufacturer distance charts carefully and begin at a conservative dimming level. Increase gradually over several days while watching leaf color and stretch, then adjust again if tips start to claw or curl. In hydro, the safest approach is slower ramp-up because nutrient uptake changes can make stress look like deficiency or burn.
Next Article
How to Grow One Weed Plant: Beginner Step-by-Step
Step-by-step guide to grow one cannabis plant: setup, germination, light, feeding, troubleshooting, harvest and curing.