You can grow a cannabis plant naturally at home by starting with a quality feminized seed, planting it in an organic soil mix, giving it the right light and airflow, feeding it with compost-based nutrients, and harvesting when trichomes shift from clear to milky with a touch of amber. That is the whole loop. Everything in this guide is about making each of those steps concrete so you are not guessing.
How to Grow a Weed Plant Naturally: Step-by-Step Guide

Marcus Holbrook
5 May 2026
Legality, responsibility, and what 'natural' actually means here
Before you drop a single seed in soil, check your local law. If you are wondering, can i grow my own weed plant, the first step is verifying the rules in your area before you buy any seeds or soil. Home cultivation rules vary a lot. California lets adults 21 and older grow up to 6 plants, but cities and counties can add stricter rules on top of that, including indoor-only requirements and permit requirements.
Colorado allows up to 6 plants per resident with no more than 3 flowering at the same time, and if anyone under 21 lives in the home the grow must be in a locked, enclosed space minors cannot access. Virginia allows up to 4 plants per household for adults 21+, and each plant needs a legible tag with your name, ID number, and a note that it is for personal use.
Across most legal states, the common requirements are: stick to the plant-count cap, keep plants out of public view, and in many cases keep them in a secured space. Cannabis also remains federally illegal in the US, so you cannot grow on federal land or take plants across state lines.
Now, what does 'natural' mean in a growing context? It does not mean anything mystical. In practical cannabis cultivation, growing naturally means leaning on organic inputs (compost, worm castings, organic dry amendments) and avoiding heavy synthetic salt-based fertilizers. It means feeding the soil biology rather than force-feeding the plant directly.
Living soil approaches work on the idea that microbes, fungi, and bacteria cycle nutrients to plant roots naturally, which buffers pH, builds resilience, and produces better tasting results at harvest. You can grow naturally indoors or outdoors. If you are still deciding what you need to grow a weed plant, focus first on the basics like seeds, light, soil, watering, and airflow grow naturally. This guide focuses on soil-based and coco-based methods because those align best with organic inputs.
Choosing genetics, confirming sex, and deciding on indoor vs. outdoor
For beginners, buy feminized seeds. Feminized seeds are bred to produce only female plants, which are the ones that grow the buds you actually want. Regular seeds can produce male plants, which pollinate females and ruin a harvest if you are not watching carefully. Autoflowering feminized strains are another great beginner option because they flower automatically based on age rather than light schedule, which removes one major variable. Choose a strain described as mold-resistant if you are growing outdoors or in a humid climate.
If you do grow from regular seeds or a clone from an unknown source, you will need to identify the sex. Cannabis plants show 'pre-flowers' at the nodes (the junction where a branch meets the main stem) when they are roughly 3 to 8 weeks old from seed. Male pre-flowers appear earlier, usually around weeks 3 to 4, and look like small smooth ball or sac-like structures with no white hairs. Female pre-flowers typically show up between weeks 4 and 8 and produce tiny white hair-like pistils. Check multiple nodes, not just the top of the plant, because pre-flower visibility varies by strain. Remove males immediately if you want sensimilla (unseeded) buds.
One more thing to watch for is hermaphroditism, where a plant develops both male and female structures. This is usually caused by stress: light leaks during the dark cycle, excessive heat, inconsistent watering, nutrient burn, or heavy pruning late in flower. Keep stress minimal and your environment dialed in and you will rarely see it.
On indoor versus outdoor: indoors gives you total control over light, temperature, and humidity, which usually means faster, more predictable results. Outdoors is lower cost and more sustainable but you are at the mercy of your climate and pest pressure. For a natural soil grow, both work well. If you are just starting out and want to understand the plant before committing to an outdoor season, a small indoor setup is a reasonable first move. If outdoor conditions in your region support it (warm summers, low humidity late in season), outdoor is genuinely easier on your wallet and your time.
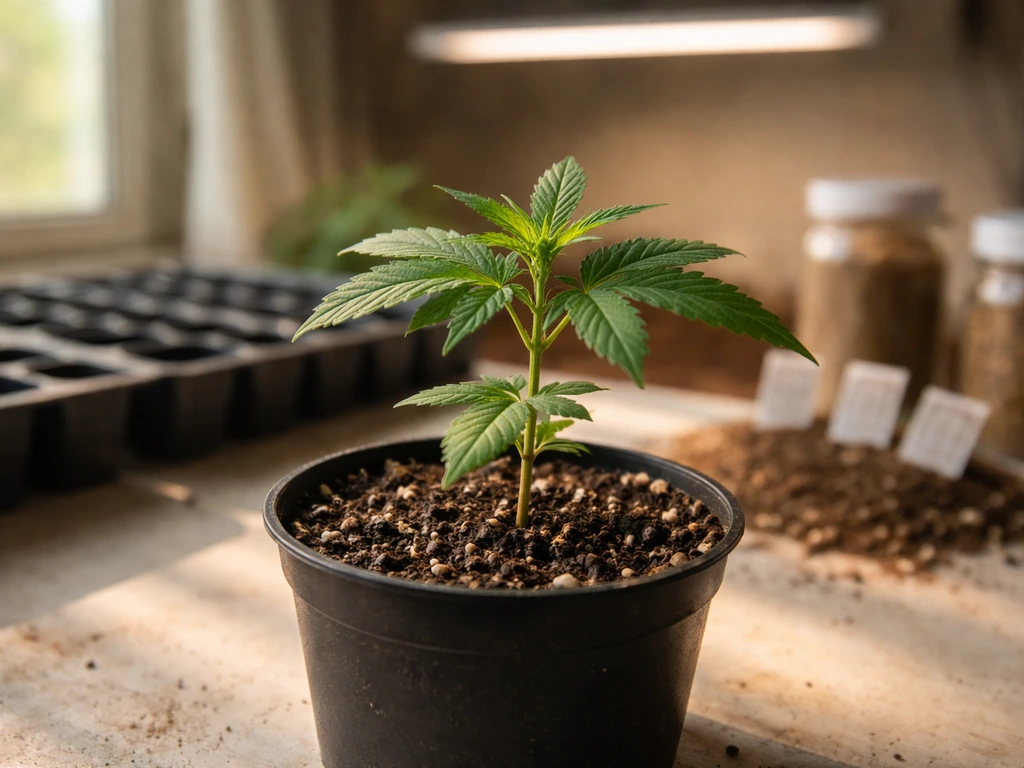
Germination and early seedling care
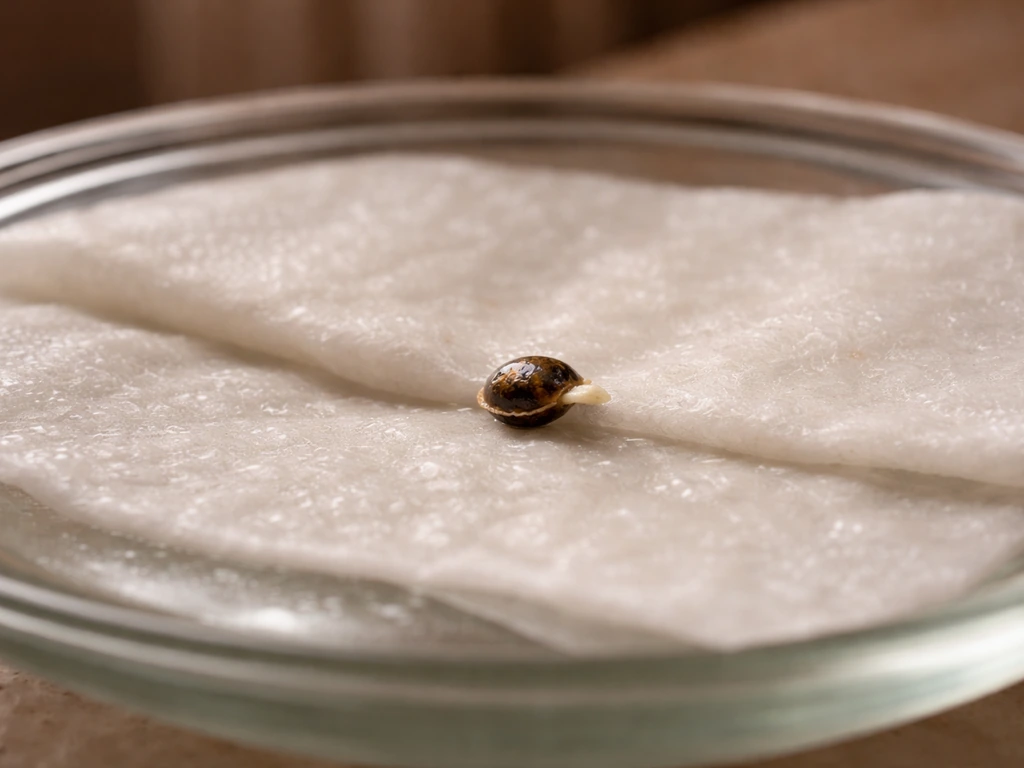
The paper towel method works fine: place your seed between two damp paper towels on a plate, cover with another plate, and keep it somewhere warm (around 70 to 80°F). Check daily and plant into a small container as soon as the taproot is about a quarter to half an inch long, usually within 24 to 72 hours. Plant the seed about twice its width deep, taproot pointing down, and cover lightly with your starter medium. You can also plant directly into a small starter pot of moist soil without the paper towel step.
Keep the starter pot at roughly 70 to 80°F and 65 to 70% relative humidity. Consistent moisture matters here but overwatering is the number one reason seedlings fail. The soil should feel like a wrung-out sponge, not soggy. A clear plastic dome or a loose plastic bag over the pot helps maintain humidity during germination. Remove the cover as soon as the seedling pushes through the soil surface.
Once the seedling is up, it needs bright light immediately. Insufficient light at this stage causes stretching, where the stem grows long and weak as the plant reaches for more light. Indoors, a small LED or T5 fluorescent light positioned a few inches above the seedling works well. Outdoors, a sheltered spot with morning sun and afternoon shade is gentler than full blazing sun for the first week. Once you see 3 to 4 sets of true leaves, the seedling is transitioning into the vegetative stage.
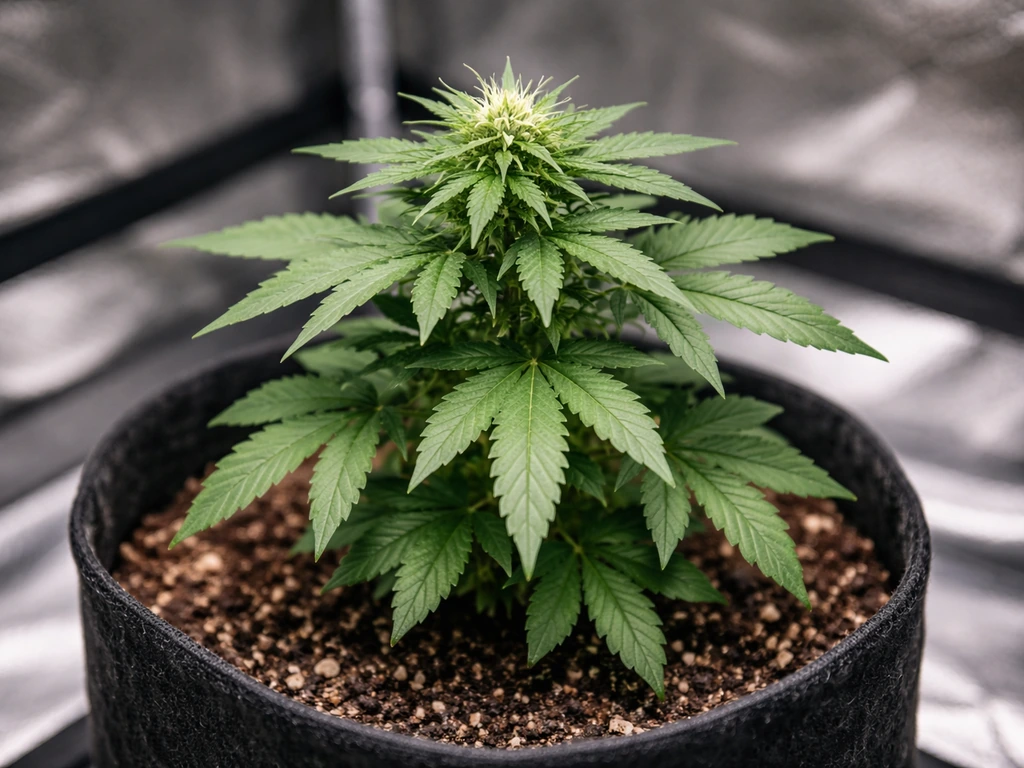
Vegetative growth: light, watering, training, and airflow
During veg, your plant is building the structure that will hold all of its flowers. Indoors, give it 18 hours of light and 6 hours of darkness per day. Outdoors, plants naturally veg while days are long (spring and early summer) and begin flowering as days shorten in late summer. Aim for temperatures between 70 and 85°F during the day and relative humidity around 50 to 65%. Vapor pressure deficit (VPD) in the 0.8 to 1.2 kPa range is a good vegetative target if you want to get precise, but temperature and RH in the ranges above will naturally get you there.
Watering in veg is where a lot of beginners go wrong. Lift your pot before and after watering so you learn what a dry pot feels like versus a saturated one. Water when the top inch or two of soil is dry and the pot feels noticeably lighter. Water thoroughly until runoff comes out the bottom, then do not water again until the pot dries out. This wet-dry cycle encourages roots to grow deep searching for moisture, which builds a strong plant.
Training your plant during veg increases yield without adding any inputs. Low-stress training (LST) is the easiest natural method: gently bend the main stem and tie it down to create a flatter canopy so lower branches get more light. Topping (cutting off the main growing tip) is another common technique that creates two main colas instead of one. Do any heavy training at least 3 to 4 weeks before you plan to flip to flower so the plant has time to recover.
Airflow is non-negotiable indoors. A small oscillating fan blowing gently across the canopy strengthens stems (called 'thigmomorphogenesis' if you want the science term, but the practical point is that gentle movement builds stronger stalks) and prevents humid pockets that invite mold and mites. If you are in a tent, exhaust air through a carbon filter to control odor and keep air moving. Outdoors, good plant spacing accomplishes the same thing.
The flowering stage: schedule, environment, and knowing when to harvest
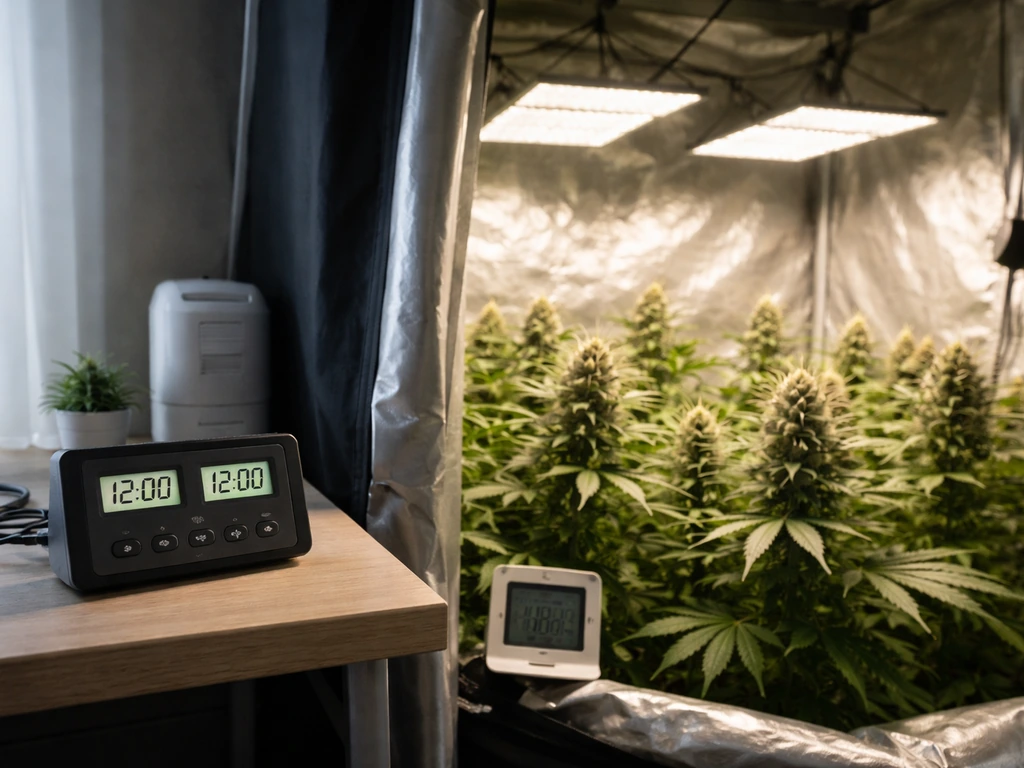
To trigger flowering indoors, switch your light schedule to 12 hours of light and 12 hours of uninterrupted darkness. This simulates the shortening days of late summer that tell the plant it is time to reproduce. Autoflowering strains skip this step and flower on their own after 3 to 5 weeks from seed regardless of light schedule. Outdoors, photoperiod strains naturally begin flowering as days shorten past roughly 12 hours of darkness, which typically happens in late July to August depending on your latitude.
During flowering, lower your humidity progressively to prevent bud rot. Target around 45 to 55% RH in early flower and tighten that to 40 to 50% in the final weeks before harvest. Temperature should stay between 65 and 80°F. Keep that airflow strong and consistent. Any dead or yellowing leaves tucked inside the canopy should be removed to reduce moisture traps.
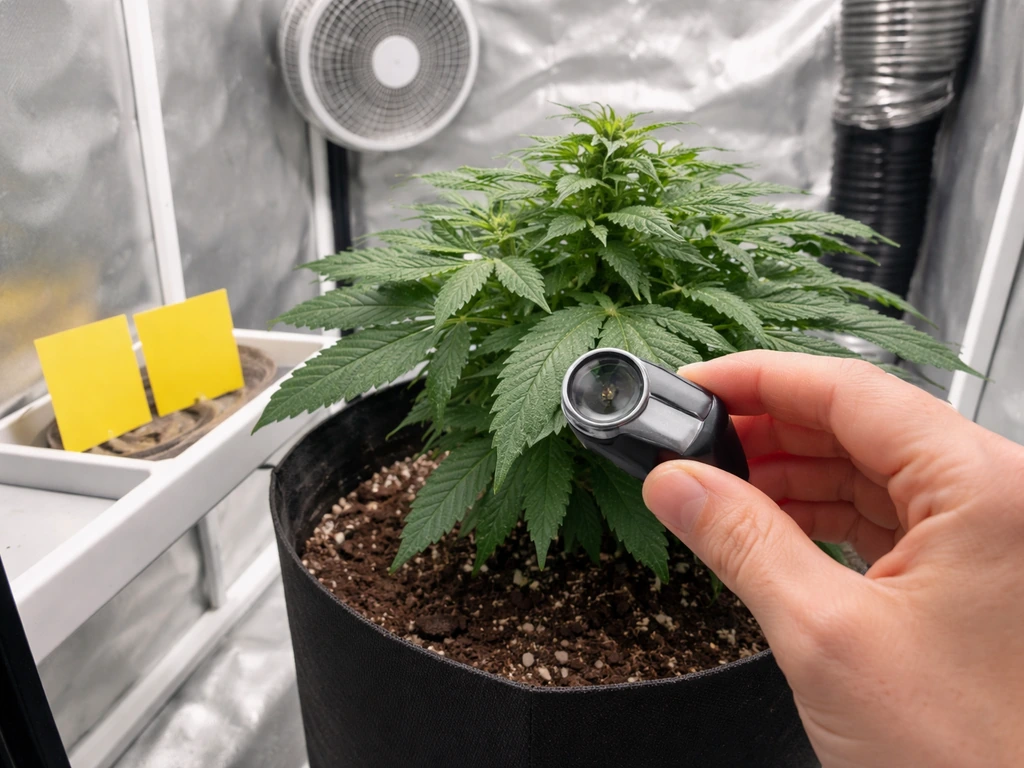
Breeder-listed flowering times (often listed as '8 to 9 weeks') are estimates, not finish lines. The same strain can vary by 5 to 10 days depending on your environment and the specific phenotype you are growing. Use trichome color as your actual harvest trigger, not the calendar. Get a jeweler's loupe (30x to 60x) or a cheap digital microscope and look at trichomes on the buds themselves, not the sugar leaves. Here is what you are looking at:
| Trichome Color | What It Means | Harvest Decision |
|---|---|---|
| Clear/translucent | Still developing, THC building | Too early, wait |
| Milky/cloudy white | THC near peak | Getting close, watch daily |
| Mostly milky with 10–20% amber | THC at peak, slight sedation beginning | Ideal harvest window for most growers |
| Majority amber | THC degrading to CBN, more sedative effect | Harvest now if you want heavier body effect |
Pistil color is a secondary confirmation: when 70 to 90% of the white hairs have turned orange or red and curled in, the plant is usually close. But trichomes are the real call. Build in a realistic 1 to 2 week buffer past the breeder's listed flowering time before you expect to be in harvest range.
Building a natural soil mix and feeding organically
A natural soil grow starts with good living media. Healthy soil is biologically active, meaning it is full of bacteria, fungi, and microorganisms that break down organic matter and make nutrients available to plant roots. You want your soil to have around 3 to 5% organic matter content, which is why compost is a foundational ingredient. Compost improves soil structure, water retention, drainage, and pH buffering all at once.
For a basic natural mix in containers, a common starting point is roughly 60% quality potting mix (look for one without synthetic slow-release fertilizer pellets), 20 to 30% compost or worm castings, and 10 to 20% perlite for aeration. If you are amending native or raised-bed soil for an outdoor grow, work in 30 to 50% well-composted organic matter by volume to improve drainage and nutrient availability.
One important step that a lot of first-timers skip: if you build an amended living soil mix, let it 'cook' for 2 to 4 weeks before transplanting into it. This allows the microbial activity to stabilize and hot organic amendments (like high-nitrogen bat guano or blood meal) to mellow out. Planting directly into freshly amended soil can cause nutrient burn even from organic inputs.
For feeding throughout the grow, organic dry amendments (kelp meal, alfalfa meal, neem cake, langbeinite, rock phosphate) mixed into your soil at the start can carry plants a long way without any liquid feeding. Worm casting teas and compost teas can be brewed and applied as a soil drench to keep microbial populations active. If you want to use bottled organic liquid nutrients, look for OMRI-listed products (certified for organic use).
OMRI’s compost standards categorize compost and related inputs as Allowed, Allowed with Restrictions, or Prohibited, and compost tea is specifically covered in those standards OMRI-listed products. Keep your soil pH in the 6.
0 to 7. 0 range for best nutrient availability in a living soil system. Most quality organic potting mixes start in that range naturally.
Signs of overfeeding even with organics include dark green clawing leaves (nitrogen toxicity) and brown leaf tips. Signs of underfeeding include pale yellowing that moves up from lower leaves (nitrogen deficiency in veg) or purple tints and slow growth (phosphorus issues in flower). With a well-built living soil mix that has been cooked properly, you often will not need to add much at all during veg. Flower-stage amendments (phosphorus and potassium heavy, reduced nitrogen) can be top-dressed around week 2 to 3 of flower.
Pests, mold, and other problems: natural prevention and fixes
The most effective pest and mold strategy is prevention, not reaction. Most problems in a home grow come from the same root causes: too much humidity, poor airflow, and overcrowded canopies. Here is a practical prevention checklist:
- Keep humidity in stage-appropriate ranges (50–65% veg, 45–55% early flower, 40–50% late flower)
- Run oscillating fans inside the canopy, not just above it
- Defoliate moderately to open airflow through the canopy in early flower
- Inspect undersides of leaves weekly for spider mites (tiny dots, fine webbing) and aphids
- Keep grow room walls and floors non-porous (painted concrete or plastic sheeting) so moisture does not absorb and breed mold
- Remove and discard (do not compost) any infected plant material immediately
- Avoid overhead watering and getting water on leaves, especially late in the day
Powdery mildew is the most common mold issue for indoor growers. It thrives when temperatures sit at 70 to 80°F and humidity cycles high at night and low during the day. That exact range overlaps with ideal cannabis growing conditions, which is why prevention matters so much. At first signs of white powdery patches on leaves, remove the affected tissue immediately and increase airflow. A spray of diluted hydrogen peroxide (3% food grade at a 1:3 ratio with water) applied early can stop spread. Resistant strains help too, especially outdoors.
Botrytis (gray mold or bud rot) is the nightmare of late flowering, especially outdoors during rainy periods. It targets weak, damaged, or dying tissue first and spreads fast in cool, wet conditions (50 to 80°F with free moisture on surfaces). If you see gray or brown mushy bud tissue, cut it out well below the affected area, improve airflow, and drop your humidity immediately. In outdoor grows, harvesting slightly early during an extended rain event is sometimes the right call versus losing the whole crop to bud rot.
For spider mites, aphids, and fungus gnats, neem oil solution (mixed per label directions and applied to leaves and soil surface), insecticidal soap spray, and diatomaceous earth on the soil surface are effective natural controls. Neem is best applied in the vegetative stage. Avoid neem or any spray on open flowers as it can leave an unpleasant residue and affect flavor. Predatory insects (ladybugs for aphids, predatory mites for spider mites) are a legitimate biological control option for outdoor grows.
Nutrient lockout is a common non-pest problem that looks like deficiency even when you have been feeding. The plant cannot absorb nutrients when pH is out of range. In a living soil system, good compost and biology buffer pH naturally, but if you are watering with heavily chlorinated tap water or flushing constantly, you can throw pH off. Let tap water sit uncovered for 24 hours before using it to off-gas chlorine, or use filtered water. Test your soil pH occasionally with an inexpensive soil probe if things look off.
Harvest, drying, curing, and what to do if something goes wrong after
When trichomes hit your target window (mostly milky with some amber), stop all feeding and water with plain pH-adjusted water for the last 10 to 14 days. This 'flush' helps clear residual organic compounds from the buds and contributes to a cleaner final smoke. Cut branches at harvest and remove large fan leaves immediately. If you want to use dried bud as a starting point, understand that dried cannabis seeds are unreliable and may not be viable or able to sprout.
Dry your harvested branches in a dark room at 60 to 70°F and 55 to 65% relative humidity. Hang them upside down on lines or racks with enough space between branches for air to circulate. Do not rush drying with fans blowing directly on the buds or by raising temperature. A slow dry over 7 to 14 days preserves terpenes and produces a much smoother end product. Buds are ready to move to jars when the small stems snap rather than bend.
Curing happens in glass mason jars in a dark, cool space. Fill jars about 75% full, seal them, and check your hygrometer reading inside the jar after the first 12 to 24 hours. You are targeting 58 to 62% RH inside the jar. If it reads above 65%, leave lids off for a few hours, then reseal.
If it reads below 55%, the buds dried too fast and you can add a small Boveda or Integra humidity pack to bring them back. For the first two weeks, 'burp' the jars (open them for 15 to 30 minutes) once or twice a day to release built-up gases. After two weeks, once-a-day or every-other-day is fine. Most buds reach peak flavor and potency after 4 to 8 weeks of curing.
If something goes wrong post-harvest, here are the most common scenarios: buds feel spongy or smell like hay (dried too fast or at too-low humidity, cure longer and add humidity packs), buds develop mold in jars (RH was too high during dry or cure, remove any affected buds immediately and increase burping frequency), or buds taste harsh (may need more curing time or the flush was not adequate). Most post-harvest problems are fixable with patience and proper curing conditions.
Your next steps, simplified
If you are reading this today and have not started yet, here is what to do first: confirm your local plant limits and any location requirements, pick a feminized strain suited to your climate and space, source a quality organic potting mix and some compost or worm castings, and decide indoor or outdoor based on your setup. If you are wondering how grow a weed plant from seed, this guide walks you through each stage, from germination to curing.
Everything else in this guide follows from those four decisions. You do not need expensive equipment or complicated nutrients to grow naturally. A good soil mix, consistent environment, and attentive observation will get you most of the way there.
If you want to dig deeper on specific parts of this process, the topics of how much equipment you actually need to get started and how to manage a small or compact plant are worth exploring once you have your basics dialed in.
- Check your state and local home cultivation laws and confirm your plant count limit and any location/security requirements
- Buy feminized seeds from a reputable source and choose a strain matched to your climate or indoor setup
- Build or buy an organic soil mix and let it cook for 2 to 4 weeks if you have added dry amendments
- Germinate seeds using the paper towel or direct-sow method at 70 to 80°F with consistent moisture
- Provide bright light immediately after sprout emergence to prevent stretching
- Maintain stage-appropriate temperature, humidity, and airflow throughout veg and flower
- Train plants during veg with LST or topping for better yield without extra inputs
- Switch to 12/12 light (or wait for natural daylength shift outdoors) to trigger flowering
- Monitor trichomes in the final weeks and harvest when mostly milky with early amber appears
- Dry slowly at 60 to 70°F and 55 to 65% RH, then cure in jars at 58 to 62% RH for at least 4 weeks
FAQ
Do I need to “cook” my compost or amended living soil before planting, or can I use it right away?
If your goal is consistent “natural” results, avoid mixing fresh compost directly into every cup of soil at planting time. A more reliable approach is to pre-mix compost or worm castings into your potting base, then let any amended batch “cook” for 2 to 4 weeks before filling containers. This reduces the chance of an overly hot, microbe-imbalanced start that can cause early nutrient burn even when all ingredients are organic.
What are the signs that I overwatered my seedlings, and what should I do next?
If you overwater in the seedling stage, the common signal is not just yellowing but also a slow collapse (stems feel weak) and a persistent sour smell in the soil. A practical fix is to stop watering immediately, increase airflow, and only resume once the pot feels significantly lighter and the top layer is dry to depth (about the first inch).
How can I tell if light leaks are affecting my plant during the 12 hours of darkness?
For indoor grows, the biggest accidental light problem is any light during the dark cycle. Even brief flashes from LEDs, a door left open, or a light coming through a tent zipper can trigger hermaphroditic stress in some phenotypes. Use a dedicated timer plus a completely dark enclosure, and test with your eyes or a phone camera during the “lights off” window.
My plant has clawing leaves, is that always an organic nutrient problem?
When you see clawing, first confirm whether it is heat stress or nutrient excess. Clawing plus soil that stays wet and run-off that looks very dark usually points toward nitrogen excess, while clawing plus warm temps and fast-drying soil often points toward temperature or watering issues. The decision aid is to adjust one variable at a time, and re-check leaves after 2 to 3 days.
Should I flush even if I’m using only compost-based feeding, and what does “flush” mean in practice?
In a natural soil setup, “flush” is less about starving the plant and more about reducing residual buildup. If your buds are still heavily cloudy and you flush for 10 to 14 days, stop feeding and water carefully, but do not keep the medium constantly wet. Overly wet late in flower can worsen mold risk, especially once humidity is being tightened.
What should I do if I spot early signs of bud rot on a few buds?
Treat bud rot risk like a humidity-management problem, not a leaf problem. If you notice tight bud structure holding moisture, remove only clearly affected tissue and immediately increase airflow and lower RH to your late-flower target. Also avoid misting or spraying anywhere near flowers, because free moisture drives botrytis spread.
What is the best natural pest-control sequence if I see insects but I’m still early in flowering?
For integrated pest control, don’t rely on sprays as your only step. Start with prevention, then use targeted interventions: neem tends to work best early, insecticidal soap is better for visible pests on leaves, and diatomaceous earth works mainly as a physical barrier on dry soil surfaces. If you must spray, do it when lights are off or during the coolest period to avoid leaf stress.
My plant shows deficiency symptoms, but I’m feeding lightly, could it still be from water or soil conditions?
If leaves look deficient but your feeding schedule is already “light,” check root function first. Soil that stays too wet reduces oxygen at the root zone, which can mimic nutrient deficiency symptoms. Lift the pot to assess moisture, correct watering frequency, and only then adjust nutrients.
Why does harvesting on the breeder’s timeline sometimes lead to harsher buds?
Don’t assume a short grow means better results. A faster finish often means harvesting slightly earlier than trichomes would suggest, which can reduce smoothness and total terpene development. If your goal is natural quality, prioritize the trichome window and leave yourself the buffer time before changing your calendar target.
What should I do if my curing jars keep reading too high RH?
If the jar RH keeps rising above 65% repeatedly, the usual cause is not “bad jars,” it is drying that went too quickly or not enough time between dry and cure. Fix by removing any affected buds, increasing burping, and if needed using humidity packs temporarily to stabilize, but do not ignore the underlying moisture imbalance.
Next Article
How Much Weed Can One Seed Grow and How to Maximize It
Realistic yield from one cannabis seed, what limits it, and steps to maximize flower at home from seed to harvest.