Growing weed indoors is absolutely doable for a beginner, and you can pull it off in a closet, spare room, or a purpose-built grow tent. The full cycle from seed to smokable bud takes roughly 3 to 5 months depending on your strain, and the basics come down to five things: decent light, fresh air, controlled temperature and humidity, the right nutrients, and a little patience.
How to Grow Weed Indoors Step by Step for Beginners

Marcus Holbrook
24 Apr 2026
To speed things up for the fastest indoor results, focus on dialing in your light intensity, airflow, and humidity from day one fast indoor results. Get those five things dialed in and you will grow quality, potent cannabis at home. Before you dig in, check your local laws first, home cultivation rules vary widely by country, state, and municipality, and responsible growing starts with knowing exactly what is legal where you live.
Your Indoor Grow Setup: Space, Light, and Airflow
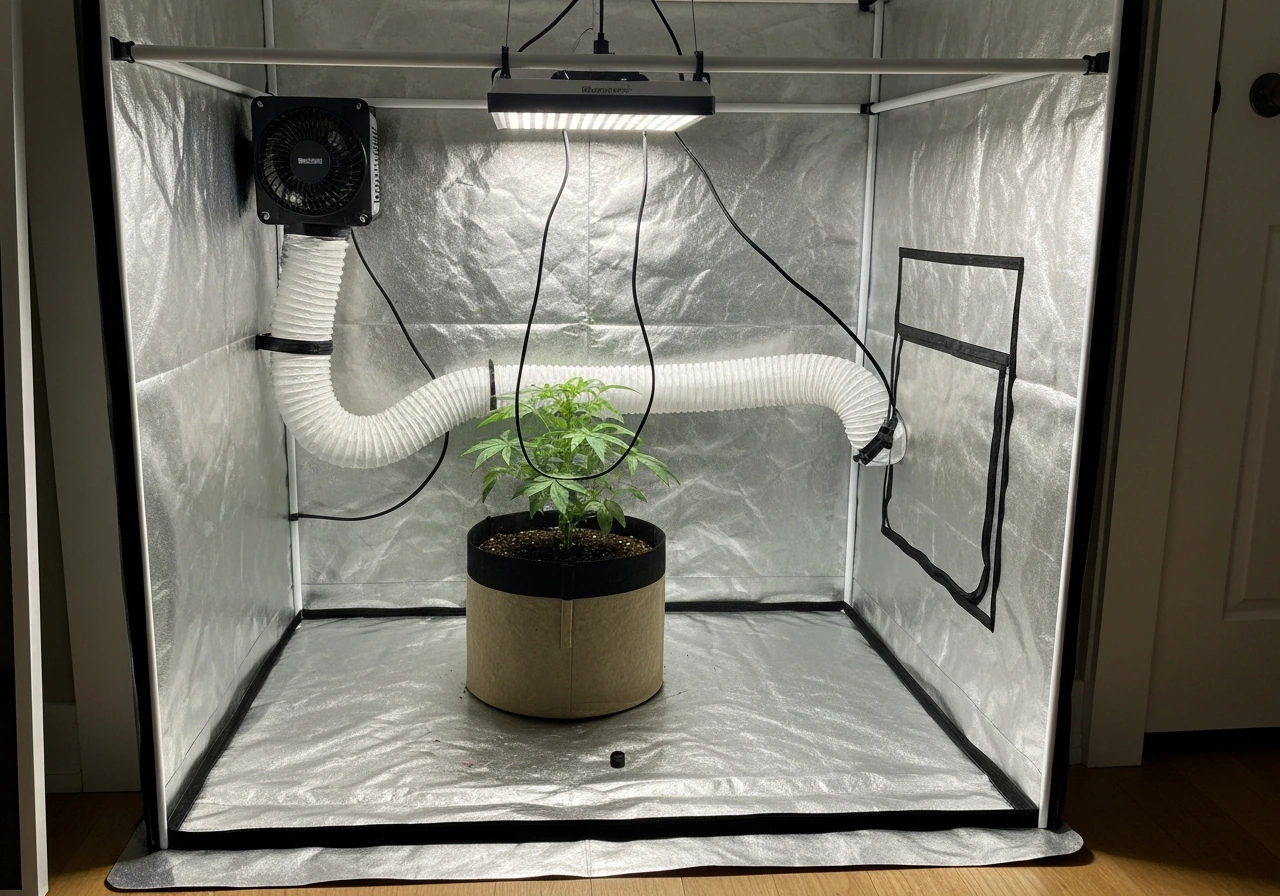
You do not need a lot of space. A 2x2 ft tent handles one plant comfortably. For detailed, step-by-step setup for a single beginner plant, see how to grow 1 weed plant indoors. A 4x4 ft tent is the sweet spot for 2 to 4 plants and gives you room to work. If you are just starting out, a complete grow tent kit (tent, light, fan, and filter bundled together) removes a lot of guesswork and keeps your costs predictable. Whatever space you use, it needs to be light-tight during the dark cycle and easy to access for daily checks.
Lighting
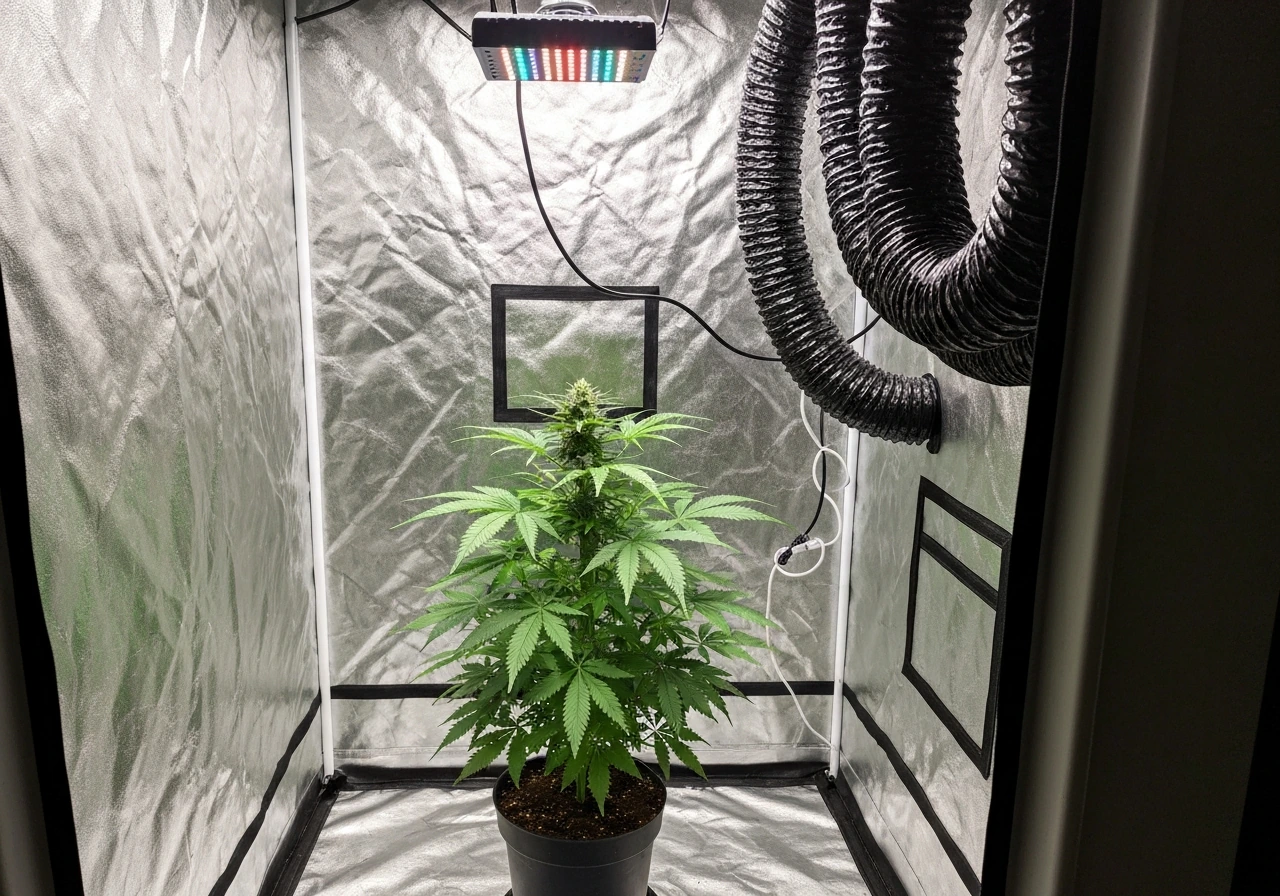
Light is the single biggest driver of yield and potency indoors. For most beginners, a quality LED grow light is the best starting point, modern full-spectrum LEDs run cooler than HID lights, use less electricity, and cover the full spectrum your plant needs from seedling to flower. As a general rule, aim for 200 to 400 true watts (from the wall) of LED coverage per 4x4 ft space. HID lights (HPS or CMH) are still used widely by experienced growers and can produce excellent results, but they generate more heat and require better ventilation management. Avoid cheap blurple LED panels, they are rarely as powerful as advertised.
Airflow and Ventilation
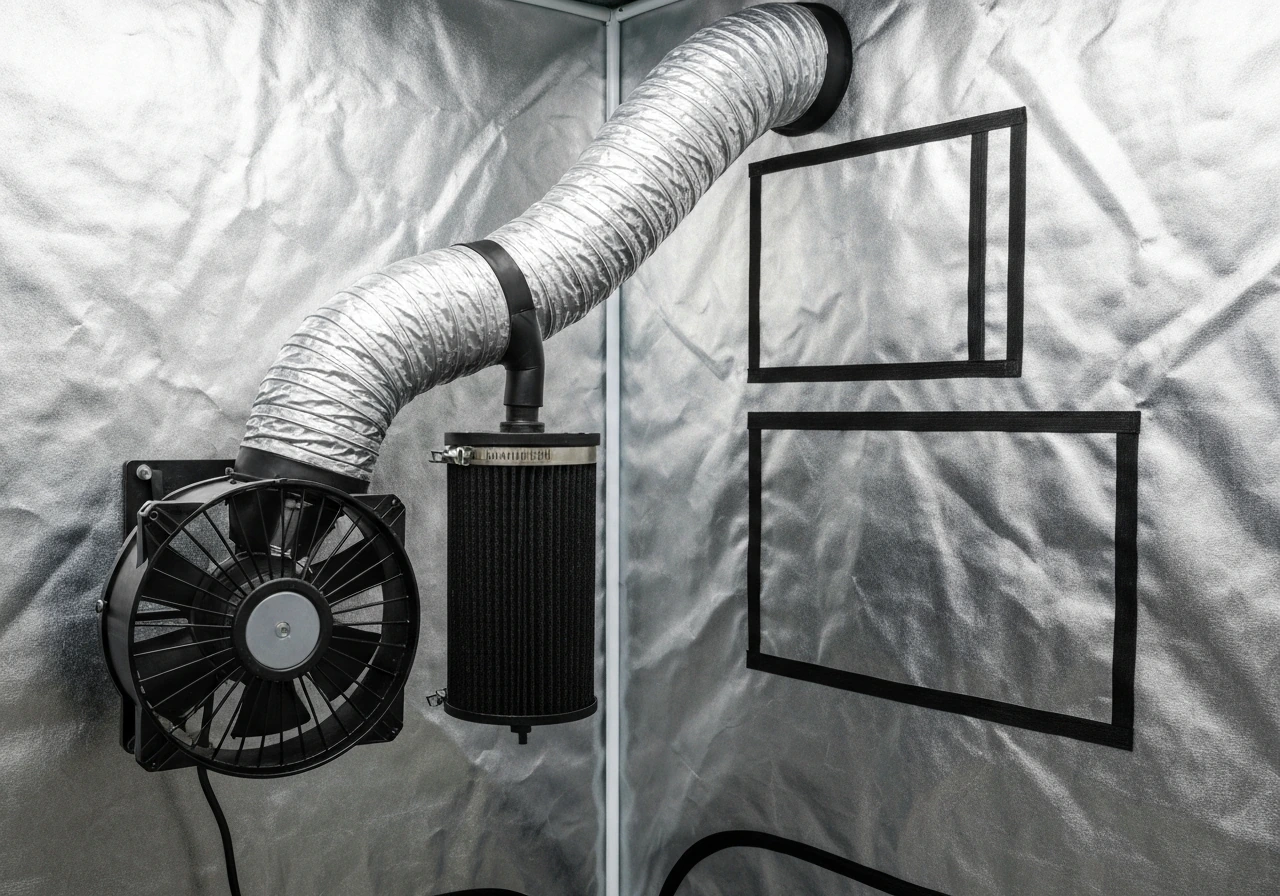
Fresh air exchange is non-negotiable. Cannabis plants consume CO2 actively, and stale air leads to heat buildup, humidity problems, and mold. You need an exhaust fan sized to your space, a common formula is to exchange the full air volume of your tent every 1 to 3 minutes. For a 4x4x6.
5 ft tent (roughly 104 cubic feet), a 100 to 200 CFM inline fan is appropriate. Pair your exhaust fan with a carbon filter to control odor, which is a practical necessity for most home growers. Run passive intake (a lower vent left partially open) or an active intake fan to create negative pressure, meaning air is always being pulled out rather than pushed in. Negative pressure keeps smells contained and ensures constant fresh air circulation.
Add one or two small oscillating fans inside to keep air moving across your canopy and strengthen your stems.
A critical note on electrical safety: grow tents and rooms involve a mix of water, humidity, and multiple electrical devices running continuously. Use GFCI (ground fault circuit interrupter) outlets wherever possible. Do not daisy chain power strips, plugging one power strip into another is a documented fire risk and is flagged as unsafe in electrical safety guidance across the board. Plug high-draw items like lights and fans directly into wall outlets or a single properly rated power strip, and never exceed your circuit's rated load. Overcrowded circuits in grow rooms are a real fire hazard and one of the most common setup mistakes I see.
Picking the Right Seeds and Strains for Potent Indoor Results
Strain choice shapes everything: how long your grow takes, how tall your plants get, how forgiving they are for beginners, and how strong the final product is. For indoor growing specifically, you want something that stays manageable in height and finishes in a reasonable timeframe.
For beginners chasing potency, autoflowering strains are a strong first choice. They flower automatically based on age rather than light schedule, finish in as little as 8 to 10 weeks from seed, and stay compact. Strains like Northern Lights Auto, Gorilla Glue Auto, and Wedding Cake Auto consistently test above 20% THC and are well-documented for indoor performance. If you prefer photoperiod strains (which flower when you switch to a 12/12 light cycle), indica-dominant varieties tend to stay shorter and finish faster than pure sativas. Blue Dream, OG Kush, and Girl Scout Cookies are beginner-friendly, widely available, and known for strong indoor results.
Buy seeds from reputable, established seed banks that offer feminized seeds. Feminized seeds are almost guaranteed to produce female plants (which are the ones that produce flowers), saving you the hassle of identifying and removing male plants mid-grow. Regular seeds are cheaper but require sexing. Autoflowering seeds are nearly always feminized.
| Seed Type | Veg Control | Typical Seed-to-Harvest | Beginner Friendliness | Potency Potential |
|---|---|---|---|---|
| Autoflowering (feminized) | Not needed — age-triggered | 8–12 weeks | Excellent | High (many strains 20%+ THC) |
| Photoperiod feminized | 12/12 light flip required | 14–22 weeks total | Good | Very high |
| Photoperiod regular | 12/12 light flip + sexing | 14–22 weeks total | Challenging for beginners | Very high |
For a first grow, go feminized autoflowering. You will learn the fundamentals faster because the timeline is shorter, the plants are compact, and you will not have to worry about light leaks triggering early flowering or male plants ruining your crop.
The Full Grow Cycle: Germination to Harvest, Step by Step
Step 1: Germination (Days 1–5)
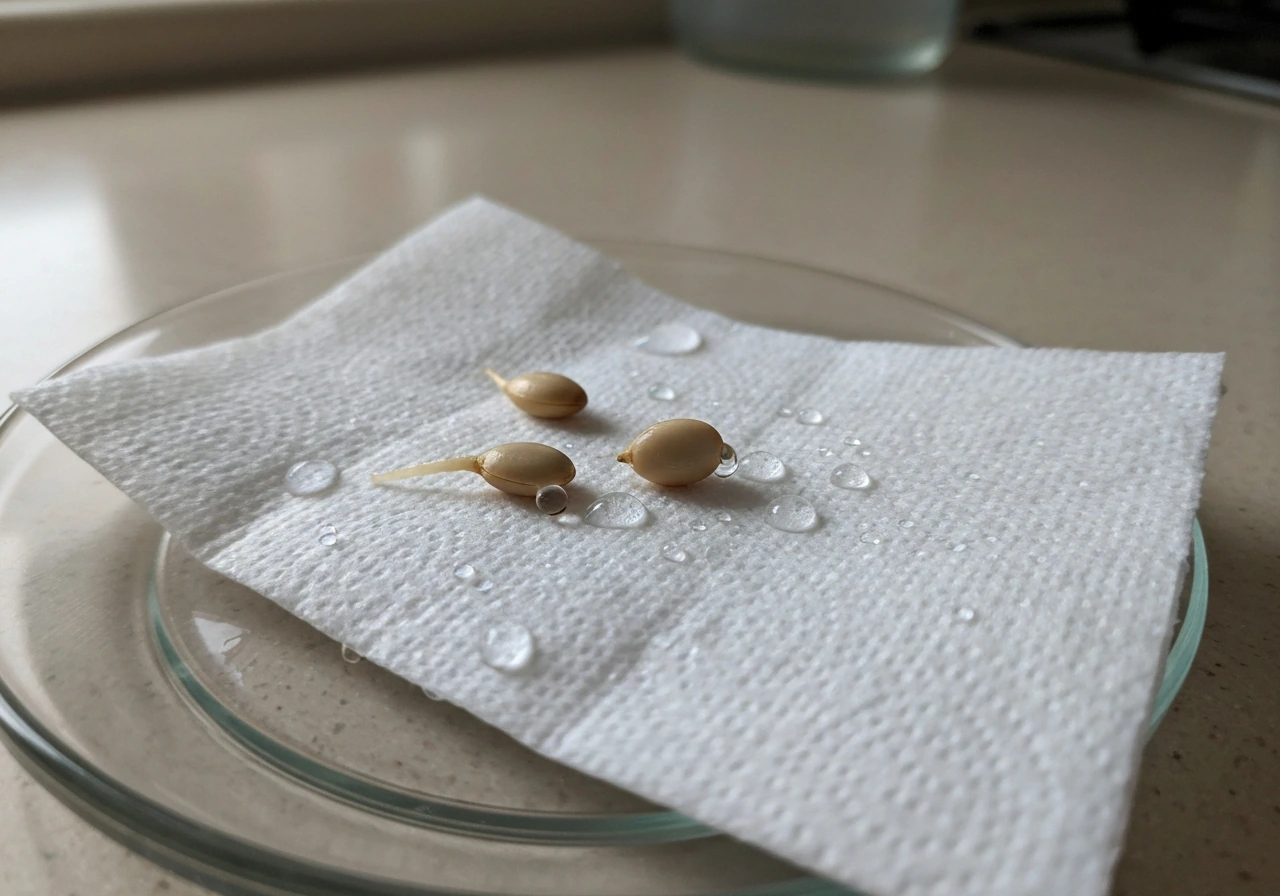
The paper towel method is simple and reliable. Place your seed between two damp (not soaking wet) paper towels on a plate, cover with another plate to retain moisture, and keep it somewhere warm, around 70 to 85°F (21 to 29°C). Check daily. Within 24 to 72 hours you should see a white taproot emerge. Once the taproot is about 0.5 inches long, plant it taproot-down about half an inch deep into a small seedling plug, starter cube, or solo cup of moist, lightly fertilized seedling soil. Keep it warm and moist but not waterlogged.
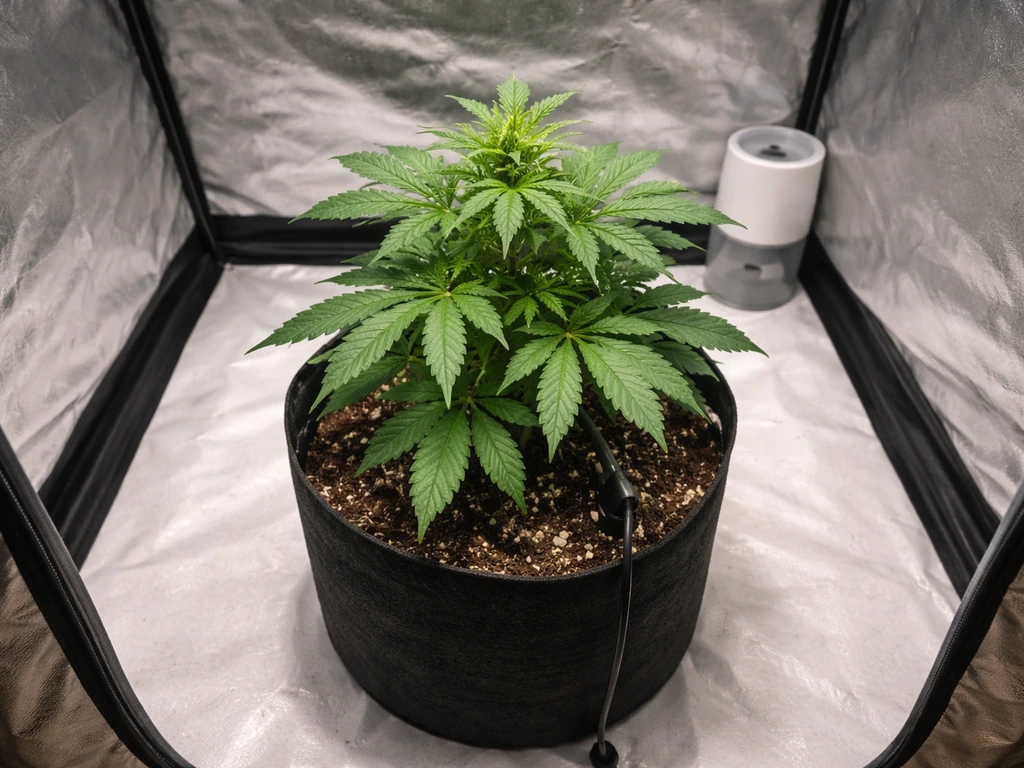
Step 2: Seedling Stage (Days 5–21)
Once the seed cracks the soil and the first leaves (cotyledons) appear, your seedling needs light, 18 hours on, 6 hours off for photoperiod strains, and the same schedule works well for autos. Keep your light higher at this stage to avoid burning delicate seedlings. Temperatures of 70 to 77°F (21 to 25°C) and humidity around 60 to 70% are ideal. Water gently and lightly, seedlings hate being overwatered. The growing medium should feel barely moist, not wet. After 10 to 14 days you will see the first true fan leaves with serrated edges and the plant is officially a seedling.
Step 3: Vegetative Stage (Weeks 3–8 for photoperiod; shorter for autos)
In veg, the plant focuses entirely on building structure, stems, roots, and leaves. Keep lights on 18 hours per day for photoperiod plants. Feed nitrogen-rich nutrients (more on that below), maintain temperatures between 70 and 85°F (21 to 29°C), and drop humidity gradually to 40 to 60%. You can veg a photoperiod plant for as long as you want, longer veg means a bigger plant and potentially bigger yields, but you are limited by your ceiling height. For most indoor grows, 4 to 8 weeks of veg is standard. Autos transition to flowering on their own around weeks 3 to 5 regardless of your light schedule.
Step 4: Flowering Stage (Weeks 8–16 from seed depending on strain)
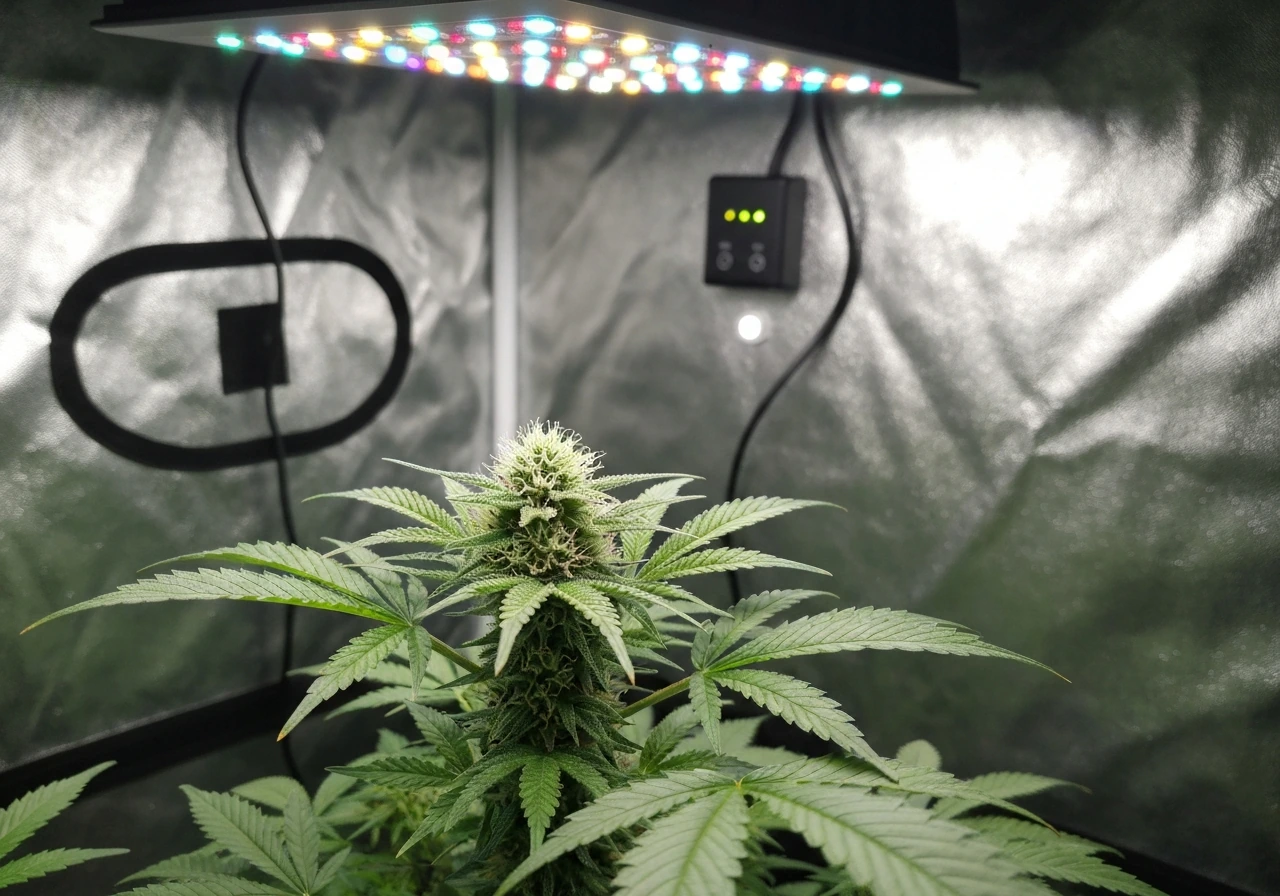
For photoperiod plants, switch your light timer to 12 hours on, 12 hours off to trigger flowering. Within 1 to 2 weeks you will see white pistils (hairs) forming at the nodes, those are your buds starting to develop.
For autos, this happens automatically. Early flowering (weeks 1 to 3 of flower) brings rapid upward growth, the so-called stretch phase where plants can double in height. Buds form and swell through mid-flower (weeks 3 to 6), and in late flower (weeks 6 to 8+) they fatten, resin production peaks, and terpene development completes. Drop humidity to 40 to 50% during flower to prevent mold, and keep temperatures between 65 and 80°F (18 to 27°C).
Cooler night temperatures in late flower (around 65°F) can encourage purple coloration and terpene expression in some strains.
Step 5: Harvest Window
The best way to judge harvest timing is by examining trichomes (the tiny resin glands) under a jeweler's loupe or digital microscope. Clear trichomes mean the plant is not ready. Milky white trichomes indicate peak THC, harvest here for a more energetic, cerebral effect. Amber trichomes signal THC is degrading to CBN, harvest here for a heavier, more sedative effect. Most growers aim for a mix of mostly milky with 10 to 20% amber for balanced potency. Checking pistil color is a secondary indicator: when 70 to 90% of white pistils have turned orange or red, you are in the harvest window. For drying and curing, BudTrainer recommends drying in a dark room at about 60,68°F (15,20°C) and 55,65% relative humidity for 7,14 days: https://www.budtrainer.com/blogs/learn/drying-cannabis Complete Guide to Drying and Curing Cannabis (BudTrainer).
Environmental Control and Training Techniques for Bigger, More Potent Buds
Temperature and Humidity Targets by Stage
| Growth Stage | Temperature (Day) | Temperature (Night) | Relative Humidity |
|---|---|---|---|
| Germination | 70–85°F (21–29°C) | 65–75°F (18–24°C) | 70–90% |
| Seedling | 70–77°F (21–25°C) | 65–75°F (18–24°C) | 60–70% |
| Vegetative | 70–85°F (21–29°C) | 65–75°F (18–24°C) | 40–60% |
| Early Flower | 68–82°F (20–28°C) | 65–75°F (18–24°C) | 40–50% |
| Late Flower | 65–78°F (18–25°C) | 60–70°F (15–21°C) | 35–45% |
A digital temperature and humidity monitor (hygrometer) placed at canopy level is a must-have, they cost under $15 and remove all the guesswork. If humidity runs too high, a small dehumidifier or more exhaust airflow fixes it quickly. If it runs too low, a simple ultrasonic humidifier brings it up.
Low-Stress Training (LST) for Bigger Yields
Training your plants to grow horizontally rather than in a single tall cola dramatically increases the amount of bud sites exposed to direct light. Low-stress training (LST) is the beginner-friendly method: gently bend the main stem sideways and tie it down with soft garden wire or plant ties starting in early veg. As new growth rises, keep bending and tying outward. This creates a flat, wide canopy, often called a flat table or screen of green, where many bud sites receive equal, intense light instead of just the top. LST can realistically increase your yield by 20 to 50% without adding any extra equipment or nutrients.
Defoliation and Topping
Topping, cutting off the very tip of the main stem during veg, splits the plant into two main colas instead of one and encourages a bushier shape. Do this when the plant has 5 to 6 nodes and is growing vigorously. Light defoliation during flower (removing large fan leaves that block bud sites from light) can improve airflow and light penetration to lower buds. Do not go overboard, taking off more than 20 to 30% of leaves at once stresses the plant and can delay development. I definitely over-defoliated on my first few grows and paid for it with lighter yields.
Nutrients and Watering: A Simple, Reliable Protocol
Cannabis needs three primary nutrients: nitrogen (N), phosphorus (P), and potassium (K). During veg, it wants more nitrogen for leaf and stem growth. During flower, it shifts to needing more phosphorus and potassium for bud development. Most beginner-friendly nutrient lines (like Fox Farm, General Hydroponics, or Advanced Nutrients Starter Kit) come with a simple feed chart that tells you exactly what to use and when. Follow the feed chart at half the recommended dose to start, then dial up if the plant shows signs of deficiency (yellowing, pale leaves). Overfeeding is far more common and damaging than underfeeding for beginners.
pH: The One Thing Most Beginners Skip (Don't Skip It)
pH determines whether your plant can actually absorb the nutrients you are feeding it. Even if you are feeding perfectly, the wrong pH locks out key nutrients and causes deficiency symptoms. For soil grows, keep your water and nutrient solution pH between 6.0 and 7.0, with 6.5 being the sweet spot. For coco coir or hydroponic grows, target 5.5 to 6.5. A basic digital pH meter costs $15 to $30 and is one of the most important tools in your kit. Calibrate it monthly and replace the probe annually.
Watering Schedule
The most common beginner mistake is overwatering. Cannabis roots need both water and oxygen, soggy soil suffocates roots and invites root rot. Water when the top inch of soil feels dry and the pot feels noticeably lighter (the lift test). Water thoroughly until 10 to 20% runoff drains from the bottom, then let the medium dry out before watering again.
In a solo cup seedling, this might be every 2 to 3 days. In a 5-gallon pot with a mature plant in veg, it could be daily. In flower, plants drink more, check daily. In the final 1 to 2 weeks before harvest, most growers flush with plain pH-adjusted water to clear residual nutrients from the medium, which can improve the cleanliness of the final product.
Troubleshooting Common Indoor Grow Problems
Every grower hits issues. Here are the most common ones and what to actually do about them.
| Problem | Likely Cause | Fix |
|---|---|---|
| Yellow leaves (lower, older) | Nitrogen deficiency or natural senescence in late flower | In veg/early flower: increase nitrogen. In late flower (last 2 weeks): normal — do not panic. |
| Yellow leaves (upper, new growth) | Iron or pH lockout | Check and correct pH first. Feed iron/micronutrients if pH is already correct. |
| Brown leaf tips and edges | Nutrient burn (overfeeding) | Flush with plain water, cut nutrient dose by 25–50%. |
| Drooping, clawing leaves | Overwatering or nitrogen toxicity | Let medium dry out fully. Reduce watering frequency. Cut nitrogen if leaves are dark green and clawing. |
| White powdery coating on leaves | Powdery mildew | Improve airflow immediately. Treat with diluted hydrogen peroxide spray (3%) or potassium bicarbonate. Remove badly affected leaves. |
| Stretchy, pale seedlings | Light too far away | Move light closer (follow manufacturer's recommended distance). |
| Slow growth, no new leaves | Overwatering, root problems, or cold temperatures | Check soil moisture, root health, and ensure temps are above 65°F. |
| Tiny bugs on leaves or webbing | Spider mites or fungus gnats | Spider mites: neem oil or insecticidal soap. Fungus gnats: let soil dry more, use sticky traps, apply Bacillus thuringiensis israelensis (BTi) soil drench. |
When something looks off, resist the urge to immediately add more nutrients or change three things at once. Check pH first, roughly 70% of visual deficiency symptoms in home grows trace back to pH being out of range. Fix that before anything else.
Harvest, Drying, Curing, and Storage: Do Not Rush This Part
How you handle your buds after harvest has an enormous impact on final potency, flavor, and smoothness. Rushing the dry and cure is one of the most common ways home growers undercut the quality of an otherwise excellent crop.
Harvesting
Harvest in the morning before your lights come on, terpene content is highest at this point. Cut the plant at the base or harvest branch by branch. Remove large fan leaves, then hang whole branches or smaller sections upside down in a dark, well-ventilated space. Some growers do a wet trim (removing all sugar leaves immediately), while others dry with leaves on and trim afterward. Leaving leaves on during the dry slows the process slightly, which generally leads to better flavor development.
Drying
Dry your buds at 60 to 65°F (15 to 18°C) with 45 to 55% relative humidity, in a dark space with gentle airflow. Do not point fans directly at buds, you want air circulation in the room, not a direct wind on the flowers. Drying should take 7 to 14 days. You will know buds are ready to jar when the smaller stems snap cleanly rather than bending, and the outside of the bud feels dry to the touch. If you dry too fast (under 60°F or very low humidity), you lock in a harsh, hay-like smell. Slow drying at the right humidity produces much smoother, more aromatic results.
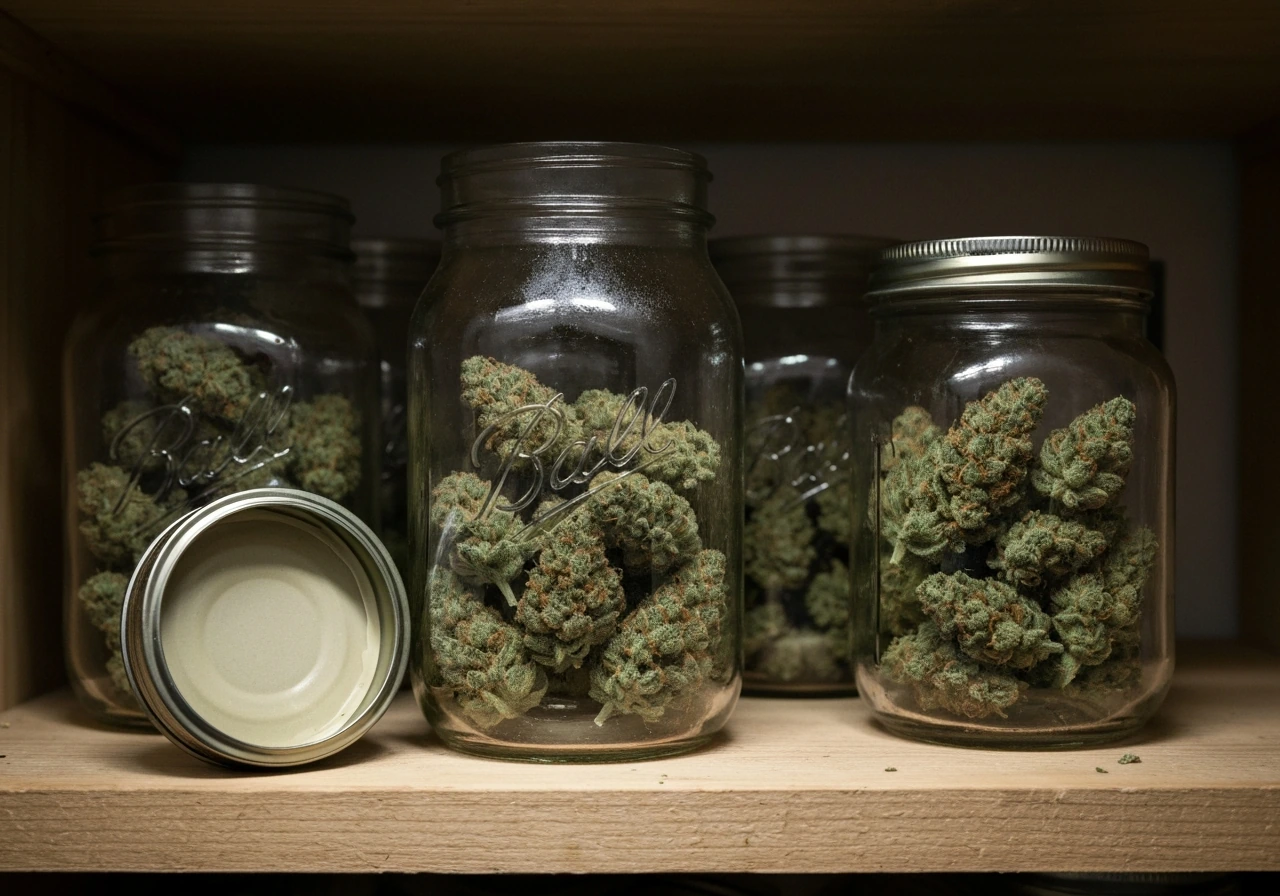
Curing
Curing is where the real quality improvement happens. Place dried buds loosely in wide-mouth glass mason jars, filling them about 75% full, do not pack them tightly. Store jars in a cool, dark place at 60 to 65°F and 58 to 62% relative humidity (Boveda 62% packs are perfect for this). For the first week, open each jar once or twice daily for 5 to 10 minutes to release moisture and gas, this is called burping. After 2 weeks, reduce to once every few days. A minimum cure of 2 to 4 weeks noticeably improves smoothness and flavor. A 6 to 8 week cure takes good bud to genuinely great bud. Patience here is 100% worth it.
Storage for Long-Term Potency
Once cured, keep buds in sealed glass jars in a cool, dark environment. Heat, light, and oxygen are the main enemies of cannabinoid preservation. At room temperature in a dark cupboard, properly cured cannabis maintains good potency for 6 to 12 months. For longer storage, vacuum-sealed jars in a refrigerator or freezer extend shelf life to 1 to 2 years with minimal THC degradation. Avoid clear plastic bags, they let in light and absorb terpenes.
Your Next Steps
If this is your first grow, keep it simple: one or two autoflowering feminized plants in a small tent, a quality LED light, an inline fan with a carbon filter, and a basic soil nutrient kit. If you are searching for how to grow weed indoors for dummies, stick to a simple autoflower setup like this and follow the same light, airflow, and watering basics from start to finish one or two autoflowering feminized plants.
That setup handles everything covered in this guide and keeps your learning curve manageable. If you want the quickest beginner path, follow this guide on how to grow weed indoors for dummies, step by step. If you prefer a written guide with a beginner-friendly checklist, you can also use a how to grow weed for dummies book alongside this indoor walkthrough.
If you prefer to learn by watching, search for how to grow weed indoors videos to see each stage in action how to grow weed indoors for dummies. Once you have one grow under your belt, you can start experimenting with training techniques, different strains, or methods like coco coir and hydro.
For those who want to go deeper on specific pieces of this process, there is a lot more to explore, from single-plant grows optimized for small spaces to faster-finishing techniques for growers short on time. The fundamentals in this guide will carry you through your first few harvests, and the rest is just refinement from there. Grow responsibly, know your local laws, and enjoy the process, there is genuinely nothing like harvesting something you grew yourself.
FAQ
Do I need a grow tent to learn how to grow weed indoors?
No, you can grow in a closet or spare room if you can make the dark period truly light-tight and control airflow. A tent mainly helps with consistent containment, easier negative pressure setup, and odor control when paired with a carbon filter.
What’s the biggest sign my light is too strong for a beginner grow?
If you see leaf “praying” upward, rapid bleaching, or a pale, washed look on the top canopy, the light is often too close or too intense. Start with the recommended distance from your light manual, then adjust based on canopy color and slight daily movement.
How do I prevent mold if humidity spikes during flower?
Watch humidity specifically at canopy level, not just at the wall sensor. If it creeps above your target range, increase exhaust runtime, verify the carbon filter and ducting are not restricting airflow, and consider lowering night humidity by adjusting your environment controls.
Can I use tap water when I’m learning how to grow weed indoors?
Sometimes, but it depends on your local water chemistry. If your water is very hard or pH off, it can cause nutrient lockout even when you follow a feed chart. Testing your water pH and, if possible, EC and hardness will save you time.
How often should I water, exactly?
Base it on dryness at the root zone, not a calendar. Water when the top inch is dry and the pot feels lighter, then water thoroughly until some runoff happens, but avoid keeping the medium constantly wet.
Should I run my exhaust fan all the time?
In many setups, running the exhaust continuously helps maintain stable temperature and humidity and supports negative pressure. Some growers use staged speeds to manage heat, but the key is steady air exchange (your tent volume) rather than a random on-off schedule.
What causes the “nutrient burn” look if I didn’t overfeed?
A common culprit is pH mismatch or salt buildup, not just excess fertilizer. If tips are browning or leaves are clawing downward, verify your solution pH, check runoff pH if possible, and consider flushing or reducing feed concentration before making multiple changes.
Is it okay to start germinating seeds on a cold windowsill?
Usually not. The paper towel method works because it stays warm (about 70 to 85°F). If the area is cooler, taproot emergence can stall or take much longer, increasing the chance of mold in the paper towels.
When I transplant from starter cups, what’s the safest approach?
Transplant when roots are established but the plant is still small, and handle the plug gently to avoid tearing. If you disturb the root ball too much or transplant into very wet soil, seedlings can stall due to oxygen shortage or shock.
How can I tell whether a yellowing problem is deficiency or overwatering?
Check medium moisture first. Yellowing with wet, heavy soil often points to overwatering or poor oxygen, while yellowing paired with dry medium and slow new growth more often indicates a nutrient imbalance. In most cases, confirm pH before changing nutrients.
What should I do if I accidentally cause early flowering from light leaks?
Immediately fix the light schedule and eliminate leaks (including under doors, around tent zippers, and indicator lights). For photoperiod plants, early flowering may not fully reverse, so prevention and stable 12/12 timing are critical going forward.
Do autoflowering plants need a special light schedule after the first weeks?
Most autos do best with a consistent schedule (commonly 18/6 or 20/4) and you should avoid sudden major changes. Also keep in mind autos start flowering based on age, so pushing too much nitrogen late can lead to less optimal bud development.
Should I trim leaves in the dark cycle or lights-on period?
It’s safer to do major work when lights are on (or at least during the same period you normally check plants). Sudden stress plus high humidity during the dark period can increase the chance of issues, so plan trimming around airflow and your routine.
What’s the correct way to check trichomes for harvest timing?
Look at multiple buds, not just the top cola. Also check at the same magnification each time, and use a jeweler’s loupe to confirm whether you’re seeing mostly milky heads versus early amber development across the canopy.
How can I avoid harsh smoke after drying and curing?
Avoid drying too fast or at very low humidity, and don’t rush curing. If small stems do not snap cleanly or the buds still feel too springy, extend drying, then cure longer with proper burping to stabilize moisture.
Can I store dried but uncured buds and cure later?
It’s better to cure promptly. If you jar too dry, you may get poor cure and slower rehydration. If you jar too wet, you risk mold, so aim for the “dry but not brittle” stage where stems snap and outside feels dry.
Next Article
How to Grow Cannabis Indoors: One-Plant Step-by-Step
Step-by-step indoor one-plant cannabis grow: setup, light, humidity, feeding, training, flowering, harvest, and fixes.