Growing cannabis in containers is one of the most practical and flexible methods available to home growers, whether you're working indoors under lights or outdoors on a patio. You get full control over the root environment, you can move plants when needed, and scaling up from one pot to several is straightforward. You get full control over the root environment, you can move plants when needed, and scaling up from one pot to several is straightforward.
How to Grow Pot in Containers Step-by-Step Guide

Marcus Holbrook
24 Mar 2026
This guide walks you through every stage, from picking a strain and setting up your containers to harvesting and handling the most common problems beginners run into. Before anything else, though: check your local laws. Home cultivation rules vary enormously by state, city, and even neighborhood in Florida.
Some states like Massachusetts and California allow adults to grow up to 6 plants at home, while others like Washington state prohibit adult-use home cultivation entirely and restrict it to registered medical patients only. The Washington State Department of Health notes that personal cannabis home grows are prohibited unless qualifying medical patients are authorized, and the relevant details are provided on the WA DOH patient/consumer cannabis pages Medical Cannabis Information for Patients and Consumers.
Illinois limits home grows to qualifying medical patients with up to 5 plants. DC allows up to 6 plants per household. Local municipal codes can also be stricter than state law, so knowing your state limit is just the starting point. Once you've confirmed you're in the clear legally, everything below applies.
how to grow medical marijuanas in missouri. how to legally grow medical weed in texas
Picking a strain and setting up your containers
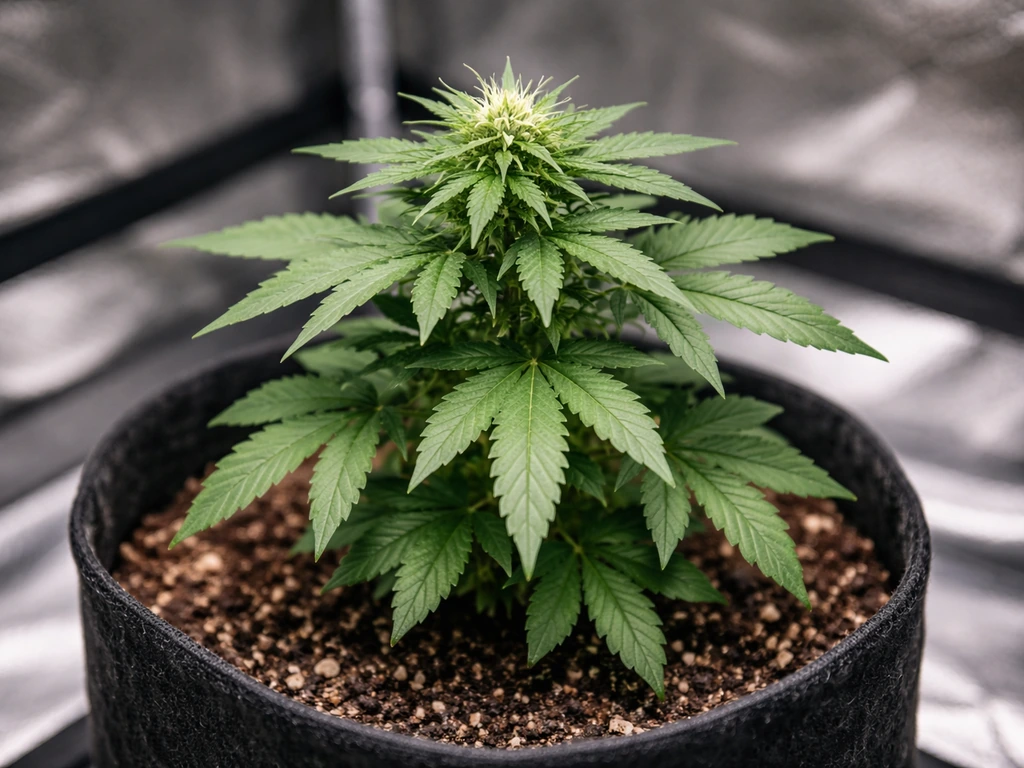
Strain choice matters more for container growers than most beginners realize, because pot size and plant size are directly connected. If you pick a tall sativa-dominant strain and put it in a 3-gallon pot indoors, you'll be fighting the plant the entire grow. For beginners, autoflowering strains are the most forgiving choice: they stay compact (typically 1 to 3 feet), don't require you to manually flip light cycles, and finish in 70 to 90 days from seed. Indica-dominant photoperiod strains are the next best option, typically staying manageable with some training. Save the big sativa landrace stuff for after you've run a couple of successful grows.
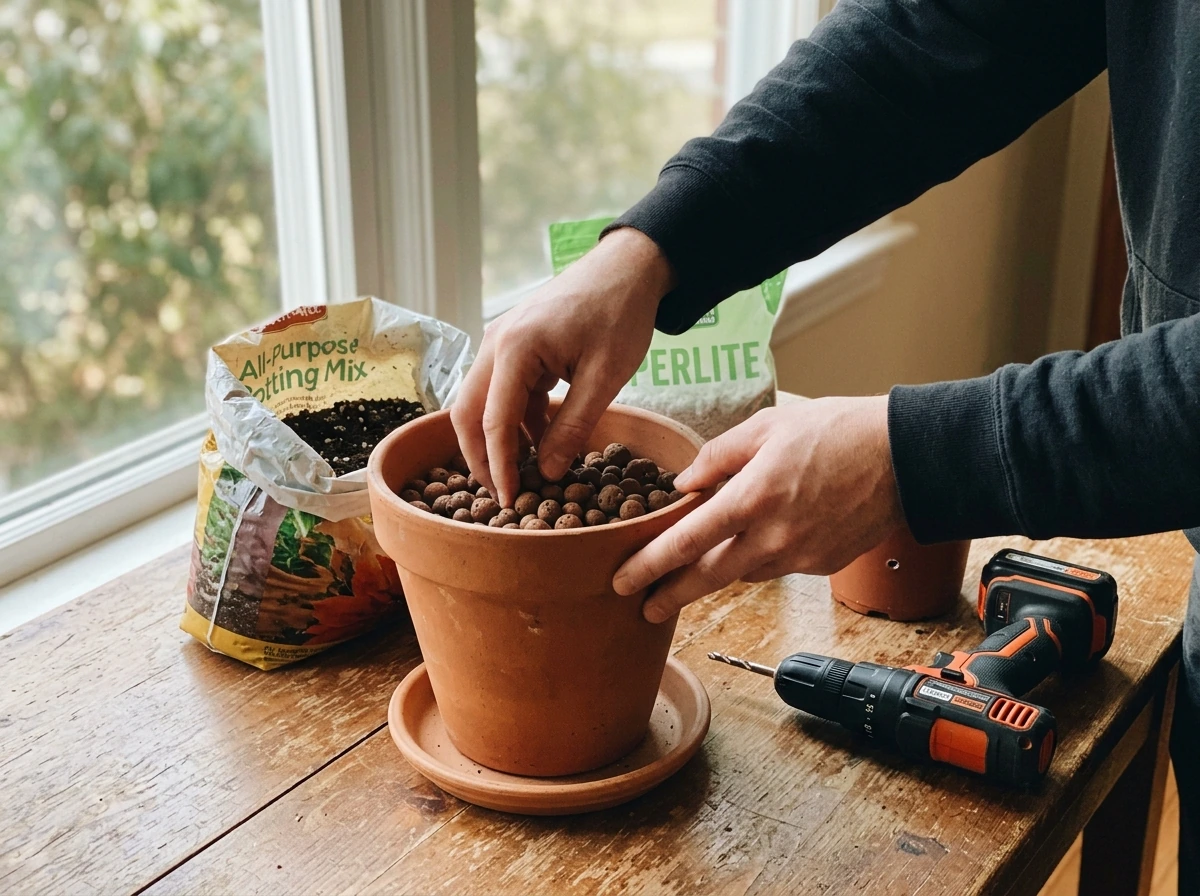
Container size is one of the most important decisions you'll make, and it's easier to think about it in terms of plant stages. Seedlings do well in small 1-gallon starter pots or Solo cups, then get transplanted up. For a full photoperiod grow, most growers end up in 5-gallon containers as a final home, which is the sweet spot for indoor grows with medium-sized plants. For larger outdoor plants that you want to let run, 7 to 15 gallons gives the root system room to really expand. Autoflowers are better off in 3 to 5 gallons and, because they dislike root disturbance, many growers start and finish autos in the same pot.
Drainage is non-negotiable. Every container you use needs holes at the bottom. Without them, water pools at the root zone, oxygen gets cut off, and root rot sets in fast. Fabric pots are genuinely worth the small extra cost: they air-prune roots naturally (preventing the roots from spiraling and getting bound), promote better oxygen exchange, and make it much harder to overwater. Plastic pots work fine but require more attention to drainage and watering frequency. Whatever container you use, place it on a tray or saucer and empty any runoff within 30 minutes of watering so roots aren't sitting in pooled water.
| Container Type | Best For | Drainage | Overwatering Risk | Portability |
|---|---|---|---|---|
| Fabric pot (3-5 gal) | Indoor and outdoor grows, autos and photos | Excellent (air-prunes) | Low | Good |
| Plastic pot with holes (5 gal) | Indoor and outdoor, any strain | Good if drilled properly | Moderate | Great |
| Smart pot / air pot | Indoor, root-sensitive strains | Excellent | Low | Moderate |
| Bucket (DWC/hydro) | Indoor hydroponic container grows | N/A (water-based) | Managed by system | Limited |
For soil, a high-quality cannabis-specific mix or a well-amended coco/perlite blend are your two main starting points. A mix with 20 to 30 percent perlite improves drainage and aeration significantly. Avoid plain potting soil from the garden center, which is often too dense and nutrient-unbalanced for cannabis. If you want a near-zero-maintenance soil experience, a "living soil" or "super soil" mix allows you to water with plain pH-adjusted water for most of the grow. Hydroponic container options like deep water culture (DWC) buckets are also a valid path for home growers who want faster growth and are willing to learn basic nutrient solution management.
Starting from seed vs. clone
Seeds are the more accessible starting point for most beginners, and feminized seeds are worth the higher price because they eliminate the need to identify and remove male plants (which don't produce usable flower and can pollinate your females if left in the garden). Regular seeds produce roughly 50 percent males. Autoflowering feminized seeds are a great first choice for exactly the reasons mentioned above: compact, forgiving, and fast.
Germination is simple. The paper towel method works reliably: place seeds between two damp (not soaking) paper towels on a plate, cover with another plate to retain moisture and block light, and keep the whole setup somewhere warm, around 70 to 80°F. Check every 12 hours. Most seeds crack and show a tap root within 24 to 72 hours. Once the tap root is 0.25 to 0.5 inches long, plant it root-down about 0.5 inches deep in your starter container. You can also germinate directly in the final container by planting the seed 0.5 inches deep in moist soil, though this is slightly less reliable for temperature control.
Clones (rooted cuttings from a mother plant) give you a genetic head start and eliminate germination uncertainty. If you can get clones from a trusted source, a dispensary, or a friend's legal home garden, you skip 2 to 3 weeks of seedling development. The tradeoff is that clones can carry pests or disease from their source environment, so inspect them carefully before introducing them to your grow space. Clones need high humidity (70 to 80 percent) and gentle, indirect light until roots establish, typically 7 to 14 days after cutting.
Vegetative growth: light, water, nutrients, and training
The vegetative stage is when your plant builds the structure it will use to support buds later. For photoperiod strains, veg runs as long as you keep your light schedule at 18 hours on and 6 hours off. Most indoor growers veg for 4 to 8 weeks depending on how large they want the plant before flipping to flower. Autoflowers don't respond to light schedule changes; they start flowering on their own timeline regardless of light hours.
Light
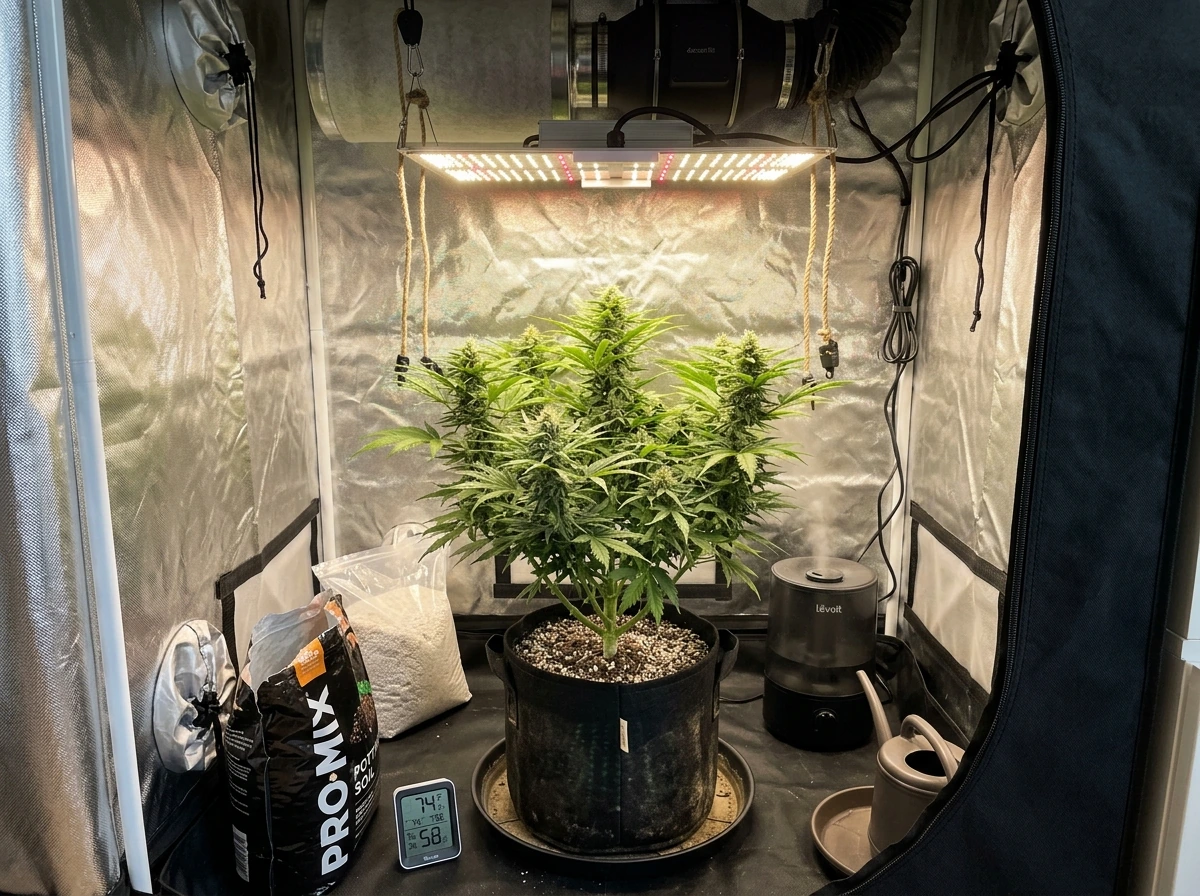
Indoors, LED grow lights have become the dominant choice for good reason: they run cooler than HPS lights, use less electricity, and full-spectrum LEDs cover the plant's needs from seedling through harvest. During veg, a general target is 400 to 600 PPFD (micromoles per square meter per second) at canopy level. Keep lights at the manufacturer's recommended height to avoid light stress or burn. Outdoors, cannabis loves direct sun and ideally gets 6 or more hours of direct sunlight daily. South-facing positions in the northern hemisphere get the most consistent light exposure.
Watering in containers
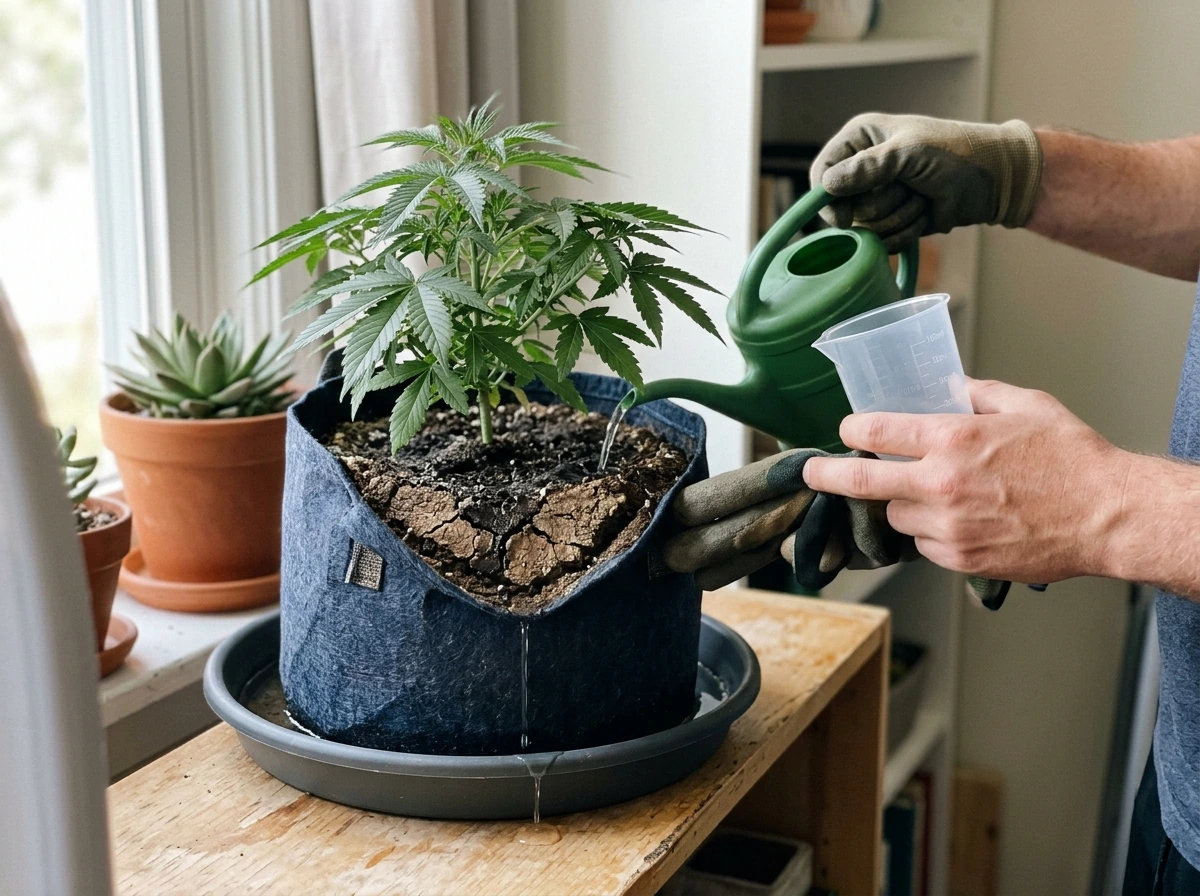
Container watering is where most beginners go wrong, myself included in my first grow. The standard advice to "water when the top inch of soil is dry" is okay, but lifting the pot is more reliable: a dry pot feels noticeably lighter than a recently watered one. Water thoroughly until about 10 to 20 percent runoff drains from the bottom, then wait until the pot lightens again before watering.
In a 5-gallon fabric pot with a medium-sized veg plant, this might mean watering every 2 to 3 days indoors, though it varies by temperature, humidity, and plant size. Always use pH-adjusted water: target 6. 0 to 7. 0 pH for soil grows and 5.
5 to 6. 5 for coco or hydroponic setups. Keep the root-zone pH in the commonly recommended ranges: soil roughly 6. 0, 7.
0, coco around ~5. 8, 6. 2, and hydro/soilless about ~5. 5, 6.
5 root-zone pH in recommended ranges. pH that drifts outside these ranges locks out nutrients even if they're present in the soil.
Nutrients during veg
During vegetative growth, cannabis needs more nitrogen relative to phosphorus and potassium. A standard "grow" or "veg" nutrient formula reflects this with an N-P-K ratio that's nitrogen-heavy, something like 3-1-2. Start at half the manufacturer's recommended dose and work up; overfeeding is a more common beginner problem than underfeeding. If you're growing in a pre-amended living soil, you may not need to add anything extra during veg at all.
Training your plants
Training is what turns a single tall cola into a wide, productive canopy, and it matters even more in containers where you're managing space carefully. Low-stress training (LST) involves gently bending the main stem outward and tying it down to encourage lateral growth and more bud sites. It costs nothing and dramatically improves yields.
Topping (cutting the main growing tip) is another technique that creates two main colas instead of one, though it adds a week or so of recovery time. For multiple containers side by side, training helps you keep canopies level and prevents taller plants from blocking light to shorter ones. Give each plant at least 2 to 3 square feet of canopy space when planning a multi-pot setup.
Flowering: hitting the right environment and feeding your plants
For photoperiod strains, flowering is triggered by switching your light schedule to 12 hours on and 12 hours off. From that point, most strains take 8 to 12 weeks to finish flowering. Autoflowers begin flowering on their own at around 3 to 5 weeks of age.
Environmental targets during flower
Dialing in your environment during flower is important because this is when the plant is most sensitive and when issues like mold can do the most damage. Target daytime temperatures of 65 to 80°F, with nighttime temps no more than 10°F cooler than daytime. Keep relative humidity between 40 and 50 percent during mid-to-late flower to prevent bud rot. Good airflow is critical: an oscillating fan in the grow space keeps air moving over and through the canopy and dramatically reduces mold risk. Outdoors, choose a location with good natural air circulation and avoid spots where moisture collects.
Feeding during flower
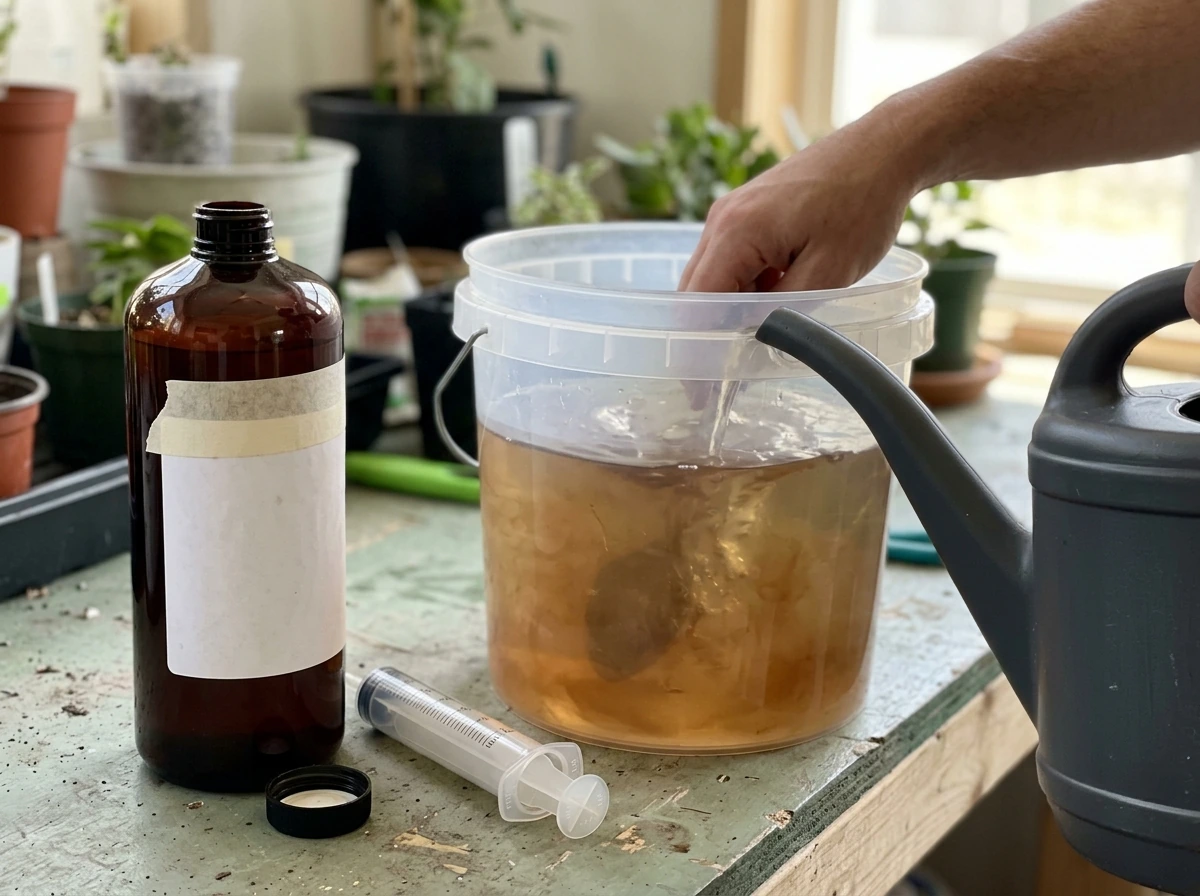
In flowering, the nutrient balance shifts: nitrogen drops and phosphorus and potassium go up to support bud development. A "bloom" formula with something like a 1-3-2 or 0-5-4 N-P-K ratio is appropriate from weeks 2 through 6 or 7 of flower.
In the final 1 to 2 weeks before harvest, most growers do a flush by watering with plain pH-adjusted water only, which is thought to improve the final taste and smoothness of the smoke by reducing any residual nutrient salts in the growing medium. Water management stays the same as veg: water to 10 to 20 percent runoff and wait for the pot to lighten before the next watering.
During heavy flowering, plants may drink more, so check containers more frequently.
Knowing when to harvest and what to do right after
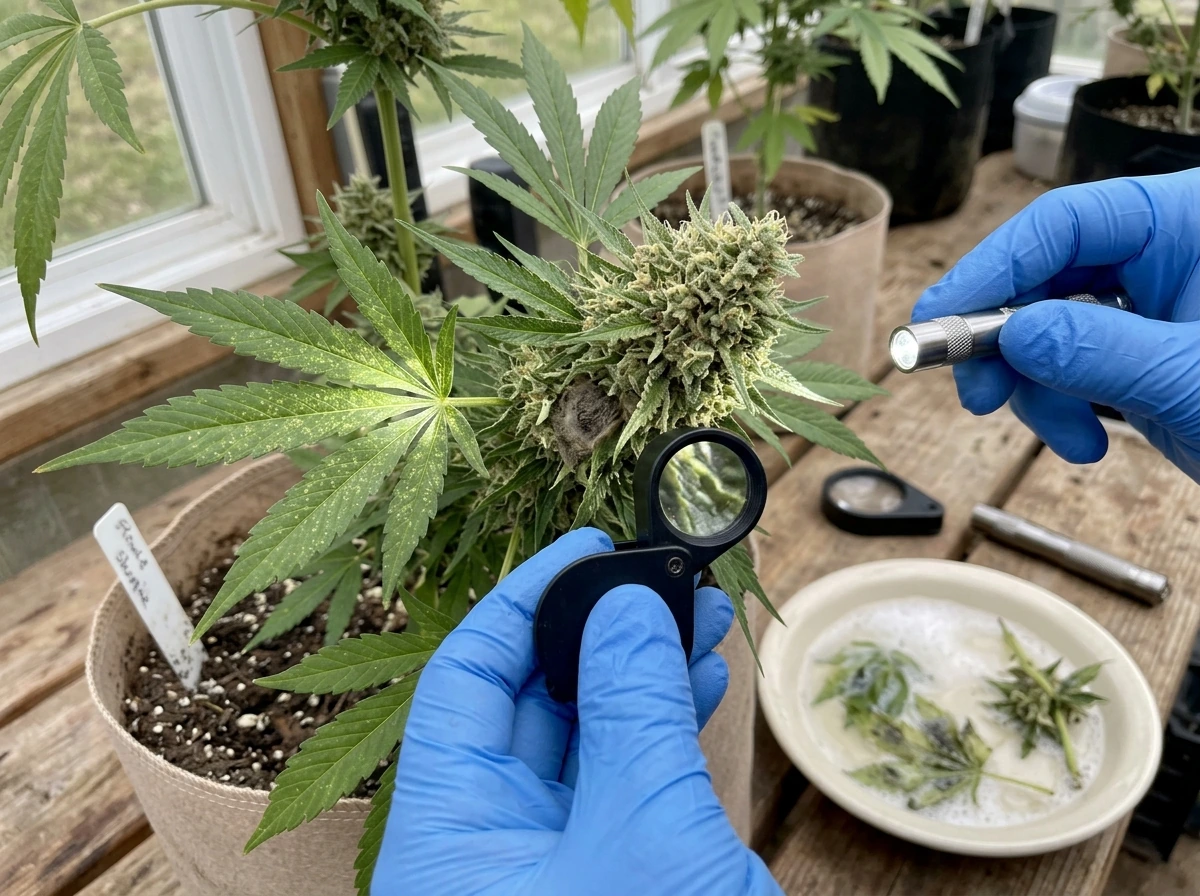
Harvest timing is the most underrated skill in home growing. Harvesting too early means lower potency and a more racy, anxious effect. Too late and THC degrades into CBN, producing a heavy, sedative effect. The most reliable method is checking trichomes with a jeweler's loupe (30x to 60x) or a digital microscope. You're looking at the resin glands on the buds and sugar leaves. Milky white trichomes indicate peak THC. Amber trichomes signal THC degradation and a more relaxing, couch-lock effect. Most growers aim for a mix of mostly cloudy/milky with about 10 to 30 percent amber, depending on personal preference.
A secondary indicator is the pistils (the hair-like structures on buds). When roughly 70 to 90 percent of pistils have darkened and curled in, the plant is likely near its harvest window. Use both trichome and pistil checks together for the most accurate read.
At harvest, cut the plant at the base or harvest branch by branch. Trim large fan leaves immediately (wet trimming), then hang branches upside down in a dark space with 60 to 70°F temps and 45 to 55 percent humidity for 7 to 14 days to dry. Airflow matters here too: a small fan circulating air in the drying space (but not blowing directly on buds) prevents mold. Once stems snap rather than bend, the dry is done. Move buds into glass mason jars for curing, opening jars once or twice daily for the first 1 to 2 weeks to release moisture and gas. A 2 to 4 week cure noticeably improves smell, flavor, and smoothness.
Solving the most common container grow problems
Overwatering and underwatering
Overwatering is probably the number one beginner mistake, and it's tricky because symptoms (drooping, yellowing leaves) look similar to underwatering. The tell is the leaves: overwatered plants have leaves that droop and feel firm or puffy, while underwatered plants have limp, papery-feeling leaves. The lift-the-pot test described earlier is your best prevention tool. If you've overwatered, skip the next watering entirely and let the medium dry out. Add more perlite to your mix next time to improve drainage.
Nutrient deficiencies and toxicities
Yellowing lower leaves during mid-to-late flower is often normal nitrogen drawdown, not a deficiency. But yellowing that starts mid-canopy during veg, or brown leaf tips that spread inward, usually signals a problem. Brown crispy tips are the classic sign of nutrient burn (too much fertilizer). Yellow leaves with green veins in newer growth point to iron or manganese deficiency, often caused by pH being too high. The fix in most cases is to check and correct your water pH first before adding more nutrients. pH problems block absorption even when nutrients are present.
Pests in container grows
Spider mites, fungus gnats, and aphids are the most common container grow pests. Fungus gnats are especially common in soil grows and are a direct result of keeping the top layer of soil consistently moist. Let the top inch dry out between waterings and this risk drops sharply. Yellow sticky traps hung just above the canopy catch adults. For spider mites (look for tiny webbing on leaf undersides and stippled leaf damage), neem oil or insecticidal soap sprays applied in the lights-off period work well during veg. In flower, avoid spraying buds with anything, as residue affects quality and can introduce mold risk.
Mold and bud rot in containers
Botrytis (gray mold) and powdery mildew are the two molds that kill harvests. Botrytis shows up as gray-brown, mushy rot starting inside dense buds, often triggered by humidity above 50 to 60 percent during late flower. Powdery mildew looks like a white dusty coating on leaves and thrives in stagnant, humid air.
Prevention is the best medicine: keep humidity in the 40 to 50 percent range during flower, run an oscillating fan, and make sure there's fresh air exchange in your grow space. If you spot powdery mildew early, a diluted hydrogen peroxide spray or potassium bicarbonate solution can help. Botrytis that's visible needs to be removed immediately by cutting out affected bud with clean scissors, and improving airflow right away.
Light and climate issues
Light burn looks like bleached or yellowing tips on the uppermost leaves and buds, and is fixed by raising your light. Light stress from inconsistent photoperiods (light leaks during dark periods for photoperiod plants) can cause hermaphroditism, where the plant produces both male pollen sacs and female buds. Check your grow tent or room for any light leaks before you flip to 12/12. Temperature swings above 85°F or below 60°F stress plants and slow growth; a basic digital thermometer/hygrometer combo, around $10 to $15, should be running in your grow space at all times.
Getting started today: your first steps and how to plan a full cycle
The single best thing you can do right now is verify what's legal where you live, then commit to a simple first setup before overthinking it. Here's a practical starting checklist for a beginner indoor container grow with 1 to 3 plants. how to grow marijuanas in nevada
- Confirm your state and local home cultivation limits (check your state's cannabis regulatory agency site, then your city or county code for any stricter local rules).
- Pick a compact autoflowering feminized strain from a reputable seed bank. Blue Dream Auto, Northern Lights Auto, and Gorilla Glue Auto are reliable beginner choices.
- Get 3 to 5 gallon fabric pots, a bag of quality cannabis potting mix, and perlite to mix in at roughly 25 to 30 percent by volume.
- Set up a grow tent sized for your plant count (a 2x2 or 2x4 tent works well for 1 to 3 plants), an LED grow light appropriate for that footprint, an oscillating fan, and a small exhaust fan with carbon filter for odor control.
- Pick up a pH meter or pH test kit, pH up and pH down solutions, and a basic liquid nutrient set with a veg formula and a bloom formula.
- Germinate seeds using the paper towel method, plant into starter containers, and place under gentle light (lights on for 18 to 20 hours daily for autoflowers).
- Keep a simple grow journal: note your watering days, any nutrients added, temperatures, and any symptoms you observe. This makes troubleshooting much easier.
- Expect 10 to 14 weeks total from seed to harvest for most autoflowering strains, or 16 to 22 weeks for photoperiod strains including a 6 to 8 week veg.
If you're growing outdoors in containers, the same principles apply but your timeline is tied to your local season. Start seeds indoors 4 to 6 weeks before your last frost date, then move containers outside once nighttime temps stay reliably above 55°F. Container outdoor grows are particularly flexible because you can move pots to chase sun or bring them indoors if weather turns. Just remember that outdoor plants are visible, so local security and compliance with any fencing or securement requirements in your area (many local codes require outdoor plants to be screened from public view) are worth taking seriously.
If you want to scale to multiple containers, the setup replicates easily. Keep spacing consistent (2 to 3 square feet per plant), ensure your lighting covers the full canopy area evenly, and stagger your germination dates if you want a continuous harvest rather than one large batch. Running 3 to 6 containers in a rotation is a manageable and rewarding home garden once you've dialed in the basics from a first grow. For deeper guidance on legal compliance, growing medical cannabis, or state-specific rules, check the related guides in this series covering topics like how to grow legally in specific states and how to grow medicinal cannabis.
The learning curve for container growing is real but it's not steep. Most problems have straightforward fixes once you know what to look for. Run your first grow, take notes, and don't panic if something looks off midway through. One grow's worth of hands-on experience will teach you more than any amount of reading, and the next grow will go noticeably smoother for it.
FAQ
Can I grow in a container without buying a cannabis-specific soil mix?
Yes, but avoid plain garden soil because it is often too dense and drains poorly. If you want to use a general potting mix, cut it with perlite (aim for roughly 20 to 30 percent perlite by volume) and verify it drains quickly by watering and checking how fast excess runoff clears from the tray.
How do I know if my container has enough drainage beyond “having holes”?
After watering, check the tray for runoff and then wait 10 to 15 minutes. If you still see standing water, your setup is trapping water (container shape, tray fit, or saucer design). Empty runoff promptly, and consider switching to a fabric pot or adding extra perlite to reduce water retention.
Is it better to germinate in the final pot or transplant from a starter container?
Starter-to-final transplant is usually more forgiving indoors because you control temperature and moisture better. Direct-seed in the final container can work, but it is easier to end up with uneven moisture or temperature swings, which can lead to patchy emergence.
What’s the safest way to correct pH if my leaves suggest a nutrient lockout?
First measure pH of your source water and your runoff if you can. If runoff is consistently outside the target range (soil roughly 6.0 to 7.0, coco or hydro roughly 5.5 to 6.5), adjust future watering and wait several water cycles before adding more fertilizer, since over-correcting nutrients is a common mistake.
How often should I check runoff pH and water volume during flower?
You do not need it every watering, but check when you change anything (new nutrients, a bigger container, a major environmental shift). Runoff pH that trends steadily the wrong way is a sign your medium is buffering improperly, and it is usually more actionable than guessing from leaf color alone.
Do I need to flush, and how should I do it in containers?
If you flush, do it only in the final 1 to 2 weeks, using pH-adjusted water without added nutrients. Stop nutrients, keep watering consistent (same “wait for pot to lighten” approach), and avoid soaking the medium repeatedly because constant wetness can encourage late-stage issues.
Should I overwater to “prevent drying out” while I’m busy?
Generally no. A common container problem is watering too frequently, then roots lose oxygen and you get root rot risk. If you will miss a day or two, plan for less frequent but thorough watering (water to runoff, then wait until the pot lightens) and keep humidity and airflow stable to slow transpiration.
What humidity target should I use if my buds are staying too wet during late flower?
For mid-to-late flower, aim for about 40 to 50 percent relative humidity. If you are higher than that, prioritize airflow first (oscillating fan plus fresh air exchange) before adding any treatments, since excess moisture is a direct driver of botrytis.
Can I spray neem oil or insecticidal soap during flowering if pests show up?
Avoid spraying during flower, especially on or near the buds. If you must treat pests, focus on timing and contact methods that minimize residue on the harvestable portions, and consider addressing the cause (watering habits for fungus gnats, sanitation and airflow for mites and mildew).
My plant shows drooping, but leaves feel firm. Is that underwatering or overwatering?
Firm, puffy, drooping leaves usually point to overwatering, while underwatered leaves tend to feel limp and papery. Use the pot-lift method, then if you suspect overwatering, skip the next watering and let the medium dry down rather than adding more water.
What light leak problems can cause hermaphroditism in photoperiod plants?
Even small leaks during the dark period can disrupt flowering stability. Common culprits are a tent zipper gap, indicator LEDs, room lights, or light from under doors. Block all light sources during 12/12, and do not open the grow room during the dark unless necessary.
How do I space multiple containers so taller plants do not steal light?
Plan for at least about 2 to 3 square feet of canopy space per plant and keep the light footprint even across the full row. If you are using training, stop at a height where all canopies land at the same level before flowering starts, so the shorter plants are not shaded.
What’s the simplest way to decide harvest day if trichomes are mixed (some cloudy, some amber)?
Aim for mostly cloudy or milky with a portion amber (often around 10 to 30 percent depending on preference). If most trichomes are still clear, wait, and if you see a lot more amber than you wanted, expect a heavier, more sedative outcome.
Should I dry in a larger room or a small drying box?
Dry in the smallest space you can control. Smaller volumes are usually easier to keep stable at about 60 to 70°F and 45 to 55 percent humidity, and stable conditions reduce the risk of mold developing inside dense buds.
Can I reuse the same soil for another container grow?
It is possible, but it rarely works as a “no-effort” solution. Reused medium can carry salts and pests, and nutrient balance drifts. If you reuse, you generally need a regeneration approach (re-amending and managing nutrient salt buildup), and fresh mix is the simplest path for beginners.
Next Article
How Much Weed Can One Seed Grow and How to Maximize It
Realistic yield from one cannabis seed, what limits it, and steps to maximize flower at home from seed to harvest.