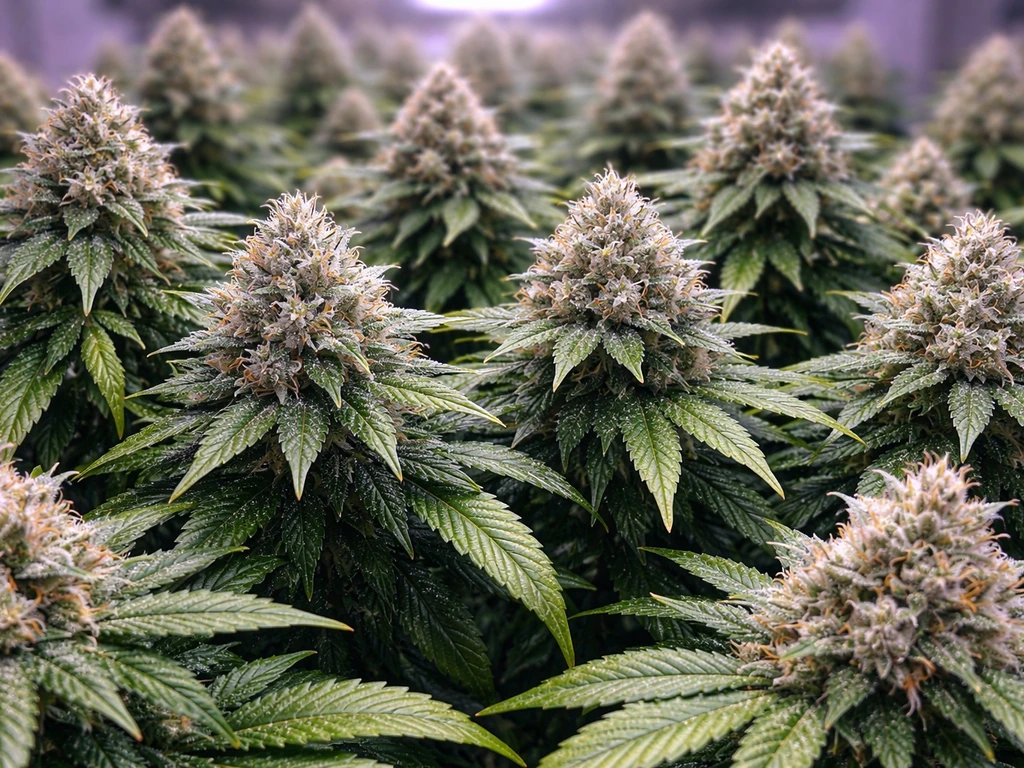
If you searched "how to grow weed cheese," you're almost certainly looking to grow a cannabis strain from the famous Cheese family: an indica-dominant cultivar known for its pungent, savory, almost funky aroma, dense resinous buds, and an easy grow profile that suits beginners well. Cheese strains typically finish flowering in 8 to 9 weeks indoors, yield around 400 to 500 g/m² under good conditions, and test around 17 to 20% THC. This guide will walk you through exactly how to grow it, from picking your seeds to opening a cured jar of that unmistakable funk.
How to Grow Weed Cheese: Beginner Step-by-Step Guide

Marcus Holbrook
1 Jul 2026
What "weed cheese" actually means
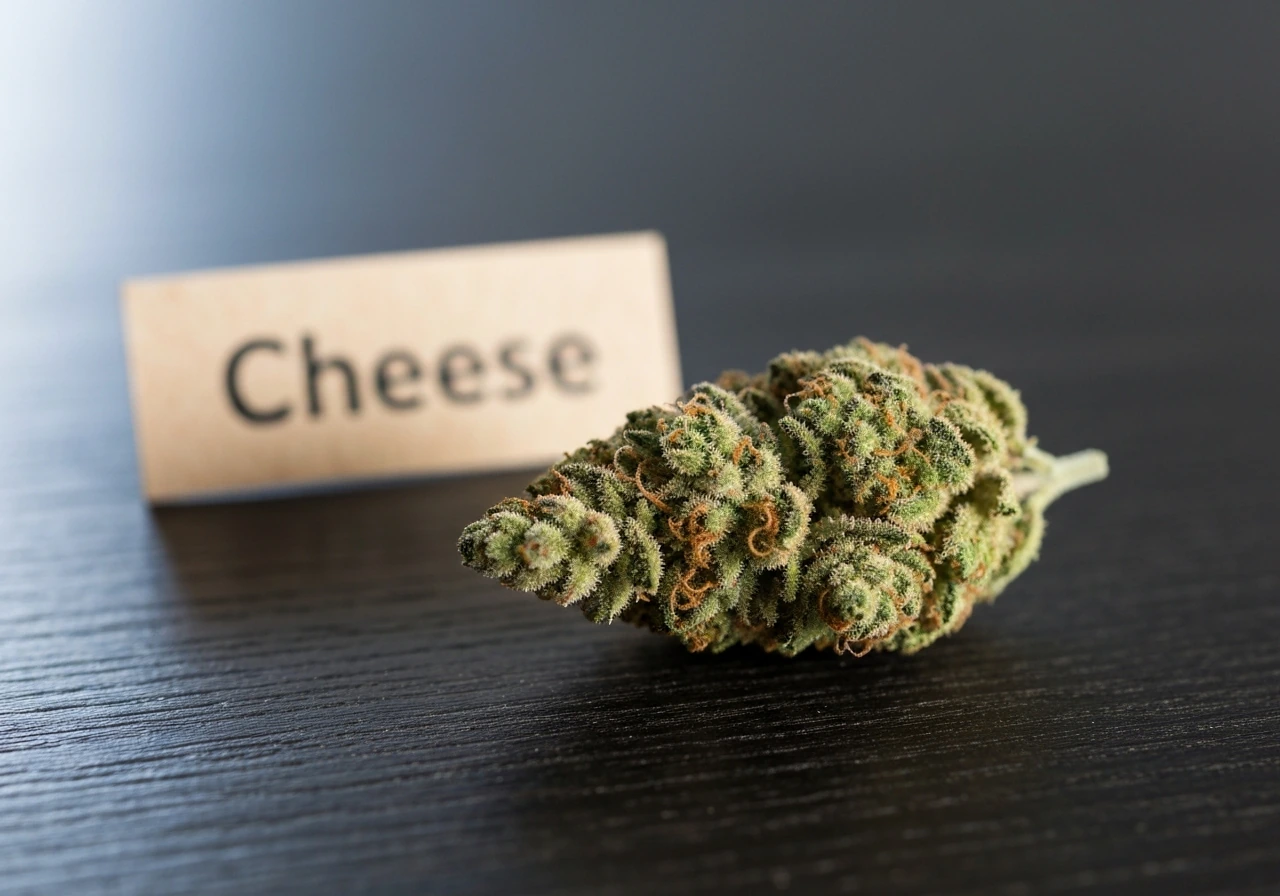
"Cheese" in cannabis culture refers to a specific lineage, not slang for quality or a drug product. The original Cheese is widely believed to have emerged from a Skunk No. 1 phenotype in the UK in the late 1980s, with its defining trait being a sharp, dairy-funk terpene profile driven by compounds like isobutyric acid and ethyl methylbutyrate. From that original cut, breeders developed stabilized seed lines. Big Buddha Seeds crossed it with Afghani and won 1st Place in the Indica category at the 2006 High Times Cannabis Cup. Dinafem's Cheese is another popular commercial version. Strains labeled "Blue Cheese," "Exodus Cheese," and "Super Cheese" all trace back to this lineage.
So if someone told you to try Cheese, pointed you at a dispensary menu, or you picked up a bag and loved the smell, you're working with this indica-dominant genetic family. The grow plan below is tailored to its actual characteristics: bushy, lateral growth, a preference for moderate feeding, and buds that reward training techniques like SCROG (Screen of Green).
Check your local laws before you plant a single seed
This is the section most guides rush past, but it matters. Cannabis cultivation laws differ enormously by jurisdiction, and getting this wrong has real consequences. If you are searching for how to grow weed in Australia, make sure you confirm which rules apply where you live, including whether home cultivation is permitted Cannabis cultivation laws differ enormously by jurisdiction. Here is where things stand in a few key places as of mid-2026:
| Jurisdiction | Home Grow Status | Plant Limit | Key Notes |
|---|---|---|---|
| Massachusetts, USA | Legal (21+) | Up to 6 plants per person; up to 12 per household | Civil penalties apply above limits; harvest must stay within possession rules (2 oz outside home) |
| Canada | Legal (18+/19+ by province) | Maximum 4 plants per household | Limit is per household, not per person; no selling without a license |
| England and Wales, UK | Illegal | Zero legal plants | No personal-use exemption; treated the same as commercial cultivation under law |
| Most US states (varies) | Varies widely | Typically 3 to 6 plants where legal | Always check your specific state and municipality; local rules can be stricter than state law |
If you are in a jurisdiction where home cultivation is illegal, this guide is informational only. Where it is legal, keep your plant count within limits, do not sell without a license, and store your harvest within your legal possession allowance. With that squared away, let's get into the actual grow.
Picking your genetics: seeds vs. clones
Your first real decision is whether to start from seeds or clones. If you are looking for a practical walkthrough based on community discussion, you will find many Reddit threads that share real grow experiences and common beginner mistakes for weed from seed start from seeds. Both work, and each has a trade-off.
Starting from seeds
Seeds are the easiest option for most home growers because they are widely available, they arrive in legal postal mail in many jurisdictions, and they carry no pests or pathogens from a donor plant. For Cheese specifically, look for feminized seeds from established breeders: Dinafem Cheese, Big Buddha Cheese, and Royal Queen Seeds' Cheese are all reliable commercial options with consistent genetics. Feminized seeds mean virtually every plant will be female and bud-producing, which matters when you have a plant count limit. If you want the simplest possible experience and do not want to track photoperiod light cycles, autoflowering Cheese varieties exist, though yields tend to be smaller.
Starting from clones
Clones are cuttings taken from a known mother plant. The advantage is genetic consistency: if someone you trust has a verified Cheese phenotype with the exact aroma profile you want, a clone from that plant will produce the same results. The risk is that clones can carry spider mites, powdery mildew, or root aphids from the source garden. Always inspect clones carefully before introducing them to your space. Clones also skip the germination stage, saving about two weeks.
What to expect from Cheese genetics
- Grow difficulty: Easy, rated beginner-friendly across most seed bank databases
- Flowering time: 8 to 9 weeks from the flip to 12/12 light cycle
- Indoor yield: Approximately 400 to 500 g/m² under well-optimized conditions
- THC content: Typically 17 to 20% depending on phenotype and grow quality
- Plant structure: Bushy, lateral, indica-dominant growth with moderate stretch in early flower
- Aroma: Pungent dairy-funk that intensifies significantly in week 6 and beyond, requiring carbon filter ventilation
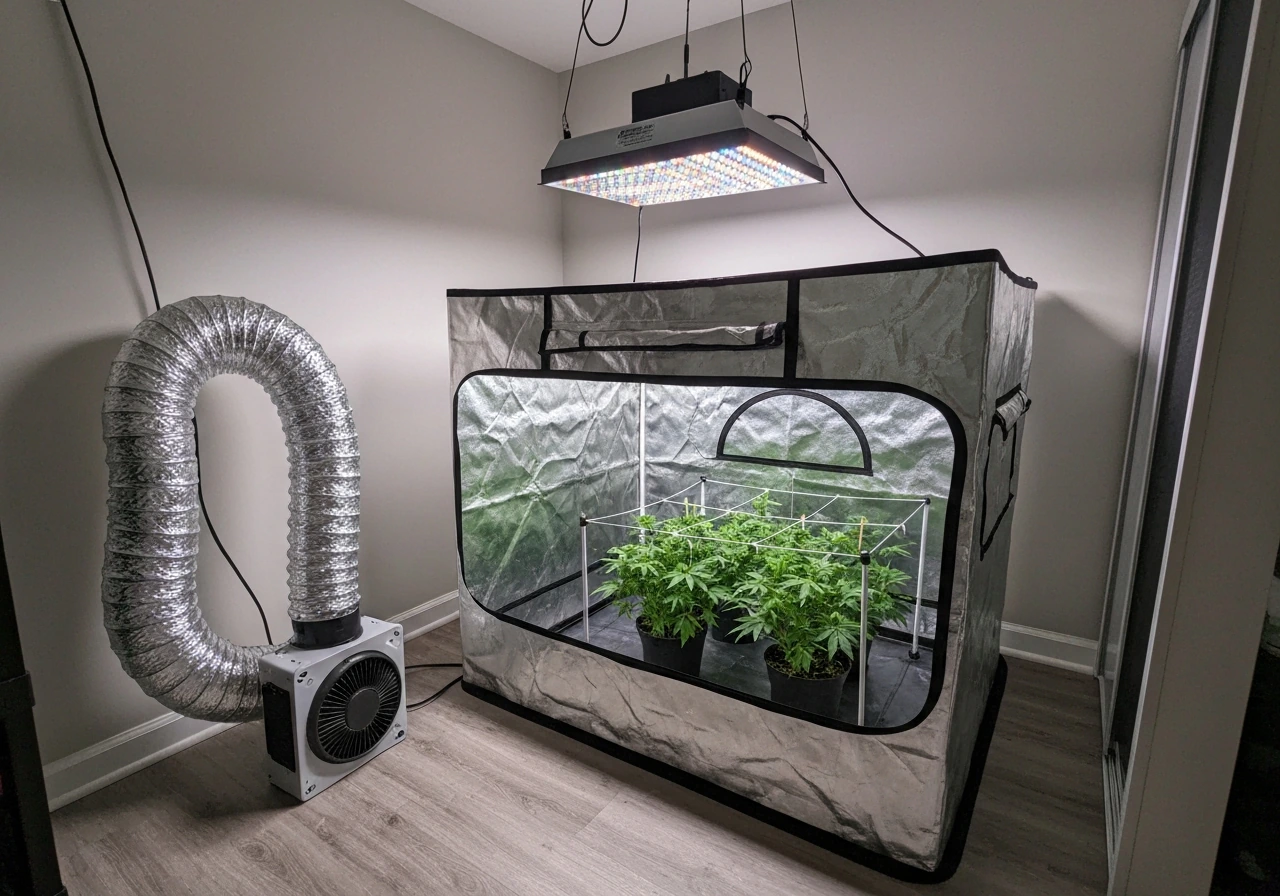
Setting up your grow space
Cheese is flexible enough to thrive indoors, outdoors, or in hydroponic systems. Your choice here depends on your space, budget, and how much control you want. Each path is a legitimate route to great buds.
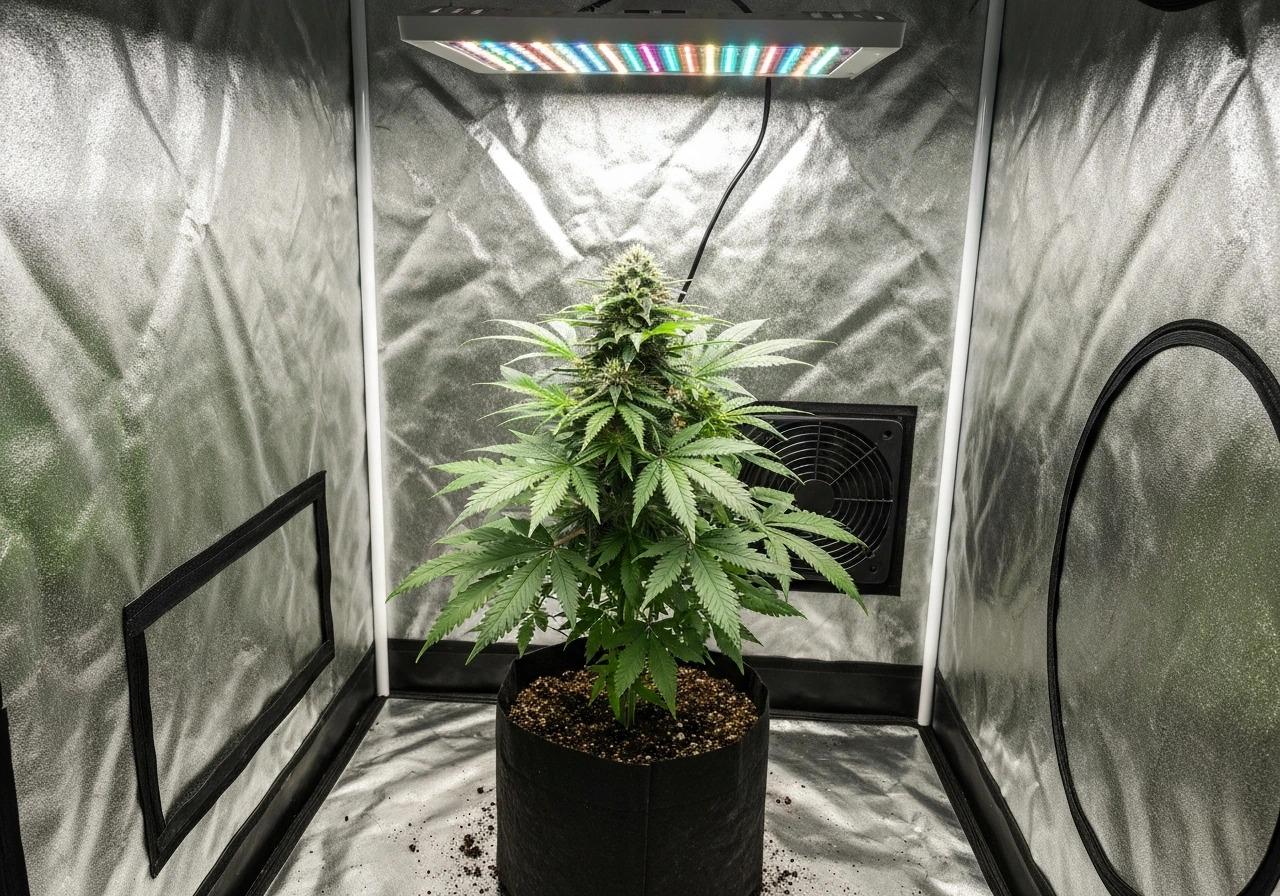
Indoor growing
Indoor growing gives you the most control over every variable and lets you run multiple cycles per year regardless of season. A basic indoor setup needs: a grow tent (a 4x4 ft tent suits 2 to 4 plants comfortably), a quality LED or HPS grow light, an inline fan and carbon filter for odor control (this is non-negotiable with Cheese), a thermometer/hygrometer, and containers with good drainage. Start with a 1 to 3 gallon pot for veg and transplant to 5 to 7 gallon for flower. Soil is the most forgiving medium for beginners.
Outdoor growing
Cheese handles outdoor conditions well due to its hardy, pest-resistant indica genetics. CannaConnection also describes Cheese as a hardy, pest-resistant indica-dominant strain hardy, pest-resistant indica genetics. Outdoors, it prefers a temperate to warm climate with at least 6 hours of direct sunlight per day. In the Northern Hemisphere, start seedlings indoors in April to May and transplant outside after the last frost. Outdoor Cheese typically finishes in late September to early October. Expect larger plants and potentially higher per-plant yields than indoors, but less control over pests, weather, and privacy. The odor during late flower is very strong, so consider your neighbors.
Hydroponic growing
Hydroponics, growing plants in a nutrient solution rather than soil, produces faster growth and can push yields higher, but it demands more precision. pH and EC (electrical conductivity) must be checked daily. Systems like Deep Water Culture (DWC), Nutrient Film Technique (NFT), or coco coir with hand-watering all work with Cheese. If you are a complete beginner, I would suggest starting in soil first and moving to hydro on your second or third grow once you understand how the plant responds to feeding and environment.
Environmental targets across the whole grow
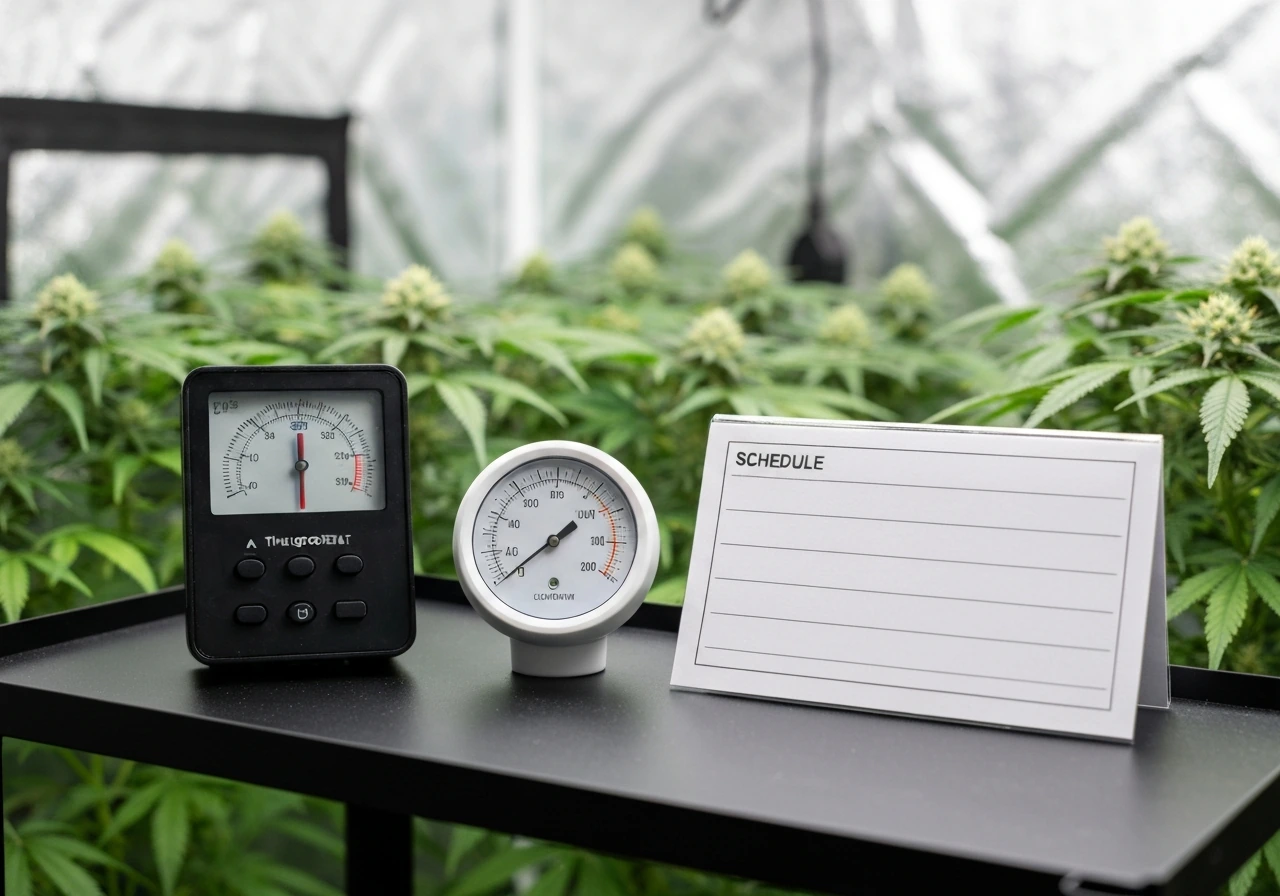
Getting your environment dialed is where most new growers either win or lose. The numbers below are specific targets, not suggestions. Hit these ranges consistently and your Cheese will reward you.
| Stage | Light Cycle | Temperature (Day) | Humidity (RH) | Airflow Notes |
|---|---|---|---|---|
| Seedling (Week 1 to 2) | 18/6 or 20/4 | 72 to 78°F (22 to 26°C) | 65 to 70% | Gentle airflow; no direct fan blast on seedlings |
| Vegetative (Week 3 to 8) | 18/6 | 70 to 78°F (21 to 26°C) | 50 to 65% | Strengthen stems with indirect oscillating fan |
| Early Flower (Week 1 to 3 of 12/12) | 12/12 | 68 to 76°F (20 to 24°C) | 45 to 55% | Increase airflow through canopy as buds form |
| Late Flower (Week 4 to 9) | 12/12 | 65 to 74°F (18 to 23°C) | 40 to 50% | Keep humidity below 50% to prevent bud rot in dense Cheese colas |
| Final Week (Flush/Pre-harvest) | 12/12 | 65 to 72°F (18 to 22°C) | 40 to 45% | Maximum airflow; watch for any mold closely |
Lighting intensity matters as much as the cycle. In veg, target 400 to 600 µmol/m²/s PPFD. In flower, push toward 600 to 900 µmol/m²/s depending on your light and CO2 levels. Keep your light at the manufacturer's recommended hanging height and watch for bleaching or stretching as cues to adjust. Temperatures below 65°F slow nutrient uptake noticeably; above 85°F you start cooking your terpenes and stressing the plant.
Airflow deserves its own emphasis with Cheese. This strain produces thick, dense buds, which are prime candidates for botrytis (grey mold) if humidity is high and air is stagnant. Run an oscillating fan inside the tent and make sure your inline fan exchanges the full tent volume every 1 to 3 minutes. In late flower, err on the side of more airflow rather than less.
Feeding your Cheese plant: nutrients, pH, and water quality
Cannabis does not need a complicated nutrient program, but it does need the right nutrients at the right time, and your water pH has to be correct or nothing else matters. This is probably the most common place beginners go wrong, and I made this mistake myself early on.
pH and water quality basics
Cannabis prefers a root-zone pH of 6. Leafly Canada also notes that cannabis generally prefers water in the roughly 6 to 7 pH range to support nutrient uptake, though the exact ideal can vary with factors like municipality and grow medium.
0 to 7. 0 in soil (aim for 6. 2 to 6. 8 as your sweet spot) and 5.
5 to 6. 5 in hydroponic or coco setups. Outside these ranges, nutrients lock out even if they are present in the water. Get a digital pH meter, calibrate it with standard solution monthly, and check your water every time you mix nutrients.
EC (electrical conductivity) tells you how strong your nutrient solution is. In veg, target 0. 8 to 1. 4 EC; in flower, work up to 1.
4 to 2. 0 EC. Flush or plain-water days between feedings help prevent salt buildup in soil grows.
A simple feeding schedule
Cannabis needs three primary macronutrients: nitrogen (N), phosphorus (P), and potassium (K). The ratios shift across the grow. In veg, you want higher N to support leafy growth. As you flip to 12/12 and buds start forming, you taper nitrogen down and push P and K up to fuel bud development. Most quality nutrient brands (Advanced Nutrients, General Hydroponics, Fox Farm, Plagron) publish strain-neutral base schedules you can follow. Start at half the recommended dose, observe the plant, and increase if she looks pale. Overfeeding is harder to fix than underfeeding.
- Seedling (Week 1 to 2): Water only, no nutrients. Let cotyledons feed the plant.
- Early veg (Week 3 to 5): Begin base nutrients at 25 to 50% of recommended dose. High N formula.
- Mid to late veg (Week 6 to 8): Full veg nutrient dose. Add cal-mag if using RO or very soft water.
- Transition / early flower (Week 1 to 2 of 12/12): Begin reducing N. Introduce a bloom (high P/K) base.
- Peak flower (Week 3 to 7 of 12/12): Full bloom feeding schedule. Add a bud booster if desired. Monitor runoff pH and EC.
- Late flower / pre-harvest (Week 8 to 9 of 12/12): Taper or stop all nutrients. Flush with plain pH-adjusted water for the final 5 to 10 days to clear residual salts.
Water your plants when the top inch or two of soil feels dry, or when the pot feels noticeably lighter than when freshly watered. Water thoroughly until about 10 to 20% runoff drains from the bottom of the pot. This ensures even distribution and prevents dry pockets at the root zone.
Spotting and fixing common deficiencies fast
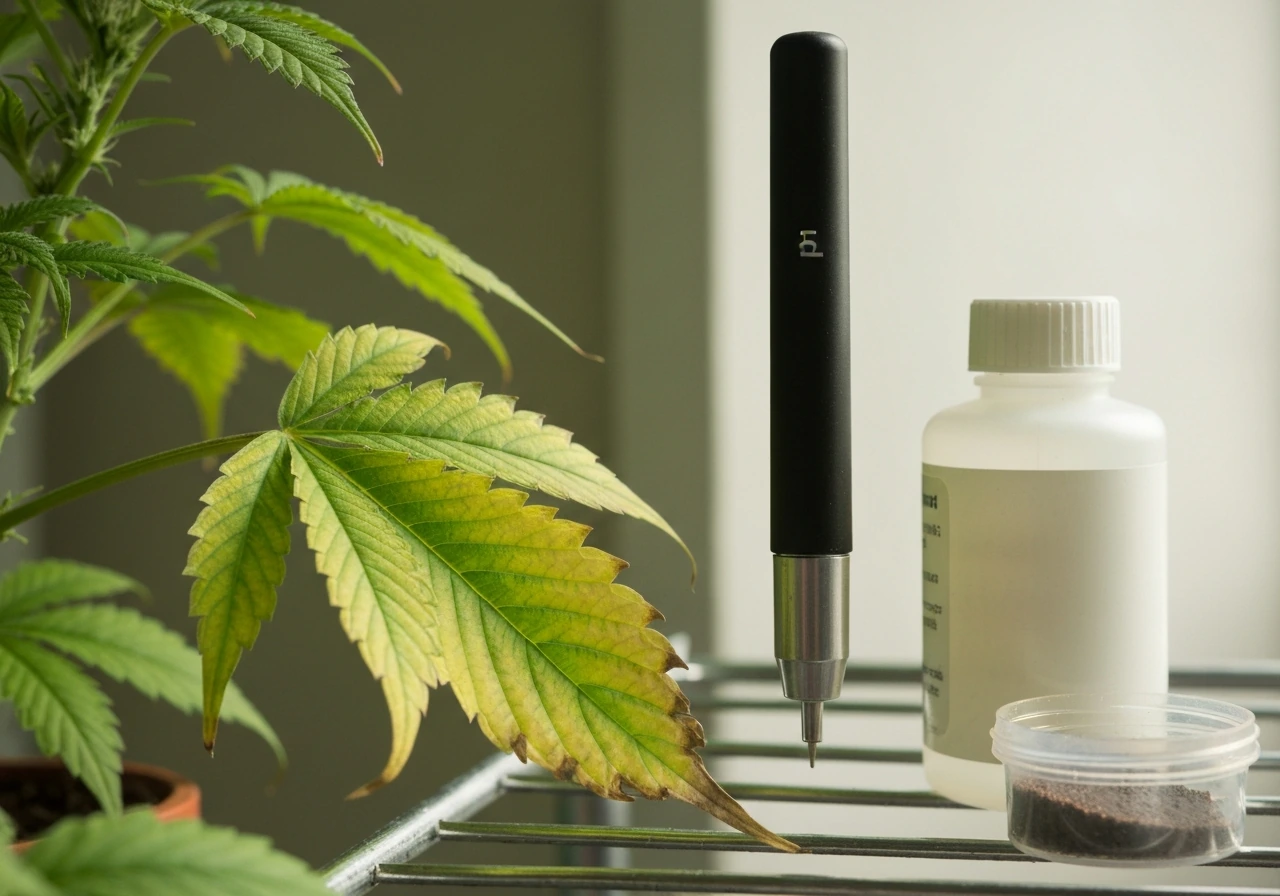
- Yellowing lower leaves in veg: Often nitrogen deficiency; increase N feeding or check pH is not locking it out
- Brown leaf edges curling up in flower: Potassium deficiency or nutrient burn; check EC and reduce if too high
- Purple stems and slow growth in seedling stage: Often a phosphorus or temperature issue; warm the room and check pH
- White powdery coating on leaves: Powdery mildew; increase airflow, reduce humidity below 50%, and treat with dilute hydrogen peroxide or a potassium bicarbonate spray
- Dark brown patches on buds in late flower: Botrytis (bud rot); remove affected material immediately, lower humidity, and maximize airflow
- Pale yellow new growth at the top: Iron or manganese lockout, usually a pH problem in hydro; recheck and correct pH
Training your Cheese plant for dense, heavy yields
Cheese grows bushy and lateral by nature, which makes it an ideal candidate for low-stress training (LST) and SCROG (Screen of Green). Training during veg can significantly increase your yield by exposing more bud sites to direct light. You do not have to do all of these, but even basic LST will make a real difference.
Low-Stress Training (LST)
Start LST around week 3 to 4 of veg once the plant has 4 to 6 nodes. Use soft plant ties or LST wire to gently bend the main stem horizontally and secure it to the pot rim. This exposes lower nodes to more light and encourages multiple colas to develop at an even canopy height. Revisit and adjust the ties every few days as the plant grows. This technique does not require cutting the plant and is very forgiving for beginners.
SCROG (Screen of Green)
Place a trellis net or wire screen about 8 to 12 inches above your pots. As the plant grows up through the screen during late veg, tuck the branches back under the screen horizontally. The goal is to fill the screen evenly with bud sites before you flip to 12/12. Once you flip, let everything above the screen grow vertically into bud sites. Cheese is Leafly-recommended for SCROG specifically because of its bushy lateral structure. This method works best with 1 to 2 plants per 4x4 tent and takes a few extra weeks in veg, but the yield payoff is significant.
Defoliation
Cheese can get dense and leafy, which reduces airflow through the canopy. Light defoliation (removing large fan leaves blocking bud sites) during the first two weeks of flower can help light penetration and reduce the humidity in the canopy. Do not over-strip the plant; removing more than 20 to 25% of the foliage at one time stresses the plant and slows growth.
Harvest timing, drying, and curing
Getting this part right is what separates mediocre buds from the smooth, potent, funky Cheese you were after. Rushing the harvest or skipping the cure is the single most common mistake I see new growers make.
Knowing when to harvest
The most reliable harvest indicator is trichome color, checked with a jeweler's loupe (30x to 60x) or a digital microscope. Trichomes are the tiny crystal-like resin glands on buds and sugar leaves. Clear trichomes mean not yet ready. Cloudy (milky white) trichomes indicate peak THC. Amber trichomes mean THC is degrading to CBN, producing a heavier, more sedative effect. For Cheese, harvesting at mostly cloudy with 10 to 20% amber gives a well-balanced indica experience. Pistil color is a secondary guide: when 70 to 80% of the white hairs have turned orange or brown, you are getting close.
Cheese finishes around week 8 to 9 of the 12/12 cycle. Start checking trichomes weekly from week 7 onward. Do not rely on the calendar alone, as environmental conditions affect finishing time.
Drying your harvest
After cutting, hang whole branches or individual buds upside down in a dark room. Target a drying environment of 60 to 70°F (15 to 21°C) with 55 to 65% relative humidity. This slow-dry preserves terpenes and chlorophyll breaks down gradually for a smoother smoke. At around 50% RH and 21°C, the process is well-controlled. Drying typically takes 7 to 14 days. The buds are ready to jar when the smaller stems snap cleanly rather than bend, and the outside of the bud feels dry to the touch but the inside still has some moisture.
Curing for maximum aroma and potency
Curing is what develops the full Cheese aroma profile. Pack your dried buds loosely into wide-mouth glass mason jars, filling them about 75% full. For the first week, open the jars twice daily for 15 to 20 minutes (this is called "burping") to release moisture and fresh air. After the first week, burp once daily.
Target a humidity inside the jar of 60 to 62% RH. If you have a small hygrometer you can place inside the jar, use it. If jars read above 65%, leave them open longer to dry. If below 55%, add a Boveda 62% humidity pack.
A minimum cure of 2 to 4 weeks transforms good buds into great ones. Cheese specifically benefits from a longer cure of 4 to 6 weeks, as the distinctive funk terpene profile deepens and smooths considerably over time.
Your next steps in plain English
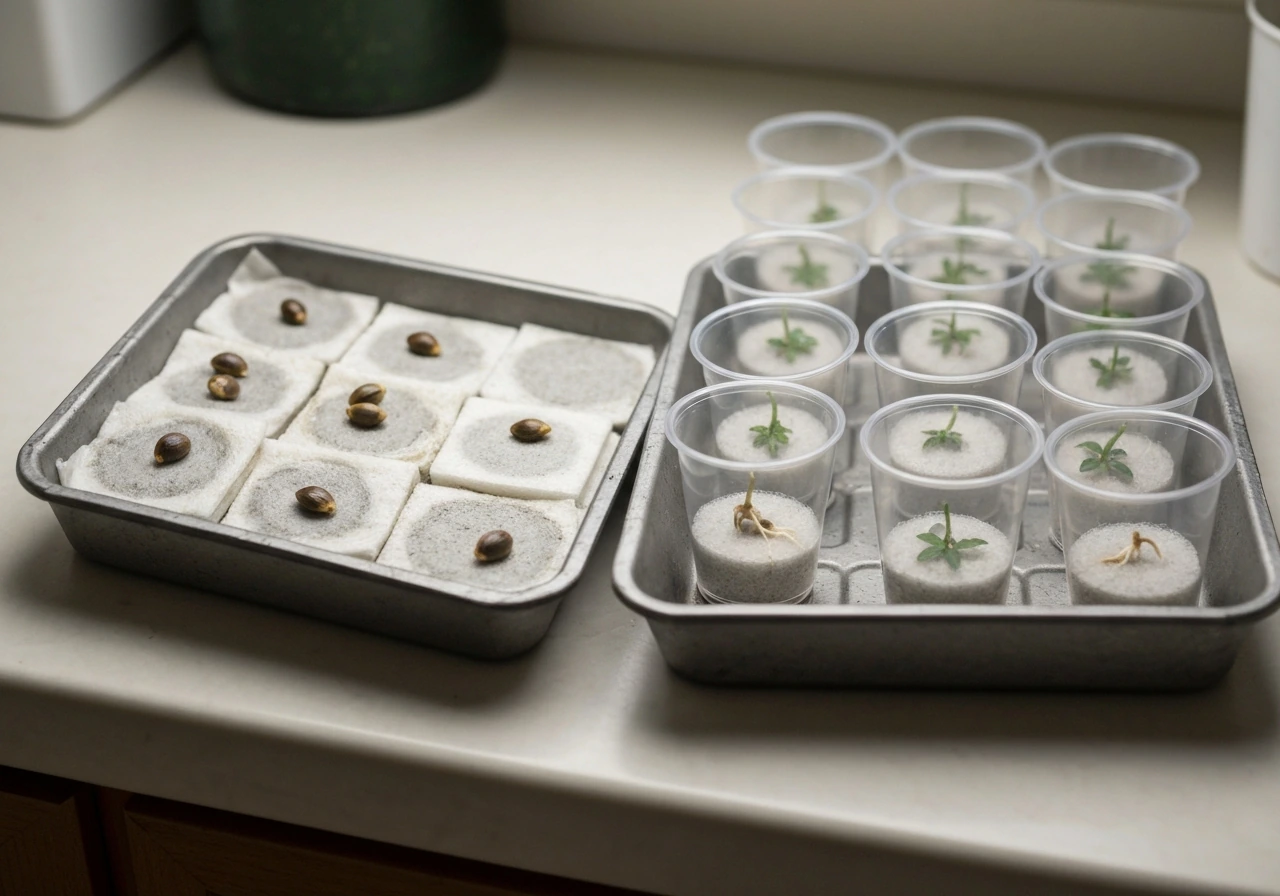
Start by confirming your local grow laws, then order feminized Cheese seeds from a reputable breeder. For DayZ specifically, the steps differ from a real-world grow, so make sure you match the game mechanics and available resources before you start. Set up your grow space with proper lighting, ventilation, and a carbon filter before your seeds arrive. Germinate in a warm, moist paper towel or directly into a small pot of moist seedling mix.
Follow the environmental targets in this guide stage by stage, check your pH every single watering, and start training gently around week 3 of veg. When late flower arrives, drop humidity, keep airflow strong, and start monitoring trichomes from week 7. Dry slowly, cure in jars, and give it at least a month before you judge the final result. The Cheese funk you are looking for does not fully arrive until the cure is done.
Whether you are a first-time grower following each step carefully or a more experienced cultivator refining your environment and training game, Cheese rewards the attention. It is one of the most beginner-friendly strains available without sacrificing the quality that made it a cup winner. Get your setup right, be consistent, and you will have dense, resinous, properly funky Cheese buds from your own home grow. If you specifically mean how to grow Zaza weed, the steps are very similar, but you will want to start by confirming the exact Zaza genetics and flowering time from the breeder.
FAQ
What is the best way to confirm I actually have a Cheese lineage (not a marketing mix)?
Check the breeder’s stated parents and flowering time, then verify the expected terpene profile by looking for the “dairy funk” description in grower notes, not just the strain name on a label. If the plant finishes far earlier or later than the typical 8 to 9 weeks and the smell is not pungent and savory, your genetics may be mislabeled or a different cross.
Can I grow “Cheese” outdoors if I live in a cooler or wetter area?
You can, but you will need to manage late-flower humidity aggressively to avoid botrytis. Use the sunniest spot you have, consider a roof or temporary cover during rainy spells, and start airflow-pruning practices (light defoliation) earlier than you would indoors. If fall is reliably damp where you live, consider indoor or greenhouse with dehumidification.
How do I prevent mold and bud rot with Cheese’s dense buds?
Do not let humidity stay high once flowers thicken. In practice, keep canopy airflow strong, avoid overwatering so the soil stays wet, and remove only the largest fan leaves that block bud sites in the first two weeks of flower. Also inspect dense inner buds with a flashlight every few days during late flower.
Should I use LST or SCROG, which gives better results for beginners?
For a first grow, LST is usually simpler and faster to learn. SCROG can yield more by spreading bud sites evenly, but it takes extra veg time and requires consistent training under the screen, so it rewards patience. If you want the easiest path to solid results, do LST first, then attempt SCROG on a later run.
What EC and pH mistakes most commonly ruin a Cheese run?
The biggest ones are not calibrating the pH meter and using pH readings without rechecking after mixing nutrients. Another common issue is chasing targets with overly frequent changes, which makes the plant experience swings. Mix, let it sit a few minutes, measure pH and EC, then commit to a stable feeding approach for several days while you observe leaf color and growth rate.
Do I need to flush in soil before harvest, or can I just keep feeding to the end?
You can avoid a hard flush for most beginner grows by focusing on pH accuracy and not overfeeding. If you do flush, do it as a controlled reduction in nutrient strength rather than starving the plant abruptly. Watch the trichomes and leaf fade, if leaves stay very green and plants look healthy, a gentle taper is safer than a sudden stop.
How can I tell if I’m overfed versus underfed in Cheese?
Overfeeding often shows as dark, clawing leaves, nutrient burn tips, and buildup-related issues even when watering schedule is correct. Underfeeding typically looks lighter, slower growth, and weaker color without tip burn. Because pH problems can mimic nutrient problems, check pH in the runoff (soil) or solution (hydro) before you change nutrient strength.
What if my buds are swelling but the smell seems weak, how do I troubleshoot?
Weak “Cheese funk” is usually caused by stress, inconsistent humidity, or finishing too early. Make sure airflow and humidity are controlled during late flower, avoid letting temperatures run too hot (especially above 85°F), and harvest using trichome cues rather than only week count. Also plan on a longer cure, the strongest funk often develops during the later part of curing.
How do I know when the cure is done enough to smoke without ruining flavor?
A minimum of 2 to 4 weeks can improve smoothness, but Cheese often continues to deepen after that. If jars stay stable around 60 to 62% RH and the buds feel springy and aromatic, you can start sampling around week 3 to 4. If jar RH repeatedly climbs above 65%, it is not done drying and you should continue burping or add more drying time before extending the cure.
Can I use the same grow targets if I’m using coco coir instead of soil?
Yes, but treat pH targets and watering style differently. Coco behaves more like a hydro system, so you should keep root-zone pH in the narrower 5.5 to 6.5 range and avoid letting coco fully dry out. Also consider slightly more frequent, smaller waterings so salts do not accumulate while you are dialing in feeding.
What should I do if I start growing in seeds but only a few plants sprout?
First, verify your germination moisture level and temperature consistency. If only a few sprout, don’t assume the batch is bad, sometimes one or two conditions were off. Start new germination promptly so seedlings are at similar ages, since uneven age makes training and flowering timing harder.
Next Article
How to Grow Zaza Weed: Beginner Step by Step Guide
Step-by-step guide to grow Zaza-style cannabis from seed or clone indoors or outdoors, with lighting, nutrients, and cur