Growing autoflower seeds from seed to harvest takes roughly 65 to 90 days depending on the strain, and the process is more forgiving than photoperiod growing once you understand a few key rules: never transplant if you can avoid it, don't overwater early, keep your light schedule consistent at 18 to 20 hours per day indoors, and feed lightly until the plant tells you it wants more. Autos flower based on age, not light, so they run on their own internal clock from the moment they sprout. Get the environment dialed in during the first two weeks and the rest of the grow basically follows the plant's lead.
How to Grow Auto Flower Seed From Germination to Harvest

Marcus Holbrook
29 Apr 2026
Before anything else, check your local laws. Home cannabis cultivation is legal in some jurisdictions and illegal in others, and plant count limits, possession rules, and licensing requirements vary widely. Everything in this guide assumes you're growing in a place where it's legal to do so and in full compliance with your local regulations.
Picking the right autoflower seeds and planning your grow
Start with a strain that fits your space and timeline. Most autoflowers finish in 65 to 85 days from sprout, but that range varies by breeder and genetics. A strain like Mephisto's Iced N Baked, for example, is listed at 65 to 80 days from sprout to harvest. For beginners, pick something from a reputable breeder that lists a realistic day count and has documented grow journals online. Avoid ultra-fast 45-day marketing claims on cheap seed sites, those numbers are usually measured from flip, not from seed.
For indoor grows, you have full control over light, temperature, and humidity, which makes it easier to hit the optimal ranges. A 2x2 or 2x4 tent is the most common beginner setup and fits one to four plants comfortably depending on pot size and training style. Outdoors, autos work well in climates with at least 2.5 to 3 months of warm weather (above 15°C / 60°F nights). They're a great option for short outdoor seasons because they don't wait for the fall equinox to flower. If you want to go deep on outdoor-specific tactics, there's dedicated guidance on how to grow autoflower outdoors that covers timing windows, pest pressure, and climate considerations in detail. If you are planning an outdoor run, the timing windows, pest pressure, and climate considerations are the key details to get right how to grow autoflower outdoors.
Decide on your medium before you buy anything else, because your pot size, watering frequency, and nutrient approach all flow from that decision. The three main paths are soil, coco coir, and hydroponics. Each has a specific playbook, which is covered later in this guide, but your first choice shapes everything downstream.
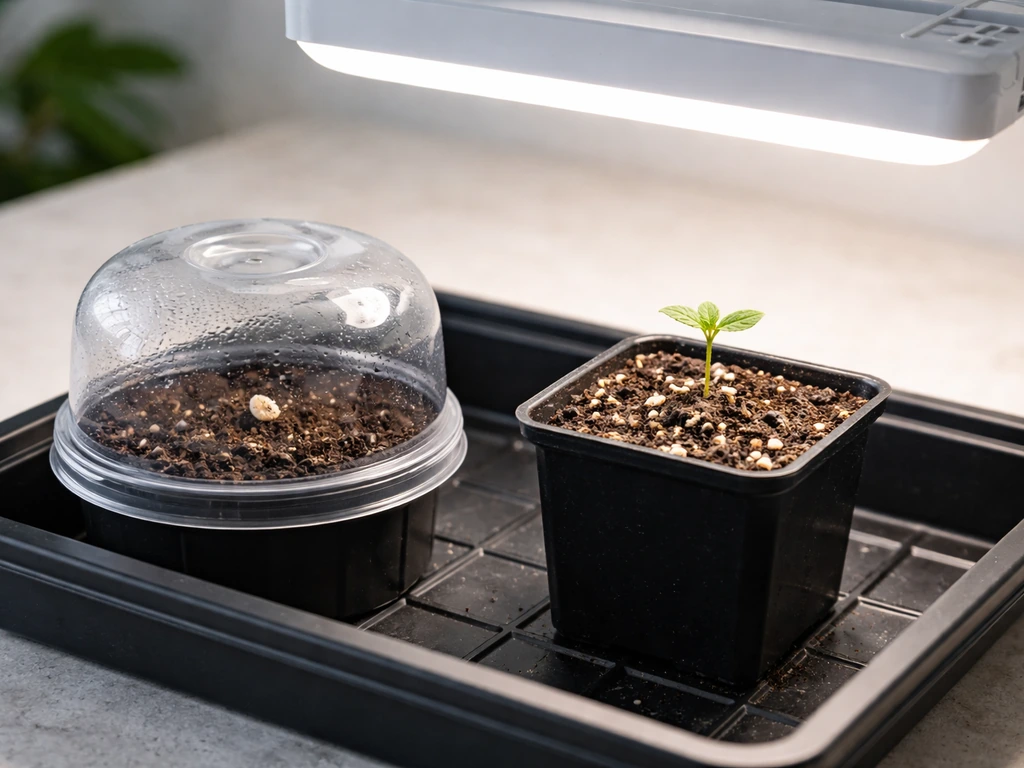
Germination: direct sow vs seed starter
The single most important thing to know about germinating autoflower seeds is this: plant directly into your final container whenever possible. Autos do not recover from transplant stress the way photoperiod plants do. A photoperiod plant stunted by a bad transplant can sit in veg for another two weeks while it recovers. An auto just loses two weeks of its fixed lifespan. That's a huge deal in a 75-day grow.
Direct sow method (recommended)
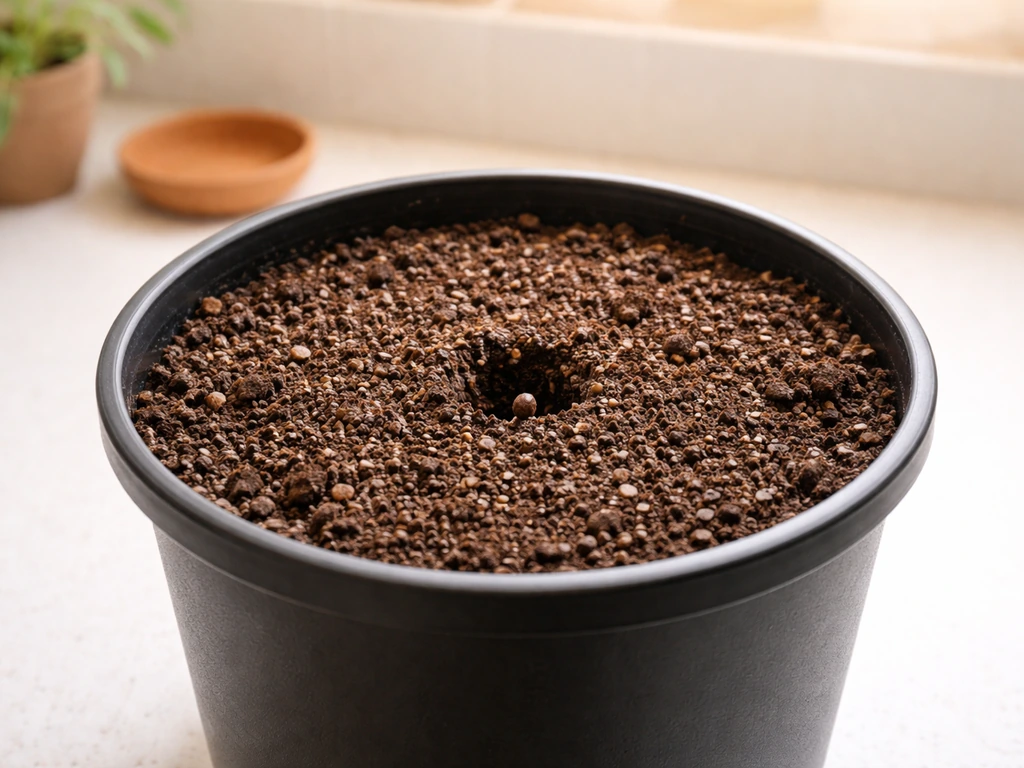
- Fill your final pot (minimum 3 gallons / ~11 liters for soil, 2 gallons minimum for coco or hydro) with lightly pre-moistened medium.
- Poke a hole about 1 cm (half an inch) deep with a pencil or finger.
- Drop the seed in, pointed end down if you can tell, and cover lightly.
- Keep the top of the medium moist but not soaked — a spray bottle works well here.
- Cover loosely with plastic wrap or a humidity dome to maintain surface moisture.
- Maintain temperature between 22 and 26°C (72 to 78°F). Most seeds pop in 24 to 72 hours.
Seed starter / paper towel method (use if needed)
If you want to confirm viability before committing to a container, the paper towel method works fine. Dampen two paper towels, place the seed between them, seal in a zip-lock bag or between two plates, and keep at 22 to 26°C until you see the taproot emerge (usually 24 to 48 hours). Transfer the sprouted seed to your final pot immediately once the taproot is 0.5 to 1 cm long. The longer you wait, the more fragile the root becomes. Handle with tweezers, not fingers, and plant taproot facing down.
Skip the solo cup or small starter pot step entirely with autos. I made this mistake on my first few grows, thinking I'd avoid overwatering in a big pot by starting small. What actually happened was I stunted the plant during the transplant right as it was trying to push into pre-flower. Big pots from day one, water in a small ring around the seedling, and let the roots chase moisture outward.
Light schedule, environment, and watering basics
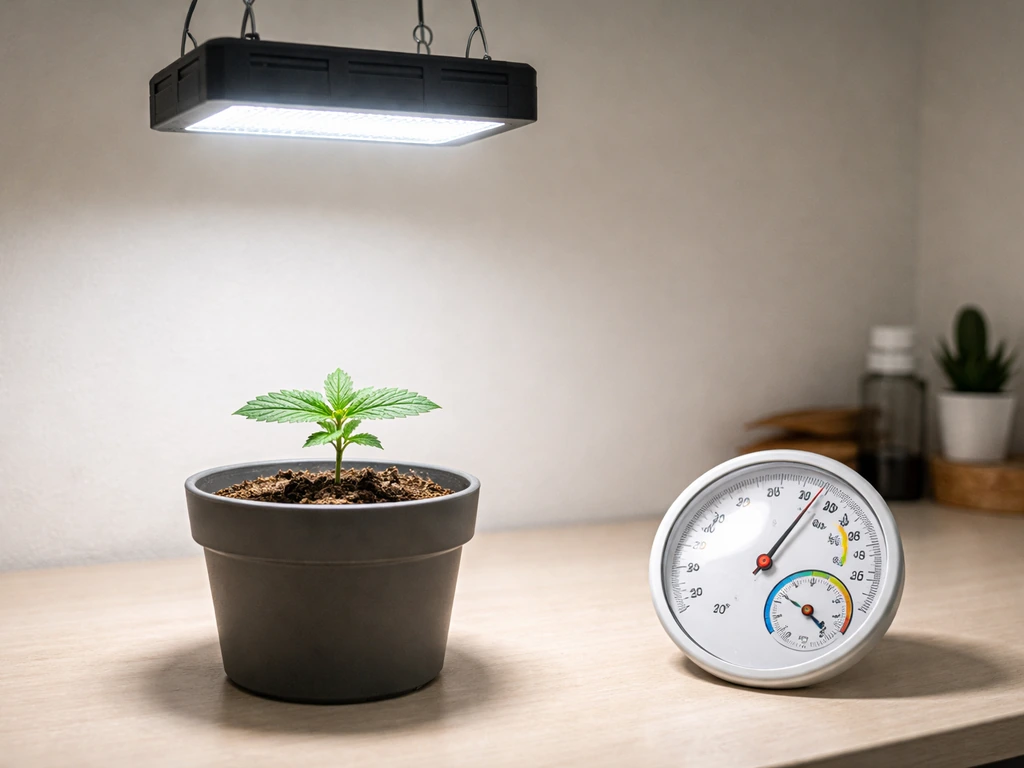
Indoors, run your lights at 18 to 20 hours per day for the entire life of the plant. Some growers use 20/4 or even 24/0, but 18/6 is the sweet spot for most genetics, it saves electricity, allows a natural dark period for plant respiration, and still produces excellent yields. You don't need to flip to 12/12 like you would for photoperiod plants. The auto will flower regardless.
Temperature and humidity matter more than most beginners expect. Keep temps between 24 and 27°C (75 to 81°F) throughout the grow. During early veg, run relative humidity (RH) around 60 to 65%. Once flowering begins (usually around day 21 to 28), drop humidity to 50% or below to reduce mold risk. In late flower, especially the last two to three weeks, push RH below 45% if you can. Bud rot is the most heartbreaking way to lose a crop that was two weeks from harvest.
Airflow is non-negotiable. A small oscillating fan keeps stems strong and prevents hot spots under the canopy. Make sure your grow space has both intake and exhaust, fresh CO2 keeps the plant fed and a carbon filter on the exhaust handles odor. Aim for one full air exchange per minute in your tent.
Watering: the rule that fixes most beginner problems
Overwatering kills more autoflower seedlings than any other mistake. The rule is simple: water thoroughly until runoff, then wait until the top inch of soil feels dry before watering again. Lift the pot, a dry pot feels noticeably lighter than a wet one. In the first two weeks, a seedling in a 3-gallon pot might only need a small amount of water every two to three days. As the plant grows and roots fill the container, watering frequency increases naturally. Always pH your water to 6.0 to 7.0 for soil, 5.8 to 6.2 for coco or hydro.
Soil vs hydroponics: container size, medium setup, and what to expect
Your choice of medium sets your nutrient approach, watering schedule, and how much active management the grow needs. Here's a direct comparison:
| Medium | Container Size | pH Target | Watering Style | Nutrient Complexity | Best For |
|---|---|---|---|---|---|
| Soil (pre-amended) | 3 to 5 gallon fabric pot | 6.0 to 7.0 | Water to runoff, dry-back cycle | Low (built-in buffering) | Beginners, forgiving of small errors |
| Coco coir | 2 to 3 gallon fabric pot | 5.8 to 6.2 | Frequent (daily or near-daily) | Medium (must add all nutrients) | Faster growth, more control, intermediate growers |
| Hydro (DWC/NFT) | Net pot + reservoir | 5.5 to 6.1 | Continuous (reservoir management) | High (precise EC and pH monitoring) | Experienced growers, fastest yields |
For soil, use a high-quality cannabis-specific mix or build your own with perlite at 20 to 30% for drainage. Avoid hot soils with heavy pre-amendments for seedlings, the nutrient concentration can burn young roots. A lightly amended organic mix for weeks one and two, then top-dress or feed with liquid nutrients from week three onward works well. Fabric pots are strongly recommended for soil and coco because they air-prune roots and nearly eliminate the risk of overwatering.
For coco coir, rinse and buffer the coir before use to flush excess sodium and pre-load calcium and magnesium. Coco is an inert medium, meaning it holds no nutrients on its own. Every feed must include a full nutrient profile from day one of transplant. The payoff is faster growth and better oxygen at the root zone compared to soil. If coco is your path, there's a full breakdown of how to grow autoflower in coco coir with feed schedules and specific EC targets.
Hydroponics accelerates growth the most but demands the most attention. EC (electrical conductivity) and pH drift daily in a reservoir, and a problem left unchecked for 48 hours can damage roots fast. If you're brand new to growing, start with soil. Once you've got one or two harvests under your belt, hydro becomes a very rewarding upgrade. A dedicated guide on how to grow autoflower hydro covers DWC setup, reservoir management, and EC targets from seedling through harvest.
Feeding your auto from seedling to late flower
Autos are lighter feeders than photoperiod plants, especially in the early weeks. The biggest nutrient mistake is feeding too much too soon. Here's a stage-by-stage approach that works across most brands of liquid nutrients:
| Stage | Approximate Days | Nitrogen (N) | Phosphorus/Potassium (P/K) | Cal-Mag | EC Target (coco/hydro) |
|---|---|---|---|---|---|
| Seedling | Days 1 to 14 | None to very low | None | Light | 0.4 to 0.6 |
| Early veg | Days 14 to 28 | Moderate | Low | Moderate | 0.8 to 1.2 |
| Pre-flower / stretch | Days 28 to 42 | Moderate to high | Begin ramping P/K | Moderate | 1.2 to 1.6 |
| Full flower | Days 42 to 60 | Reduce N | High P/K | Moderate | 1.6 to 2.0 |
| Late flower / ripening | Days 60 to harvest | Minimal to none | Low P/K or flush | Low to none | 0.6 to 1.0 (flush) |
Always start at half the manufacturer's recommended dose and watch the plant's response for three to four days before adjusting. Yellowing lower leaves during late flower is normal, the plant is pulling nitrogen back into the buds. New yellowing on upper leaves or tips curling up during early or mid-flower signals a problem worth investigating.
Calcium and magnesium deficiencies are extremely common with autos, especially in coco or soft water. If you see rust-colored spots on leaves mid-grow or interveinal yellowing under bright light, add a cal-mag supplement at 2 to 5 ml per gallon alongside your regular feed. This one fix prevents a huge number of mid-grow headaches.
Flushing before harvest is debated in the cannabis community, but the most common approach is to run plain pH'd water through the medium for the final seven to ten days. In coco and hydro this is more impactful than in amended soil. Watch for leaves going from green to yellow and then fade, that natural senescence is often a sign the plant is close to done regardless of whether you're actively flushing.
Training autos: what works, what doesn't, and how not to stunt them
Training autoflowers is completely possible, but the rules are different from photoperiod plants. Because autos run on a fixed internal clock, recovery time from stress is limited. High-stress training (HST) techniques like topping need to be done at exactly the right time if you do them at all, and honestly, for beginners, I'd skip topping entirely on the first grow and focus on low-stress training (LST) instead.
LST (low-stress training)
LST means gently bending branches and securing them with soft ties or stakes to open up the canopy and expose lower bud sites to light. Start around day 14 to 18 when the plant has four to six nodes. Bend the main stem gently toward the edge of the pot and secure it. As new growth reaches up, continue bending and tying. This creates a flat, even canopy where multiple colas get direct light instead of one main cola shading everything below it. LST adds almost zero stress when done correctly and routinely adds 20 to 40% to final yield in my experience.
Topping (use with caution)
Topping means cutting the main growing tip to create two main colas instead of one. It works on autos only if done between nodes 3 and 5 (roughly days 18 to 25). Top too late and you burn two to three weeks of flowering time on recovery. I've seen experienced growers get great results from topping autos, but I've also seen beginners wipe out an entire plant's potential by topping at day 35 when flowering had already begun. If you want to experiment, pick a strain known for good topping response (look for grow journals confirming this for your specific genetics) and cut early.
Defoliation
Light defoliation, removing fan leaves that are blocking direct light to bud sites, is useful during the stretch phase before full flower and again during mid-flower. Remove no more than 20 to 25% of leaves in any one session, and never defoliate during the seedling stage or the final two to three weeks of flower. Some growers do a dedicated late-cycle defoliation session a week or two before harvest to reduce the amount of trimming needed at harvest time.
What actually stuns autos
- Transplanting after roots have established in a starter pot
- Overwatering in the first two weeks
- pH fluctuations outside the acceptable range for your medium
- Over-feeding during seedling stage
- Topping or heavy defoliation after day 25 to 28
- Temperature spikes above 30°C (86°F) or cold nights below 15°C (59°F)
- Root-bound conditions in pots that are too small
Troubleshooting common problems, knowing when to harvest, and curing
Common problems and quick fixes
| Problem | Likely Cause | Fix |
|---|---|---|
| Slow or stalled growth weeks 2 to 4 | Overwatering, pH off, cold temps, root-bound | Check pH, let medium dry more between waterings, confirm temps above 22°C |
| Extreme stretch with loose buds | Insufficient light intensity or light too far from canopy | Lower light to manufacturer's recommended distance, increase intensity if possible |
| Yellowing upper new growth | Cal-mag or iron deficiency, pH lockout | Check and correct pH, add cal-mag supplement |
| Yellowing lower older leaves in late flower | Natural nitrogen drawdown (often normal) | Confirm no new symptoms spreading upward; if isolated to lower leaves in weeks 7+, usually fine |
| Tip burn / crispy leaf edges | Nutrient excess or heat stress | Flush medium, reduce feed concentration, check temps and airflow |
| Bud rot (gray mold inside dense buds) | High humidity during flower, poor airflow | Remove affected material immediately, drop RH below 45%, increase airflow |
| Herming (male pollen sacs on female) | Light leaks, heat stress, genetic instability | Fix light leaks, stabilize environment, source seeds from reputable breeders |
| Slow flowering or no pistils by day 30 | Genetic variation, stress delay, or mislabeled seed | Give it time — some autos run slower; confirm seeds are from a known auto breeder |
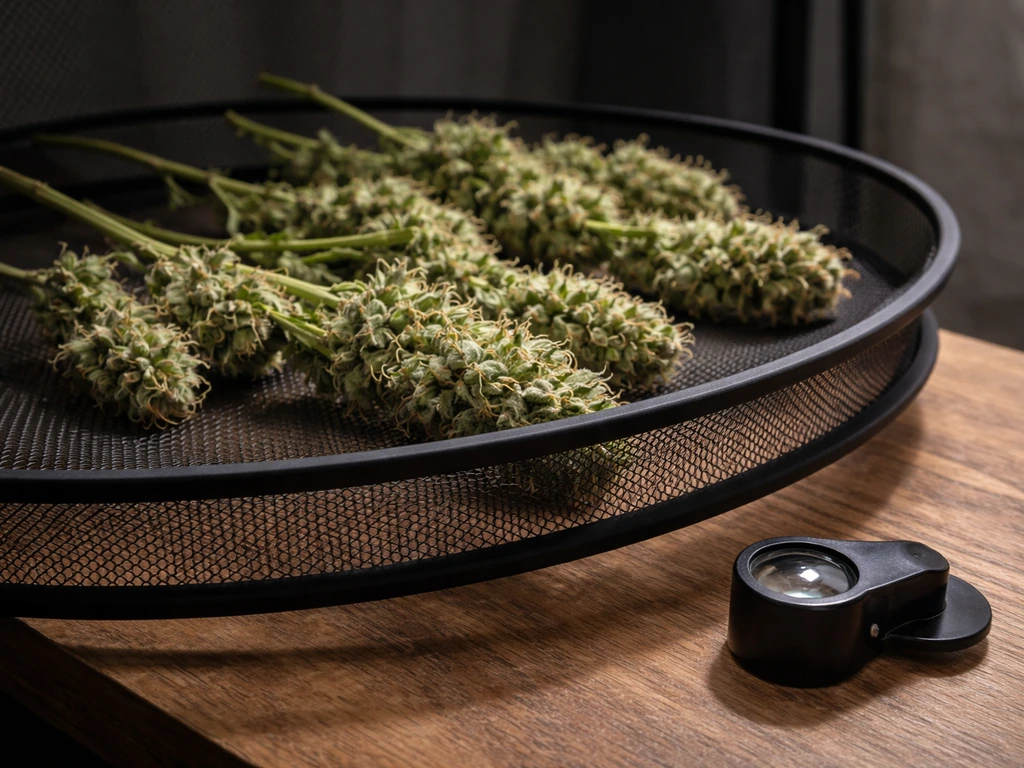
When to harvest: reading the trichomes
Strain day-count estimates are a starting point, not a finish line. The only reliable way to know when to harvest is to examine trichomes with a 60x to 100x loupe or digital microscope. Trichomes start clear and watery, shift to milky white (cloudy), then develop amber coloring as THC degrades into CBN. For most growers seeking peak potency, harvest when trichomes are mostly cloudy with 10 to 20% amber. For a more sedative, body-heavy effect, wait until 30 to 40% amber. For an energetic, uplifting effect, harvest when mostly cloudy with minimal amber.
Other harvest readiness signs: most white pistils have turned orange or brown (70 to 80% pistil color change), fan leaves are yellowing and fading naturally, and the buds have stopped swelling and are simply maturing. The plant will often look a bit tired and past its peak greenness, that's normal and expected.
Harvest, drying, and curing
- Stop watering 24 to 48 hours before harvest to reduce moisture content in the buds.
- Cut the whole plant at the base or chop branch by branch, whichever works for your space.
- Trim fan leaves immediately (wet trim) or after drying (dry trim) — both approaches work.
- Hang branches or place on drying racks in a dark space at 15 to 21°C (60 to 70°F) with 45 to 55% RH and gentle airflow.
- Dry for 7 to 14 days until small stems snap rather than bend.
- Jar the dry buds in airtight glass jars, filling to about 75% capacity.
- Burp jars daily for the first two weeks (open for 15 to 30 minutes) to release moisture and gas.
- After two weeks, burp every few days. By week four to eight of curing, flavor and smoothness peak significantly.
Expected yields vary widely. A beginner indoor grow in a 2x2 tent with one to two plants under a decent LED will typically produce 30 to 80 grams per plant. An experienced grower using LST, good genetics, and dialed-in nutrients in the same space might pull 100 to 150 grams per plant. Outdoor autoflowers in full sun and a warm climate can hit 150 to 200 grams or more per plant. Don't chase numbers on the first grow, focus on learning the plant.
Your next steps starting today
If you haven't started yet, here's the practical first-move checklist:
- Confirm your local laws and plant count limits before purchasing anything.
- Choose your medium (soil for beginners, coco for faster results, hydro for experienced growers).
- Order seeds from a reputable breeder — look for strains with documented grow journals and realistic day-count data.
- Set up your grow space: tent, light, fan, carbon filter, thermometer/hygrometer.
- Prepare your final containers (3-gallon fabric pots for soil is a solid default).
- Pre-moisten your medium and germinate directly in the final pot.
- Set your light timer to 18 hours on, 6 hours off.
- Target 24 to 27°C and 60 to 65% RH for the first three weeks, then drop humidity as flowering begins.
- Feed lightly or not at all for the first two weeks — let the medium carry the seedling.
- Take notes daily. A simple grow journal (even just your phone's notes app) makes every future grow better.
Autoflowers reward attention to the basics more than they reward complicated techniques. Get your environment stable, water correctly, and feed conservatively, and most genetics will do the hard work for you. The grow methods covered here apply to soil, but if you want to get into the specifics of growing autos in soil with organic amendments, or go deep on coco or hydro setups, each of those paths has its own full playbook worth exploring once you know which direction fits your setup best. If you are running a soil setup, this is where you can apply the tips for growing autos in soil with organic amendments.
FAQ
Should I soak auto flower seeds before germinating, or is paper towel enough?
Soaking can help uniform germination, but don’t exceed about 12 to 18 hours, and keep it cool. If you soak longer or water gets too warm, seeds can fail or develop weak taproots. Paper towel germination (kept at 22 to 26°C) avoids that risk and lets you plant immediately once the taproot reaches roughly 0.5 to 1 cm.
What’s the best container size for a beginner, and does pot size affect how fast autos finish?
Pot size mainly changes how often you water and how big the root mass gets. Autos generally still finish on their internal clock, but too-small pots can cap yield and increase stress. For most beginners, a consistent “final” size like 3 to 5 gallons indoors works well so you can avoid drying cycles and mistakes when the plant hits stretch.
How do I tell the difference between early nutrient need and natural seedling yellowing?
True deficiency usually shows as new yellowing progressing on younger leaves, or persistent problems that worsen after you start feeding. Early yellow cotyledons can happen and often resolves as the first set of true leaves takes over. Use the “feed half strength and wait 3 to 4 days” approach, then adjust based on plant response rather than reacting daily.
Is it okay to use tap water, and how important is pH if I’m growing in soil?
You can use tap water if it’s reasonably consistent, but many regions have pH swings or high alkalinity that slowly locks out nutrients. pH still matters: aim for about 6.0 to 7.0 in soil. If your runoff pH keeps drifting far from target, consider a water treatment step (like filtering or buffering) rather than only changing fertilizer.
How can I prevent overwatering when I’m not sure how dry “the top inch” really is?
Use two checks together: touch and weight. Touch confirms surface dryness, but pot weight tells the real picture. Lift the pot after it dries and learn the “light” weight for your specific medium and pot size, then wait until you’re back near that weight before watering again.
What should I do if my auto starts flowering earlier than expected?
Autos can flower sooner from stress, root disruption, or environmental problems like heat spikes or major light interruptions early on. First, stop adding extra inputs. Stabilize temperature and RH, keep light timing consistent, and avoid high-stress training. You cannot “unflower” it, but you can still maximize the remaining fixed lifespan by correcting the cause immediately.
Can I run 24 hours of light, or will it hurt my auto?
It can work for some genetics, but 24/0 increases energy use and can raise the risk of heat and stress in your canopy. The typical sweet spot of 18 to 20 hours provides strong growth while allowing a dark period for respiration. If you try 24/0, manage temps tightly and monitor leaves for stress signals, especially during early veg.
When should I start using cal-mag, and how do I avoid overdoing it?
In coco and soft-water setups, cal-mag is often needed once you begin a regular feeding routine, not only at the first sign of deficiency. If you see rust spots or interveinal yellowing mid-grow, add a cal-mag supplement within the labeled range. Avoid frequent “top ups” without symptoms, because excess can create its own nutrient imbalances and runoff salt buildup.
Is flushing always necessary before harvest?
No, flushing is optional and not always beneficial, especially in well-managed amended soil. The approach that’s most useful is running plain pH’d water for the final 7 to 10 days, mainly in coco and hydro where salt buildup can be more noticeable. If your medium and feeding were dialed in, the plant may fade naturally even without aggressive flushing.
What’s the safest training approach for autos if I’m nervous about stressing the plant?
Start with low-stress training only, begin around day 14 to 18 (when there are about 4 to 6 nodes), and secure branches gently. Avoid topping on your first grow. If you want to “test” training, do small LST adjustments rather than large changes in one day, and keep ties loose enough to prevent girdling as stems thicken.
How do I know exactly when to harvest if trichomes are mixed colors?
Mixed trichomes are normal. Use the majority rule and check multiple bud sites, not just the top cola. If most trichomes are mostly cloudy with 10 to 20% amber, you’re in the typical peak potency window. If only one area is amber while others are clear, harvest timing should follow the overall canopy rather than the earliest maturing buds.
Why are my lower buds smaller, even though the plant looks healthy?
Lower bud sites often get less light, especially if the canopy isn’t even. LST helps by spreading the canopy so more sites receive direct light, and airflow reduces hot spots that can stall lower growth. Also check that you did not over-defoliate early or allow the medium to dry excessively during stretch, both of which can limit lower development.
Next Article
How to Grow Autoflowering Cannabis Step by Step
Step-by-step guide to grow autoflowering cannabis: strain choice, setup, light, nutrients, watering, harvest, and troubl
